background image


Page 49 


Back to the 

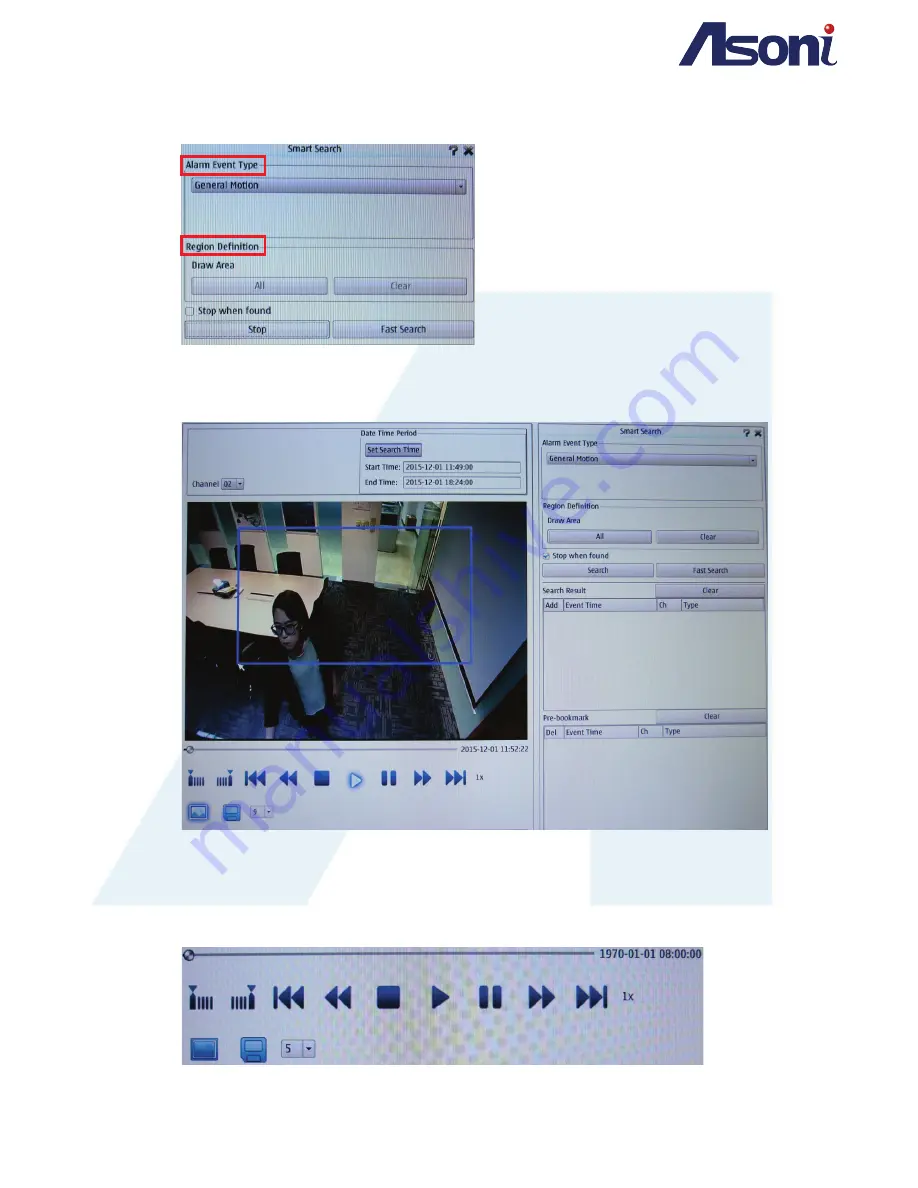
Playback Search Window

. Select an 

Alarm Event Type

 from the drop down list 

and go to 

Region Definition

.   


Region Definition

 will help you define the search area of the playback video image, and enlist 

all the events in 

Search Result


You can either draw an area of 

Region Definition

 on the playback video screen or simply 

click 

All

 to include the whole screen. To undo, click 

Clear


Refine your search by using the switch control buttons underneath the playback video 
screen.   


Содержание NVR63 Series

Страница 1: ...Page 1 User Manual NVR63 Series Linux Network Video...

Страница 2: ...formation Storage Information Log E Map Digital Output and P2P function Easy Link Playback Mode Watch recorded videos on the NVR during Playback Mode 1 Timeline Menu Recorded video data management Vid...

Страница 3: ...ly start on its own if you are using the NVR for the first time Otherwise you can start by clicking on the Setup Wizard icon from the Main Menu icon list on top of the live screen The Wizard Setup The...

Страница 4: ...assword Confirm your NVR password The administrator is an account that owns the highest level of permissions to configure any setting The keyboard will pop up once a blank column is clicked with the m...

Страница 5: ...r Exit to stop the setting up Once clicked a message window will pop up and recommend you to reset your NVR back to default since the default password is admin Click to look for any online device conn...

Страница 6: ...C Set your NVR date and time Tick Synchronize with NTP Server the NVR will be synchronized with the NTP Server After ticking the Enabling the Daylight Saving checkbox the user can use the drop down li...

Страница 7: ...e Clicking on will lead you to the S M A R T Status table where user may check on the defection of the hard disk Clicking on will lead you to the page where you must be verified as the administrator f...

Страница 8: ...either from Static IP or DHCP mode Enter the IP Address subnet mask gateway DNS1 and DNS2 values If the connected devices have not yet to be set up the set up window of will pop up again A message wi...

Страница 9: ...on Please read the Quick Setup chapter for more details B Setup Helps to set up Network Camera Schedule Event and Maintenance I Network a Network Setup DHCP The NVR will get all the network parameters...

Страница 10: ...ms to connect to this NVR Key in the name of the NVR in Bonjour column The web browser Safari also has a Bonjour function Tick Include Bonjour in the bookmark setting for the NVR to appear under the b...

Страница 11: ...the Start Menu Select Add Remove Programs Select Add Remove Windows Components and open Networking Services section Click Details and select UPnP to setup the service The IP device icon will be added...

Страница 12: ...the selected provider Timeout Depending on the input time of Timeout it will update DDNS s web site automatically The time range is from 5 to 5000 minutes State Updating Information update The state...

Страница 13: ...t d SNMP Enable SNMPv1 SNMPv2c write the name of both Read Write and Read only community Enable SNMPv3 Set the Security Name Authentication Type Authentication password Encryption Type Encryption pass...

Страница 14: ...e after the quality rate of the camera is set The streaming qualities of each channel are displayed under the frame containing the setup options Resolution Click the drop down list to change the resol...

Страница 15: ...ess Contrast Hue Saturation Sharpness parameters ranges may vary depending on the camera type Motion Press drop down lists to change the sensitivity value of setup motion in 3 Areas from 1 2 and 3 Cli...

Страница 16: ...d recording Choose a camera which you would like to assign your Recording Schedule to Ticking on Enable scheduled recording to edit Schedule Settings Different colours imply the type of recording sele...

Страница 17: ...mouse and click Copy Schedule to apply to the time and channel of your choice on the schedule b Enable audio recording The sound received from the digital output of the camera device will also be reco...

Страница 18: ...n events occur Contact Fill in the contact details of the sender b E Map Settings Setting up an E map helps you set up cameras in a more efficient manner You can easily identify your camera locations...

Страница 19: ...age on the right side of the screen block 2 b 3 To delete select the E map node and click on Delete button on top Adding the camera Highlight a camera of the list then hold and drag the highlighted ca...

Страница 20: ...hannel which you would like to apply the settings to Tick any checkbox to assign the Event type and tick the other checkboxes of Event Action so once an event occurs the NVR will carry out the action...

Страница 21: ...ew logs past and present Clear the whole log with clear icon V Maintenance a Display and Language Language Select the system language from English Simplified Chinese Traditional Chinese Spanish Italia...

Страница 22: ...an interval Tick different checkboxes for the OSD to display contents from Camera Name to Frame rate Adjust the OSD texts in Size Color and styles such as Bois and Italic b User Account The administra...

Страница 23: ...rning the NVR settings back to how it was saved by clicking on Save button to keep the previous settings of the NVR The Admin can set up permission for different users logging onto the NVR system d Ti...

Страница 24: ...nd Time of daylight saving time Tick either Auto set Daylight Saving for the NVR to set the time automatically or Manual set Daylight Saving to set your time manually e Firmware Upgrade Firmware Infor...

Страница 25: ...A R T Status table where user may check on the defection of the hard disk Your Hard Disk Device needs to be replaced if its health condition is displayed with a WARNING text under the Health Status Fo...

Страница 26: ...f the camera you would like to connect to The camera will be added to the Camera List Tick on the check box to enable different Modes which you would like to assign to the camera Note if IP Camera plu...

Страница 27: ...herwise you will receive a warning message c ROI Mode This function allows users to set up a channel as an attached channel which based on a normal RTSP channel that has been set up and can display th...

Страница 28: ...Address to Port number This interface is efficient while applying the IP numbers to the IP cameras found online all at once a Static Choose to edit the IP address of the IP camera in details manually...

Страница 29: ...efault storage device If the USB storage device is installed unto the NVR then you can shift between either HDD or USB by selecting a storage device to view the snapshots Click Previous or Next to bro...

Страница 30: ...nterface a Auto backup Manual backup Click Enable auto backup to enable the functions below Set up the Daily backup time Start time End time and assign which channel to record the backup files from Ca...

Страница 31: ...w about NVR operations in different topics Select a title and roll the middle button of the mouse to scroll down the article and read on G Live In Remote Control Mode only Click on the icon to return...

Страница 32: ...recording B Log in out Click to log out of the system to prevent other people from operating the NVR without your permission The screen will black out with only a log in window hanging at the centre...

Страница 33: ...ill inform you once the picture is stored successfully in the Album C Enable Audio Enabled Disabled Enable disable the audio volume control bar in the Side Menu or simply adjust the volume in Side Men...

Страница 34: ...channel screen G Swap Choose to start switch dwell The duration of the interval happens in every 10 seconds H Single Split Select one channel to be displayed in a 1 camera single screen I Quad Split S...

Страница 35: ...16 cameras split screen N Status Display Video Loss On top of the right corner of each channel screen various icons are displayed indicating different status When any of the situations on the left oc...

Страница 36: ...g up down the middle mouse button A Layout Switch Menu Move your mouse cursor on any icon which can be highlighted from Side Menu then click the right mouse button to open Layout Switch Menu Check unc...

Страница 37: ...lected press and hold a title with the right mouse button to start this operation But when Fixed is checked no changes can be made B Display Controller Click on different icons to perform various NVR...

Страница 38: ...d device to be displayed on the screen VI Save Jpeg Click to take a snapshot of the current screen All the snapshots can be viewed and retrieved in Album mode VII Image Process Click on the icon to ad...

Страница 39: ...as it is a question mark will be displayed instead Highlight an IP camera to start editing Click on to optimize the IP camera bandwidth Click on to connect every IP camera right away A pop up window...

Страница 40: ...ick on the icon to zoom in out the camera view V Preset Name Choose a camera view which you would like to assign your preset point to Create the preset name of your preset point by selecting the drop...

Страница 41: ...e camera lens move normally VIII Speed The bigger value selected the faster each click on the arrow button will make the camera view move IX Patrol Click to start patrolling from the preset points cre...

Страница 42: ...e NVR G Log Tick System NVR Event to view different logs recorded H E Map Graphically allow you to set up cameras in a visual layout of your surveillance area Select an E Map to see its layout in plan...

Страница 43: ...al network device which is assigned to the NVR output in connection J Easy Link Optional Install IPMotion EasyLink App on your mobile phone to access EasyLink operations which allow users to watch IP...

Страница 44: ...rough IPMotion EasyLink App and watch the live view For more operating details of the IPMotion EasyLink please click on the icons below IOS Version Android Version with your mouse to directly open the...

Страница 45: ...he Recorded Video Data from the last 1hr 1 hour 2hr 2 hours 12hr 12 hours and 24hr 24 hours range of timeline I Display in 24 hours Default II Display in 12 hours III Display in 2 hours IV Display in...

Страница 46: ...ideos recorded in different year month date Clicking on any specific number displayed in red of the calendar to view the playback video from the timeline It will start from the first time point of the...

Страница 47: ...k any date from the calendar on the top left corner to set the search range Please refer to Chapter E Calendar Display Be sure the recorded type is the type of search you are aiming for Check the colo...

Страница 48: ...ame you prefer Use the magnifying glass icon to zoom in out for you to browse through the timeline Hold and drag the timeframe of your preference with your mouse You will see the part where there is e...

Страница 49: ...l help you define the search area of the playback video image and enlist all the events in Search Result You can either draw an area of Region Definition on the playback video screen or simply click A...

Страница 50: ...ut device Adjust the Level of the sensitivity of your search from 1 10 by selecting and dragging the red line in the graph below The higher the number the more details the system will include within i...

Страница 51: ...to see all the events found from this search Highlight a particular event enlisted and click on the sign the event will go into the Pre bookmark column as a saved data Start a new search from other c...

Страница 52: ...buttons is labeled by its function B HDD Access Reading the NVR HDD from PC may not be possible since the HDD is in Linux format so you need to locate the Ext2Fsd folder and open the application to a...

Страница 53: ...Page 53 Click Add Assign a letter to the HDD then click OK so that the HDD get a drive letter and can be recognized by Windows...

Страница 54: ...to be saved Select the channel of the video recorded set the Start time and End time Choose the backup format of the video AVI or MKV Click to pause the backup As the backup file is being saved in pro...

Страница 55: ...te Control Mode Watch both live streaming and recorded videos on a PC platform during Remote Control Mode 1 PC Site Setup SYSTEM REQUIREMENT SUGGESTED REQUIREMENT CPU Intel Celeron 1 6G CPU Intel P4 2...

Страница 56: ...bove a Windows Security Alert may pop up Please click on Allow access Then the IPScanner window will pop up The NVR default IP address is 192 168 1 220 NOTE Please input correct network parameters wit...

Страница 57: ...ecurity Trusted sites Sites C LOGIN ACCOUNT PASSWORD LOGIN After the IP setup and connecting to the network or LAN type the IP address in the web browser The Login window will pop up Input admin for b...

Страница 58: ...your PC settings are compatible with the NVR system or not Remote User Log In Open the IP Scanner and double click on the NVR name Enter admin for both the default Username and Password The remote co...

Страница 59: ...on Click on the message to begin downloading the plugin Locate the plugin and click on the right button of the mouse to execute this downloaded file Choose Run as administrator Click on Next to begin...

Страница 60: ...start the operation The remote interface works almost the same as the NVR operation interface Wizard Offers to help you set up your NVR in quick direct navigation Please read the Quick Setup chapter...

Страница 61: ...or more details Live Only in Remote Control Mode Click on the icon to return to Live mode interface from other modes Live Video Control Please refer to Live Video for more details Side Menu Live Contr...

Страница 62: ...search Support Mac Safari browser Powerful mobile surveillance function support i Phone Android E MAP Manual or Schedule backup to FTP Samba B Specifications MODEL NVR 6304 NVR 6309 NVR 6316 System OS...

Страница 63: ...h Smart search Time search Event search Storage Backup Internal HDD Support SATA HDD x3 SATA HDD x2 E SATA N A x1 RAID RAID 1 5 Optional External Backup Device Locol USB backup Remote backup via web b...

Страница 64: ...NT PANEL 4 CH II FRONT PANEL 9 16 CH NVR OPERATION NO LABEL OPERATION 1 EVENT REC POWER POWER REC EVENT ALARM LED indicators 2 1 4 1 8 CHANNEL 1 2 3 4 LED indicators CHANNEL 1 8 LED indicators 3 RJ 45...

Страница 65: ...one output Phone Jack 3 eSATA HDD file output 4 ETHERNET For 4 CH RJ 45 connector 5 100V 240V 50 60Hz Connect to power adapter 6 HDMI HDMI video output 7 USB USB Connector USB Mouse Connector 8 Audio...

Страница 66: ...g 5 screws from the sides and back to remove the NVR cover 2 Connect the HDD into the NVR 3 Refit the top cover and screw the screw back For a detailed Hard Disk Compatible Table please refer to the H...

Страница 67: ...on pops up to remind the user a 5 The pre post alarm recording video can be sent to e mail uploaded to FTP a 6 The CGI can be sent to an http server b When External Alarm IO b 1 The external relay bui...

Страница 68: ...eives GND Ground ALARM IN 1 2 Alarm inputs N C Relay Normally close N O Relay Normally open COM Relay Common EX1 Connect GND Alarm to external IR detector EX2 Connect N O COM to external siren Dependi...

Страница 69: ...e to use Cat 6 Ethernet cable when connecting a Giga switch IV PTZ PAN TILT AND ZOOM CAMERA The following diagram shows the connection between the NVR and a PTZ camera joystick controller To control t...

Страница 70: ...Page 70 3 Package Contents NVR Adaptor Quick INSTALLATION Guide Power cord Mouse CD Disk Screw Package The CD includes user manual and software tools...

Страница 71: ...00322CS 1TB Pipeline HD 2 ST31000525SV 1TB SV35 5 ST31000526SV 1TB SV35 5 ST31000524AS 1TB S3 7200 12 ST1000DM003 1TB S3 Barracuda ST1000VX000 1TB S3 SV35 ST1500DL003 1 5TB S3 Barracuda LP ST31500341A...

Страница 72: ...1TB Caviar Green WD10EALX 1TB S3 Caviar Blue WD10EARS 1TB Caviar Green WD10EFRX 1TB WD10EURX 1TB S3 AV GP WD10EZEX 1TB Caviar Blue WD10EVDS 1TB Green Power WD10EVVS 1TB 7200 GP WD15EADS 1 5TB 7200 GP...

Страница 73: ...80 500GB 7200 HDS721050CLA362 500GB HDT721010SLA360 1TB 7200 HDS721010CLA332 1TB 7200 HDS721010CLA362 1TB HDS721010DLE630 1TB S3 7200 HDS722020ALA330 2TB 7200 HDS723020BLA642 2TB S3 7200 TOSHIBA DS7SA...

Отзывы: