background image

EN 19

OPERATION

Operating the oven

1.  Turn the ‘oven function knob’ to select an oven function. 


Consult the table in chapter ‘Oven functions table ‘to select the preferred function.  
Also consult the instructions for preparation on the dish packaging.

2.  Turn the ‘settings knob’ to set an oven temperature (between 30 and 275 ºC).


As long as the temperature indication is flashing you can change it using the settings knob.


When the temperature indication is not flashing then press the temperature key. 


Temperature indication starts flashing again.

0

0

3.  Press the ‘start/stop key’ for a few seconds to start the cooking process.  

The oven thermostat symbol will light up.

0

0

If necessary, first preheat the oven before placing the recipe in the oven.

Timer

0

0

Setting the day time

1.  Press the ‘timer key’ twice (oven function knob must be in de Off (0) position.


The clock symbol lights up and the time indication will flash on the display.

2.  Turn the settings knob to set the current time.


The settings will be saved automatically after 5 seconds.

Содержание CI96374W

Страница 1: ...Instructions for use COOKER CI96374W ...

Страница 2: ...EN Manual EN 3 EN 38 Pictograms used Important information Tip ...

Страница 3: ...n 18 Operation Operating the oven 19 Timer 19 Selecting additional functions 21 Operating the Induction hob 23 Locking the induction hob 24 Cooking timer 25 Connecting the Bridge induction cooking zones 26 Cleaning Please note 27 General 27 Cleaning the oven 28 Aqua clean function 28 Removing and cleaning the guide rails 29 Removing the oven door 30 Removing the oven window 31 Replacing the oven l...

Страница 4: ...our cooker In addition to information about operating the oven you will also find background information that may be useful when using the appliance Please read the separate safety instructions carefully before using the appliance Because this manual may be written for different appliances some parts and functions described in this user manual may not apply to your cooker Read this manual before u...

Страница 5: ... H Cooker symbol depending on model I Oven function symbol J Oven temperature display K Timer display L Meat probe symbol depending on model 3 Child lock for the oven key 4 Oven light key 5 Temperature key 6 Timer key 7 Start Stop key 8 Settings knob For the best touch response touch the keys with the main part of your fingertip Every time you touch a key during use a short signal will sound 0 8 1...

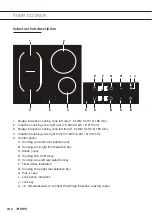
Страница 6: ...2 0 kW Ø 180 mm 4 Induction cooking zone right front 1 2 kW 1 6 kW Ø 145 mm 5 Control panel A Cooking zone left front selection key B Cooking zone right front selection key C Minus key D Cooking hob On Off key E Cooking zone left rear selection key F Timer active indication G Cooking zone right rear selection key H Plus key I Lock active indication J Lock key A E Simultaneously to connect the Brid...

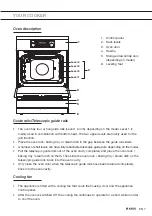
Страница 7: ... the telescopic guide rails out of the oven cavity completely and place the oven rack baking tray steam dish on them Then slide the oven rack baking tray steam dish on the telescopic guide rails back into the oven cavity Only close the oven door when the telescopic guide rails have been returned completely back into the oven cavity Cooling fan The appliance is fitted with a cooling fan that cools ...

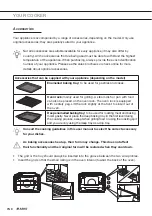
Страница 8: ...rilling A steam dish or pan with food can also be placed on the oven rack The oven rack is equipped with a safety peg Lift the rack slightly at the front to slide it out of the oven Deep enamelled baking tray to be used for roasting meat and baking moist pastry Never place the deep baking tray in the first level during the cooking process except when grilling food or using the roasting spit and yo...

Страница 9: ...e used now After each use rotate the knob back to the Off position and push it back in The push pull knob can only be pushed back when it is in the Off position Drawer Your appliance has a drawer to store accessories like trays shelves grids small pots and pans Warning The inside surface of the drawer may become hot during use Do not store any food plastic or inflammable materials in the drawer Do...

Страница 10: ...he settings will be saved You can set the values in the display faster by keeping the settings knob longer in the maximal right or left position The settings will be saved automatically after 5 seconds You can always set the current time by pressing the timer key twice oven function knob must be in the Off 0 position The clock symbol lights up and the time indication will flash on the display Then...

Страница 11: ...g manufacture When heating the oven for the first time you will notice a new oven smell Do not worry this is normal If necessary switch on the cooker hood After cool down clean the oven with warm water Only preheat the oven if it is required in the recipe Before using the induction hob Clean the glass ceramic surface with a damp cloth and some washing up liquid Do not use aggressive cleaners such ...

Страница 12: ...ing you don t need for the dish from the oven Turn the oven Off before taking out the cooked dish Ovenware In principle you can use any type of heat resistant ovenware Do not rinse glass ovenware with cold water immediately after use The sudden temperature difference can cause the glass to crack Use black or dark baking tins These conduct heat better and allow the food to cook more evenly Do not c...

Страница 13: ...e oven to the desired temperature as quickly as possible This function is not appropriate for cooking food When the oven heats up to the desired temperature the heating process is completed ECO Top Heat Bottom Heat Heating by means of the upper and lower heating elements This mode can be used for traditional baking and roasting Place the baking tray or oven rack on level 2 Preheating is recommende...

Страница 14: ...commended ECO ECO Heating by means of hot air ECO hot air uses less energy but gives the same result as the hot air setting Cooking takes a few minutes longer This mode can be used for roasting meat and baking pastry Place the tray on level 2 This setting makes use of the residual heat heating is not on the whole time to achieve low energy consumption in accordance with energy class EN 60350 1 ECO...

Страница 15: ...e has elapsed Power boost Select power level 9 and then press the plus key to activate the boost level For rapid cooking power boost can be activated for any cooking zone This will allow you to rapidly heat large amounts of food using extra power Lock Press the lock key to activating the safety lock function The hob is then protected against accidental activation and operation of the cooking zones...

Страница 16: ...is hot Avoid touching them when this indicator is lit Danger Risk of burns Fault codes See Troubleshooting table Induction noises A ticking sound This is caused by the capacity limiter on the left and right zones Ticking can also occur at lower settings Pans are making noise Pans can make some noise during cooking This is caused by the energy flowing from the hob to the saucepan At high settings t...

Страница 17: ...steel Hard wearing enamelled pans Porcelain Enamelled cast iron pans Copper Aluminium Plastic Be careful with enamelled sheet steel pans The enamel may chip the enamel comes loose from the steel if you switch the hob on at a high setting when the pan is too dry the base of the pan may warp due for example to overheating or to the use of too high a power level Never use pans with a misshapen base A...

Страница 18: ...er boost setting for start of the cooking process also suitable for very large amounts of food Power distribution cooking zones Maximum hob power available is depending on the power connection of the appliance Consult chapter Installation Setting the maximum total hob power When the power limiter is set at 7 4 then the cooking zones influence each other The power is automatically distributed when ...

Страница 19: ...When the temperature indication is not flashing then press the temperature key Temperature indication starts flashing again 0 0 3 Press the start stop key for a few seconds to start the cooking process The oven thermostat symbol will light up 0 0 If necessary first preheat the oven before placing the recipe in the oven Timer 0 0 Setting the day time 1 Press the timer key twice oven function knob m...

Страница 20: ... cooking process The elapsed preparation time will be displayed An acoustic signal will be heard which you may turn Off by pressing any key After one minute the acoustic signal will be switched Off automatically Setting a cooking time and end time 1 Select an oven function using the oven function knob and set the temperature 2 Press the timer key to select the cooking time function The pictogram f...

Страница 21: ... 0 The settings will be saved automatically after 5 seconds During the last minute the minute minder is displayed in seconds You can cancel all timer functions by setting the time to 0 If the appliance has been inactive for a few minutes it will switch to standby The current time appears and the selected timer function will light up Selecting additional functions Certain settings are not available...

Страница 22: ...for 5 seconds Two fully lit bars will appear on the display 2 Turn the settings knob to choose one of the three volume levels one two or three bars After three seconds the setting will be automatically stored and the time of day will appear Reduce display contrast 1 The oven functions knob should be on the 0 position 2 Press the light key and hold it for 5 seconds Two fully lit bars will appear on...

Страница 23: ...splays If no further operations are performed the hob will switch Off automatically after 10 seconds 3 Press the cooking zone selection key from the cooking zone you want to use Zero 0 next to the selected cooking zone will appear 4 Press the and keys to set the preferred power level When you press the key the cooking zone will directly be switched to power level 9 The set power is visible in the ...

Страница 24: ...sh in the display Locking the induction hob Activate the lock function 1 Press 1 second the lock key until you hear an acoustic signal The lock indicator appears above the lock key The lock function is activated De activate the lock function 1 Press 1 second the ock key until you hear an acoustic signal The lock indicator will disappear The lock function is de activated Set the hob to the lock mod...

Страница 25: ...the desired value is set the countdown begins After a few seconds the timer display will switch Off and a point will appear next to the cooking zone display After the set time has expired an acoustic signal will be sound and the cooking zone will be switched Off Switch Off the alarm by touching any key alternatively it will switch Off automatically after 2 minutes Changing the cooking time Remaini...

Страница 26: ... cooking zones 1 Press the On Off key to switch On the induction hob 2 Simultaneously touch and hold the two left Bridge induction zone selection keys for approx 3 seconds pressed The rear cooking zone display shows a connection symbol to indicate that the two cooking zones are connected 3 Set the desired cooking power for the connected cooking zones using the or keys To change the connected zones...

Страница 27: ...bjects or steel wool as this can cause scratches on the unit Stainless steel front panels Clean the surface with a mild detergent soapsuds and a soft sponge that doesn t scratch the surface Do not use abrasive or solvent based cleaning agents If you do not follow these instructions the casing may become damaged Painted and plastic surfaces Clean the knobs with a soft cloth and liquid cleaning agen...

Страница 28: ...ys clean This prevents accumulation of dirt and allows you to close the door properly Aqua Clean function With the Aqua Clean function and a damp cloth you can easily remove grease and dirt from the oven walls Using the Aqua Clean function Only use the cleaning programme if the oven is cold If the oven is hot it is more difficult to remove dirt and grease using this programme 1 Remove all accessor...

Страница 29: ...se conventional cleaning products to clean the guide rails Grasp the guide rails at the bottom and tilt them towards the middle of the oven A Remove the guide rails from the holes in the back wall B B A Do not clean the extendible guides in the dishwasher ...

Страница 30: ...ed with the hinge beds At the angle of 15 relative to the closed door position slightly lift the door and pull it out from both hinge beds on the appliance A B C To replace the door repeat these actions in reverse If the door does not open or close properly make sure the hinges are positioned correctly in their slots Always ensure that the catches fit properly in their slots Never allow the hinge ...

Страница 31: ... the bracket and pull this away from the glass slightly to marker 2 on the bracket 2 Grasp the glass at the bottom and gently lift this upwards to remove it from the support 3 The inner third glass depending on the model can be removed by lifting this carefully and removing it Also remove the rubber seals around the glass To replace the glass pane observe the reverse order The markings semicircle ...

Страница 32: ... when removing the lamp The lamp in this household appliance is only suitable for illumination of this appliance The lamp is not suitable for household room illumination The lamp is consumable material and is not covered by the guarantee 1 Unscrew the glass cover anticlockwise and replace the oven lamp Fit a new lamp with the same specifications 2 Screw the glass cover back on tightly ...

Страница 33: ...t lower settings Normal operation The pans make a noise while cooking This is caused by the energy flowing from the hob to the saucepan This is caused by the energy flowing from the hob to the saucepan This is not harmful for the pans or hob You have switched a cooking zone on but the display keeps flashing A pan detection symbol u will appear in the display The pan you are using is not suitable f...

Страница 34: ...ob see Operating the oven No power supply Check that the electricity is working properly fuse in the circuit breaker box plug in the socket There is smoke during use of the oven Normal during first use Clean the oven regularly Reduce the amount of fat or oil in the baking tray The food is overcooked or undercooked Wrong oven settings Check whether the correct oven function has been selected Check ...

Страница 35: ... meet the safety requirements To avoid dangerous situations resulting from any damage to the connecting cable this should only be replaced by the manufacturer the manufacturer s service organisation or suitably qualified persons Electrical connection 230 V 50 Hz 400 V 50 Hz 400 V models only Wall socket and plug must be accessible at all times Make sure that the cable does not come into contact wi...

Страница 36: ... right selector keys If a lower maximum total power is set then it is not possible to set a high power level on all cooking zones simultaneously An acoustic signal and symbol r on the selected cooking zone display will indicate that the total power level has been exceeded Installation When placing the cooker next to a tall cupboard or another wall made of flammable material keep at least 100 mm di...

Страница 37: ...G In order to prevent tipping of the appliance stabilising means must be installed Dimensions in the parenthesis represent built in measures of the support bracket without the additional support If the supplied element protecting the appliance from tipping over cannot be firmly secured to your wall with the screws and the wall plugs supplied use other fittings to secure the bracket in such way tha...

Страница 38: ... This indicates that household appliances must be disposed of separately This means that the appliance may not be processed via the regular waste flow at the end of its useful life You should take it to a special municipal waste depot or a sales outlet that offers to do this for you Collecting household equipment separately prevents harm to the environment and public health The materials used in m...

Страница 39: ...EN 39 ...

Страница 40: ...entification card is located on the inside of the appliance When contacting the service department have the complete type number to hand You will find the addresses and phone numbers of the service organisation on the guarantee card en 01 20 ...

Отзывы: