background image

16

© 2020 United States Stove Company

CHIMNEY MAINTENANCE

NEVER OPERATE THIS PRODUCT WHILE UNATTENDED

CAUTION:

DO NOT OVERFIRE APPLIANCE. YOU ARE 

OVERFIRING IF ANY PART OF THE APPLIANCE 

GLOWS RED. CLOSE THE DOOR AND SHUT 

DAMPER IMMEDIATELY TO REDUCE THE AIR 

SUPPLY AND SLOW DOWN THE FIRE.

CAUTION:

SLOW  BURNING  FIRES  FOR  EXTENDED  USE 

OR BURNING GREEN WOOD MAY CAUSE 

EXCESSIVE  CREOSOTE  BUILD-UP.  IGNITION 

OF CREOSOTE OR OVERFIRING COULD 

CAUSE A CHIMNEY FIRE. CHIMNEY FIRES 

BURN  EXTREMELY  HOT  AND  MAY  IGNITE 

SURROUNDING COMBUSTIBLE MATERIALS. 

IN CASE OF A CHIMNEY FIRE, CALL THE FIRE 

DEPARTMENT IMMEDIATELY! 

CREOSOTE FORMATION AND NEED FOR 

REMOVAL

When wood is burned slowly, it produces tar and 

other organic vapors, which combine with expelled 

moisture to form creosote. The creosote vapors 

condense  in  the  relatively  cool  chimney  flue  of 

a  slow-burning  fire.  As  a  result,  creosote  residue 

accumulates on the flue lining. When ignited this 

creosote  makes  an  extremely  high  temper  fire. 

The chimney connector and chimney should be 

inspected at least once every two months during 

the heating season to determine if a creosote build-

up  has  occurred.  If  creosote  has  accumulated  (3 

mm or more), it should be removed to reduce the 

risk of a chimney fire.

We strongly recommend that you install a 

magnetic thermometer on your smoke exhaust 

pipe, approximately 18” above the stove. This 

thermometer will indicate the temperature of 

your gas exhaust fumes within the smoke exhaust 

system. The ideal temperature for these gases 

is somewhere between 275°F and 500°F. Below 

these temperatures, the build-up of creosote is 

promoted. Above 500°F, heat is wasted since a too 

large quantity is lost into the atmosphere.

TO PREVENT CREOSOTE BUILD UP

•  Always burn dry wood. This allows clean burns 

and higher chimney temperatures, therefore less 

creosote deposit.

•  Leave the air control fully open for about 5 minutes 

every time you reload the stove to bring it back to 

proper operating temperatures. The secondary 

combustion  can  only  take  place  if  the  firebox  is 

hot enough.

•  Always check for creosote deposit once every two 

months and have your chimney cleaned at least 

once a year.

• 

If  a  chimney  or  creosote  fire  occurs,  close  all 

dampers immediately. Wait for the fire to go out 

and the heater to cool, then inspect the chimney 

for  damage.  If  no  damage  results,  perform  a 

chimney cleaning to ensure no more creosote 

deposits are remaining in the chimney.

CAUTION:

A CHIMNEY FIRE MAY CAUSE IGNITION OF 

WALL STUDS OR RAFTERS WHICH WERE 

ASSUMED TO BE A SAFE DISTANCE AWAY 

FROM THE CHIMNEY. IF A CHIMNEY FIRE 

OCCURS, HAVE YOUR CHIMNEY INSPECTED BY 

A QUALIFIED EXPERT BEFORE USING AGAIN.

ASH REMOVAL & DISPOSAL

Whenever ashes get 3 to 4 inches deep in your 

firebox or ash pan, remove excess ashes. Leave an 

ash bed approximately 1 inch deep on the firebox 

bottom to help maintain a hot charcoal bed. Ashes 

should be placed in a metal container with a tight-

fitting lid. The closed container of ashes should be 

placed on a non-combustible floor or the ground, 

away from all combustible materials, pending final 

disposal. The ashes should be retained in the closed 

container until all cinders have thoroughly cooled.

Содержание AW40

Страница 1: ...rictions and installation requirements in your area NEVER OPERATE THIS PRODUCT WHILE UNATTENDED CAUTION Please read this entire manual before you install or use your new room heater Failure to follow instructions may result in property damage bodily injury or even death Improper Installation Will Void Your Warranty Save These Instructions In A Safe Place For Future Reference CALIFORNIA PROPOSITION...

Страница 2: ...to deliver heat at rates ranging from 17 611 to 48 127 Btu hr 0 91g hr and efficiency of 72 Note The BTU ratings mentioned above are based on the EPA test protocol under specific test conditions Our advertised BTU s are based on the first hour of operation at high burn rate burning cordwood CAUTIONS Hot while in operation Keep children clothing and furniture away Contact may cause skin burns Do no...

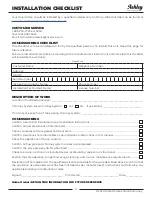
Страница 3: ...d_________________________________ If no date of inspection of the existing chimney system __________________________________________________ COMMISSIONING Confirm Hearth Pad Installation as per Installation Instructions Confirm proper placement of internal parts Check soundness of door gasket and door seals Confirm clearances to combustibles as per installation instructions in this manual Check t...

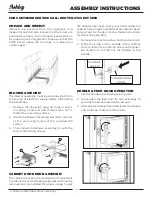
Страница 4: ...4 remaining screws CABINET DOOR KNOB ASSEMBLY The cabinet door knob is mounted on the inside of the cabinet door for shipping purposes and must be removed and re installed for proper usage To get the cabinet door open place your hand under the cabinet frame right hand side of the cabinet door and pull out on the door Follow these instructions for door knob assembly 1 Remove the machine screw and t...

Страница 5: ...rt rod stops the motion Then gently lower the top allowing the support rod to settles in the cup holding the top open To close lift the top until the support rod is out of the cup Pull the rod forward and lower the lid closed SMOKE CURTAIN INSTALLATION 1 Open the cabinet door and the fire door Cabinet Door Fire Door 2 Locate the two hooks inside the firebox above the fire door opening as shown Ins...

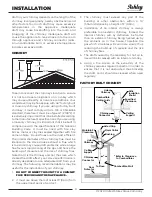
Страница 6: ... www wettinc ca POSITIONING THE STOVE It is very important to position the wood stove as close as possible to the chimney and in an area that willfavorthemostefficientheatdistributionpossible throughout the house The stove must therefore be installed in the room where the most time is spent and in the most spacious room possible Recall that wood stoves produce radiating heat the heat we feel when ...

Страница 7: ...erials contact your local safety department The provision that clearances may only be reduced by means approved by regulatory authority A B F E C D G J H Key in mm A Sidewall To Flue 23 585 B Sidewall To Stove 14 356 C Ceiling Height 84 2134 D Top Of Stove To Ceiling 50 5 1283 E Back Wall To Flue 18 458 F Back Wall To Stove 28 712 G Wall To Corner Angled Installation 18 458 H Wall To Corner Fuel L...

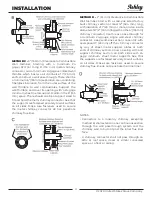
Страница 8: ...aler in order to ensure there will be no problem with the draft The stove pipe must be made of aluminized or cold roll steel with a minimum thickness of 0 021 or 0 53 mm It is strictly forbidden to use galvanized steel Your smoke pipe should be assembled in such a way that the male section crimped end of the pipe faces down Attach each section to another with three metal screws spaced an equal dis...

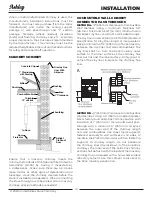
Страница 9: ... cooling of the gas and hence the build up of creosote and the risk of chimney fires Note that it is the chimney and not the stove which creates the draft effect your stove s performance is directly dependent on an adequate draft from your chimney The following recommendations may be useful for the installation of your chimney 1 DO NOT CONNECT THIS UNIT TO A CHIMNEY FLUE SERVING ANOTHER APPLIANCE ...

Страница 10: ...LE WALL CHIMNEY CONNECTOR PASS THROUGHS METHOD A 12 305mm ClearancetoCombustible Wall Member Using a minimum thickness 3 5 89 mm brick and a 5 8 16 mm minimum wall thickness clay liner construct a wall pass through The clay liner must conform to ASTM C315 Standard Specification for Clay Fire Linings or its equivalent Keep a minimum of 12 305 mm of brick masonry between the clay liner and wall comb...

Страница 11: ...ble Wall Member Start with a solid pak listed factory built chimney section at least 12 304 mm long with insulation of 1 26 mm or more and an inside diameter of 8 2 51 mm larger than the 6 153 mm chimney connector Use this as a pass through for a minimum 24 gauge single wall steel chimney connector Keep solid pak section concentric with and spaced 1 26mm off the chimney connector by way of sheet m...

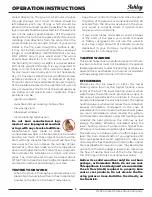
Страница 12: ... stove but specific varieties have better energy yields than others Higher efficiencies and lower emissions generally result when burning air dried seasoned hardwoods as compared to softwoods or too green or freshly cut hardwoods The following resources can assist in learning the burn characteristics of various species of wood http firewoodresource com firewood btu ratings or https forestry usu ed...

Страница 13: ...ve inches in diameter parallel to the door on the bed of red embers Keep the air control full open and close the door If ignition of the piece is accomplished within 90 seconds from the time it was placed in the stove your wood is correctly dried If ignition takes longer your wood is damp If your wood hisses and water or vapor escapes at the ends of the piece your wood is soaked or freshly cut gre...

Страница 14: ... setting 24 lbs For a medium burn once the high burn fuel load is burned down to an established coal bed load the unit with 27 28 lbs of cordwood and keep the door slightly open for 5 minutes Leave the air control fully open in the HI position for 15 minutes After 15 minutes turn the air control knob to the medium position The blower can be turned on after 30 minutes For a low burn setting once th...

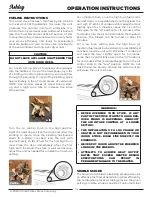
Страница 15: ...l knob is located on the side of the blower housing Turn the knob clockwise to turn the blower on The speed is controlled by turning the knob clockwise for slower speeds and counter clockwise for faster speeds To turn the blower off turn the speed control knob fully counter clockwise It is recommended to turn the blower off when the unit is not in operation The blower needs to be removed and air b...

Страница 16: ...perature for these gases is somewhere between 275 F and 500 F Below these temperatures the build up of creosote is promoted Above 500 F heat is wasted since a too large quantity is lost into the atmosphere TO PREVENT CREOSOTE BUILD UP Always burn dry wood This allows clean burns and higher chimney temperatures therefore less creosote deposit Leave the air control fully open for about 5 minutes eve...

Страница 17: ...rol over the combustion maximum efficiency and security To change the door gasket simply remove the damaged one Carefully clean the available gasket groove apply a high temperature silicone sold for this purpose and install the new gasket You may light up your stove again approximately 24 hours after having completed this operation ATTENTION THIS WOOD HEATER NEEDS PERIODIC INSPECTION AND REPAIR FO...

Страница 18: ...CA 0 55AMP BLACK NOIR BLACK NOIR NOTICE DO NOT ALLOW THE POWER CORD TO TOUCH HOT SURFACES KEEP THE POWER CORD AT LEAST 12 30 5 CM FROM THE STOVE OR PIPE SURFACES DANGER SHOCK HAZARD DISCONNECT POWER SOURCE BEFORE INSTALLATION AND WHENEVER SERVICING BLOWER ASSEMBLY CAUTION MOVING PARTS CAN CAUSE INJURY DO NOT OPERATE WITH COVER REMOVED NOTICE ANY REPLACEMENT WIRING MUST HAVE EQUIVALENT INSULATION A...

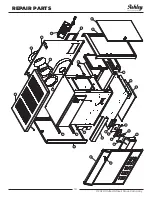
Страница 19: ... 2020 United States Stove Company 19 1 2 3 4 6 7 9 10 11 12 13 14 15 16 17 19 20 21 22 23 18 24 25 26 27 5 8 REPAIR PARTS ...

Страница 20: ... Weldment 1 20 40075 Draft Door Frame 1 21 29422 Restrictor 1 22 88090 Gasket 1 23 27461 Main Air Channel 1 24 27491 Air Channel Stop 1 25 67967 Cabinet Left End Assy 1 26 27467 Bottom Back Spacer 1 27 27466 Top Back Spacer 1 IN ORDER TO MAINTAIN WARRANTY COMPONENTS MUST BE REPLACED USING ASHLEY PARTS PURCHASED THROUGH YOUR DEALER OR DIRECTLY FROM ASHLEY USE OF THIRD PARTY COMPONENTS WILL VOID THE...

Страница 21: ...3 29437 Tube Retainer 1 4 29438 Baffle Side 1 5 27291 Front Liner Top 1 6 29408 Right Retainer 1 7 893285 Firebrick 3 8 27484 Top Brick Rack 2 9 89066A Pumice Firebrick 4 1 2 X 9 17 10 610223 Cleanout Cover Weldment 1 11 610227 Primary Air Outlet Welded 1 12 610221 Floor Welded 1 13 27564 Floor Back 1 14 27472 Brick Spacers 2 15 892945 Pumice Firebrick 4 1 2 X 7 1 2 1 16 893289 Secondary Tube 13 1...

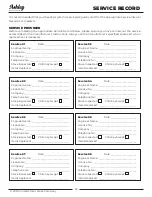
Страница 22: ...7 Date ______________________ Engineer Name ________________________________ License No _____________________________________ Company ______________________________________ Telephone No __________________________________ Stove Inspected Chimney Swept Items Replaced ________________________________ Service 02 Date ______________________ Engineer Name ________________________________ License No ____...

Страница 23: ...icles Remplacé _____________________________ Service de 07 Date _____________________ Nom de l ingénieur ____________________________ N de licence __________________________________ Compagnie ___________________________________ N de téléphone _______________________________ Poêle Inspecté Cheminée balayée Articles Remplacé _____________________________ Service de 02 Date _____________________ Nom ...

Страница 24: ...déflecteur 1 5 27291 Dessus de doublure avant 1 6 29408 Retenue à droite 1 7 893285 Brique réfractaire 3 8 27484 Support à briques supérieur 2 9 89066A Brique réfractaire ponce 4 1 2 X 9 17 10 610223 Soudure du couvercle de nettoyage 1 11 610227 Sortie d air primaire soudée 1 12 610221 Plancher soudé 1 13 27564 Plancher arrière 1 14 27472 Entretoises de brique 2 15 892945 Brique réfractaire à la p...

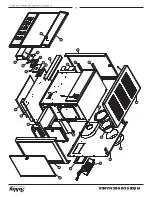
Страница 25: ...Bras Amortisseur 1 16 610987 Ensemble De Boîte De Distribution D air 1 17 89687 Bouton De Thermostat Noir 1 18 610985 Soudé Assemblé Avant De L armoire 1 19 611015 Projet De Soudure De Porte 1 20 40075 Projet De Cadre De Porte 1 21 29422 Restricteur 1 22 88090 Joint 1 23 27461 Canal D air Principal 1 24 27491 Arrêt Du Canal D air 1 26 67967 Armoire Extrémité Gauche Assy 1 27 27467 Entretoise Infér...

Страница 26: ... 2020 United States Stove Company 19 1 2 3 4 6 7 9 10 11 12 13 14 15 16 17 19 20 21 22 23 18 24 25 26 27 5 8 PIÈCES DE RECHANGE ...

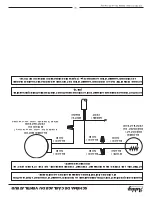
Страница 27: ...TEUR AVIS NE PERMETTEZ PAS AU CORDON D ALIMENTATION DE TOUCHER LES SURFACES CHAUDES GARDER LE CORDON D ALIMENTATION AU MOINS 12 po 30 5CM DES SURFACES DU POÊLE OU DU TUYAU DANGER RISQUE D ÉLECTROCUTION DÉBRANCHER LA SOURCE D ALIMENTATION AVANT L INSTALLATION ET LORS DE L ENTRETIEN DE L ASSEMBLAGE DE LA SOUFFLEUSE ATTENTION LES PIÈCES EN MOUVEMENT PEUVENT CAUSER BLESSURE NE PAS UTILISER AVEC LE COU...

Страница 28: ...ois par an afin d assurer un bon contrôle de la combustion une efficacité et une sécurité maximales Pour changer le joint de porte retirez simplement celui qui est endommagé Nettoyez soigneusement la rainure du joint disponible appliquez un silicone haute température vendu à cet effet et installez le nouveau joint Vous pouvez rallumer votre poêle environ 24 heures après avoir terminé cette opérati...

Страница 29: ...n dessous de ces températures l accumulation de créosote est favorisée Au dessus de 500 F la chaleur est perdue car une trop grande quantité est perdue dans l atmosphère POUR ÉVITER LA CONSTRUCTION DE CRÉOSOTE Brûlez toujours du bois sec Cela permet des brûlures propres et des températures de cheminée plus élevées donc moins de dépôt de créosote Laissez le contrôle d air complètement ouvert pendan...

Страница 30: ...s d une montre pour allumer la soufflerie La vitesse est contrôlée en tournant le bouton dans le sens des aiguilles d une montre pour les vitesses plus lentes et dans le sens inverse des aiguilles d une montre pour les vitesses plus rapides Pour éteindre la soufflerie tournez complètement le bouton de contrôle de vitesse dans le sens inverse des aiguilles d une montre Il est recommandé d éteindre ...

Страница 31: ...ne une fois que la charge de combustible à combustion élevée est brûlée dans un lit de charbon établi chargez l unité avec 27 28 lb de bois de corde et gardez la porte légèrement ouverte pendant 5 minutes Laissez le contrôle d air complètement ouvert en position HI pendant 15 minutes Après 15 minutes tournez le bouton de commande d air en position moyenne Le ventilateur peut être activé après 30 m...

Страница 32: ...rte Si l allumage de la pièce est accompli dans les 90 secondes à partir du moment où elle a été placée dans le poêle votre bois est correctement séché Si l allumage prend plus de temps votre bois est humide Si votre bois siffle et que de l eau ou de la vapeur s échappe aux extrémités de la pièce votre bois est trempé ou fraîchement coupé vert N utilisez pas ce bois dans votre poêle De grandes qua...

Страница 33: ...ines variétés ont de meilleurs rendements énergétiques que d autres Des rendements plus élevés et des émissions plus faibles résultent généralement de la combustion de bois durs séchés à l air par rapport aux résineux ou aux feuillus trop verts ou fraîchement coupés Les ressources suivantes peuvent aider à apprendre les caractéristiques de combustion de diverses essences de bois http firewoodresou...

Страница 34: ...uces 51 mm plus grand que celui de 6 po 152 4 mm Utilisez celle ci comme passage pour un raccord de cheminée métallique pour paroi unique de calibre 24 minimum Maintenez la section concentrique solid pak avec le raccord de la cheminée et à une distance de 1 po 25 4 mm de ce dernier grâce aux platines supports en tôle situées aux deux extrémités de la section de la cheminée Couvrez l ouverture et s...

Страница 35: ...quée en usine agréée de 6 po 152 4 mm de diamètre intérieur avec une isolation de 1 po 25 4 mm ou plus construisez un passage à travers la paroi avec une couche d air de 9 po 228 6 mm minimum entre la paroi extérieure de la longueur de la cheminée et les matières combustibles de la paroi Utilisez des supports en tôle fixés de façon sûre aux surfaces de la paroi sur tous les côtés afin de maintenir...

Страница 36: ...é avec une cheminée intérieure 6 L utilisation d un pare feu à l extrémité de la cheminée requiert une inspection régulière afin de garantir qu il n est pas obstrué bloquant donc le tirage et devra être nettoyé lorsqu il est utilisé régulièrement CHEMINÉE FABRIQUÉE EN USINE Lorsqu une cheminée métallique préfabriquée est utilisée les instructions d installation du fabriquant doivent être respectée...

Страница 37: ...cale style toit cathédrale où le système d évacuation des fumées peut être beaucoup plus long et raccordé sans problème à la cheminée au plafond de la pièce Il ne doit jamais y avoir plus de deux coudes à 90 dans le système d évacuation des fumées L installation d un stabilisateur de tirage barométrique registre de cheminée sur un système d évacuation des fumées est interdite De plus l installatio...

Страница 38: ...tallation en angle 18 458 H Mur au coin de chargement de carburant installation en angle 18 458 J Du mur au conduit installation en angle 18 458 A B F E C D G J H AIR DE COMBUSTION EXTÉRIEUR Votre poêle à bois est homologué pour être installé avec une prise d air extérieur 4FAK nécessaire pour une maison mobile Ce type d installation est également requis dans les maisons étanches à l air et les ma...

Страница 39: ...leur des poêles à bois par rayonnement la chaleur que nous ressentons lorsque nous sommes près d un poêle à bois Un poêle à bois fonctionne aussi par convection qui est par le déplacement de l air chaud vers le haut et son remplacement avec refroidisseur d air Si nécessaire la distribution d air chaud du poêle peut être facilitée par l installation d un ventilateur Le poêle à bois ne doit pas être...

Страница 40: ...e haut permettant à la tige de support pour se dépose dans la tasse en tenant la partie supérieure ouverte Pour fermer soulevez le haut jusqu à ce que la tige de support est hors de la coupe Tirez sur la tige avant et abaisser le couvercle fermé INSTALLATION D UN RIDEAU DE FUMÉE 1 Ouvrez la porte de l armoire et la porte coupe feu Porte D armoire Porte Coupe Feu 2 Localisez les deux crochets à l i...

Страница 41: ...ORTE ENSEMBLE BOUTON La poignée de la porte de l armoire est montée à l intérieur de la porte de l armoire pour faciliter la navigation et doit être retiré et réinstallé pour une utilisation appropriée Pour obtenir la porte de l armoire ouverte placez votre main sous le châssis de l armoire côté droit de la porte de l armoire et pousser la porte dehors Suivre ces instructions pour le montage porte...

Страница 42: ...pection du système de cheminée existant _________________________________________________________ MISE EN SERVICE Confirmer l installation du tapis de foyer conformément aux instructions d installation Confirmer le bon placement des pièces internes Vérifier la solidité du joint de porte et de l étanchéité de la porte Confirmer les dégagements aux combustibles selon les instructions d installation ...

Страница 43: ...u journal 21 po 534 mm Dimensions Dans l ensemble Profondeur x Largeur x Hauteur 21 5 po x 32 po x 33 5 po 547 mm x 813 mm x 864 mm Chambre de combustion Largeur x Profondeur 11 3 8 po x 24 3 4 po 289 mm x 629 mm Le Volume Pieds Cubes 2 32 pi Ouverture de la porte Largeur x Hauteur 10 po x 11 3 8 po 854 mm x 289 mm AVERTISSEMENTS CHAUD DURANT LE FONCTIONNEMENT MAINTENEZ LES ENFANTS LES VÊTEMENTS E...

Страница 44: ... installation de ce radiateur Contactez les responsables locaux du bâtiment ou des pompiers pour connaître les permis les restrictions et les exigences d installation dans votre région NE JAMAIS UTILISER CE PRODUIT SANS SURVEILLANCE MISE EN GARDE Veuillez lire l intégralité de ce manuel avant d installer ou d utiliser votre nouveau radiateur Le non respect des instructions peut entraîner des domma...

Отзывы: