Aseptico AMC-20 Скачать руководство пользователя страница 14

12.

OPTIONAL EQUIPMENT FUNCTIONS - 

Cont’d:

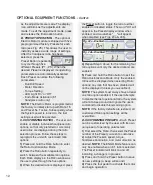
the Preset button to toggle the ratio to either

enabled or disabled status. The word "On" will

appear in the Preset display window when

enabled, and two dashes "_ _" will appear

when disabled (see Figs. 24a & 24b).

4)

Repeat Step 3 above for the remaining four

ratio options until only the desired ratio(s) are

enabled. 

5)

Press and hold the Ratio button to exit the

Ratio Customization Mode. Only the enabled

ratios will be displayed when selecting Ratio

options; any ratio that has been disabled will

not be displayed (unless you re-enable it).

NOTE:

The system must always have at least

one ratio option enabled. If the user attempts

to disable the last operational ratio, the system

will emit a beep sound and ignore the user's

command to disable this remaining option.

NOTE:

If the factory defaults are restored, all

customized Ratio option settings will be

overwritten. 

D. CUSTOMIZING PRESETS - 

Each Preset

can be customized by the user with its own

unique set of operating parameters: 

1) 

First select the Ratio, then select the Preset

number of the Preset you wish to customize. 

2) 

Adjust the Preset's speed, torque,

handpiece illumination, and motor direction as

desired. 

NOTE:

The ENDO Mode feature can

only be enabled when an 8:1 ratio is selected.

The Preset indicator will blink on and off,

indicating a change is in process.

3) 

Press and hold the Preset button to save

its new settings (a beep will sound

).

4)

Press the foot pedal to activate the motor

and begin operation.

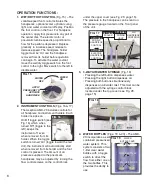
as the adjustments are made. The display

icon will blink as the adjustments are

made. To exit the adjustment mode, press

and release the Illumination button.
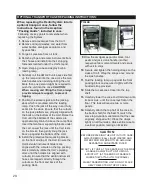
B. PRESET OPERATION

- The optional

Electric Motor module is shipped with five

preprogrammed factory Presets for each

ratio (see Fig. 25). This allows the user to

instantly access a wide range of settings.

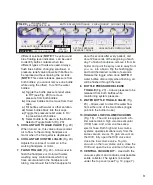
After the handpiece ratio has been

selected, press the

Preset Button repeatedly

to cycle through five

different Presets (P1 - P5). When the

desired Preset is displayed, its operating

parameters are automatically activated.

Each Preset can store the following

parameters:

- Bur/Drill Speed

- Motor Direction

- Torque Setting

- LED Light 'On' or 'Off'

- Endo Mode Activation (8:1

handpiece ratio only)

NOTE: 

The Electric Motor is programmed at

the factory to initially start up with Ratio 1:5

and Preset No.1 active. Subsequently, when

the System power is turned on, the last

settings used will be activated.

C. CUSTOMIZING RATIOS

- The user can

enable or disable individual handpiece ratio

options, so that only preferred or commonly

used ratios are displayed during the ratio

selection process. Follow these steps to

reprogram the unit with customized ratio

options:

1)

Press and hold the Ratio button to enter

the Ratio Customization Mode.

2)

Press the Ratio button repeatedly to

switch  between the available ratio options.

Each Ratio displays in the Ratio window as

the user cycles through the five options.
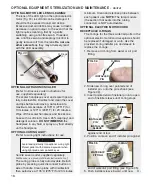
3)

When the desired ratio is displayed, press

Fig. 24a -Enabled

Fig. 24b -Disabled

Содержание AMC-20

Страница 1: ...AMC 20 Mobile Dental System OPERATION and MAINTENANCE INSTRUCTION MANUAL...

Страница 2: ...e Note For reliable grounding connect to receptacle marked Hospital Grade To prevent injury to people and damage to property please heed relevant warnings and remarks They are marked as follows WARNIN...

Страница 3: ...n E Type Endodontics Handpiece STANDARD FEATURES Automatic handpiece controls for two pneumatic handpieces Each pneumatic handpiece provides individually controlled water and coolant air 3 way air wat...

Страница 4: ...ons concerning disposal of amalgam waste WARNING Never operate unit or work on patients when the top cover is open WARNING Do not use this device for dental implant procedures CAUTION Do not run salin...

Страница 5: ...color coded to identify different fluids e g sterile water or distilled water 6 Place the foot control on the floor 7 Attach power cord to the back of the unit Fig 5 and plug into a grounded electric...

Страница 6: ...tor into the amalgam manifold Tighten the retaining screw located under the top cover Fig 10 NOTE Before installing the separator into the manifold remove the two caps from the inlet and outlet ports...

Страница 7: ...ESSURE RELEASE TOGGLE BOTTLE SELECTOR TOGGLE AUXILIARY WATER CONNECTION AUXILIARY AIR CONNECTION OPTIONAL SCALER COOLANT VALVE OPTIONAL HANDPIECE SCALER CURING LIGHT HOLDERS ELECTRIC MOTOR CONNECTOR H...

Страница 8: ...10V OUTLET AIR TANK PURGE TOGGLE WASTE COMPARTMENT ACCESS DOOR OPTIONAL 220V OUTLET QUICK DIS CONNECT FOR WASTE HOSE 1 AMP CIRCUIT BREAKERS 2 TANK DRAIN OPTIONAL 10 AMP CIRCUIT BREAKERS 2 FOR 220V 20...

Страница 9: ...PASS FILTER FILTER REGULATOR OPTIONAL FIBER OPTIC CURING LIGHT MODULE SYSTEM PRESSURE GAUGE PRESSURE REGULATOR CENTRAL VACUUM CANNISTER W AMALGAM SOLIDS TRAP INSIDE OPTIONAL OPTIONAL OPTIONAL OPTIONAL...

Страница 10: ...oved from its holder and the foot control is pressed The amount of air pressure supplied to the pneumatic handpieces may be adjusted by turning the flow control screws on the control block OPERATION F...

Страница 11: ...bout 5 seconds after every patient and about 20 seconds at the beginning of each day To flush a handpiece remove it from its holder and point the spray nozzle away from you i e into a basin Flip the f...

Страница 12: ...atio s from the five available options Refer to page 12 for complete instructions on Customizing Ratios 3 Press the SPEED Up Down buttons to select the desired operating speed for the handpiece being...

Страница 13: ...de press the Torque Up Down buttons to select the desired illumination in 10 increments from 10 to 100 The handpiece LED will automatically turn on and change intensity 4 Press the TORQUE Up Down butt...

Страница 14: ...ttings a beep will sound 4 Press the foot pedal to activate the motor and begin operation as the adjustments are made The display icon will blink as the adjustments are made To exit the adjustment mod...

Страница 15: ...100 On FACTORY DEFAULTS The optional Electric Motor Module will retain the factory default settings Fig 25 in memory until changed by the user To recall the original factory defaults press and hold th...

Страница 16: ...ly electric scaler system that provides adjustable ultrasonic levels and a water coolant system The scaler includes 3 instrument tips The 37 instrument is specially developed for subgingival scaling f...

Страница 17: ...alve and control valve are provided to turn coolant to the handpiece and motor On and Off and to control the flow Turn the coolant air control valve clockwise until it seats softly Begin turning count...

Страница 18: ...t the water lines weekly Prepare a 1 10 bleach solution 1 part household bleach to 9 parts water Purge all water lines see page 17 Purging Water From the System Fill water bottles with bleach solution...

Страница 19: ...ll water is purged from the lines with air Finally hold the water syringe over the basin and hold down the water button until all water is purged from the line with air GENERAL CLEANING The external s...

Страница 20: ...e Lazer is a product of Kinetic Instruments Inc The curing probe is fully autoclavable Detach probe by pressing quick disconnect button on side of handle Clean probe with disinfectant then autoclave a...

Страница 21: ...anchor eye bolts on the base as shown in Figure 38 7 Place the foot control pedal under the cart as shown in Figure 39 8 Wrap the cart with palletizer stretch wrap Fig 40 9 Insert the two end panels a...

Страница 22: ...protective foam packing blocks on the front and top of the Cart Ensure the Cart s dental instrument holders are aligned with the cutouts on the top packing block carefully rotate the Cart s pivoting...

Страница 23: ...ressure Insufficient vacuum Insufficient handpiece operation No water to handpiece No coolant air to handpiece Unit is turning On and Off Correction Check system power connection Check voltage selecto...

Страница 24: ...w High Vol open 42 5 liters min 3 8 cm Hg Simultaneous Vacuum High 4 Hg 5 1 SCFM 144 4 liters min 10 2 cm Hg Low 1 5 Hg 1 4 SCFM 39 6 liters min 3 8 cm Hg Vacuum Compressor Pump 115 PSI 7 92 bar 2 HP...

Страница 25: ...e Water Coolant Control Air Coolant ON OFF Toggle OR Flush Toggle Bottle Pressure Release Toggle Bottle Select Toggle Footswitch On Off Switch Mains Temperature Limitation Manufacturer Humidity Limita...

Страница 26: ...LGAM SOLIDS TRAP OPEN TYPE AA 29 1 AMALGAM SOLIDS TRAP OPEN TYPE AA 29 100 100 AMALGAM SOLIDS TRAP CLOSED TYPE AA 290VS 1 AMALGAM SOLIDS TRAP CLOSED TYPE AA 290VS 100 100 VALVE DELUXE UNIVERSL AUTOCLA...

Страница 27: ...of such action In the event of alleged defect under warranty the purchaser is to notify Aseptico s Customer Service Department promptly Customer Service will provide instructions usually directing th...

Страница 28: ...P N 420869 Rev M ECO 14212 06 2017 PRINTED IN THE U S A P O Box 1548 Woodinville WA 98072 8333 216th Street SE Woodinville WA 98072 425 487 3157 800 426 5913 www aseptico com info aseptico com...

Отзывы: