


Page 20
DISASSEMBLY - Cont’d
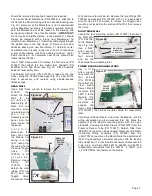
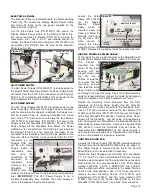
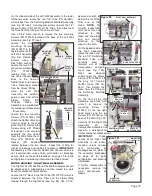
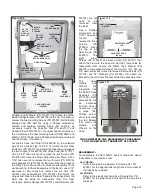
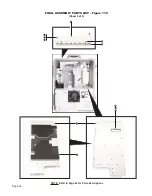
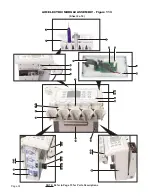
Switching Module Manifold (PN 330594): On the inboard
side of the Wall (Fig. 103), use diagonal cutters to pry the
two 1/8" tube Sleeve Clamps (PN 730015) from the Red
Tube (PN AA-94R) and Green Tube (PN AA-94G), then the
1/4" Clamp (PN 730094) and gray braided Hose (PN AA-96).
Set all Tubes and Hoses aside for reassembly later. On the
outboard side of the Wall (Fig. 102), use a 5/64" Allen
wrench to remove the two mounting Screws (PN 510037)
that attach the Switching Module to the Wall. Remove
Module and set aside for reassembly later.
3-Way Air (Unloader) Valve (PN 730578): On the inboard
side of the Wall (Fig. 103), use a 9/64" Allen wrench to
remove the two mounting Screws (PN 510764) that attach
the 3-Way Valve and two Spacers (PN 462094) to the Wall.
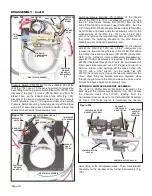
Refer to the 3-Way Air Valve subassembly breakdown on
page 42 if further disassembly is required. If the Elbow (PN
462094) that leads through the Wall to the Compressor Air
Filter needs to be removed, use a 9/16" open-end wrench to
hold the Elbow while spinning off the Hose Fitting (PN
730117) with a 7/16" wrench. Cut the Cable Ties (PN
510137) as necessary to free up the two wire leads from the
Valve. Draw the gray braided pressure regulator Hose
through the grommet in the Wall and place the Valve and its
fixtures and hoses aside for reassembly later.
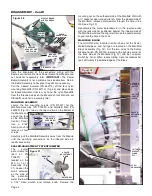
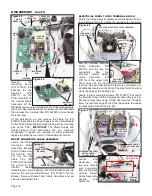
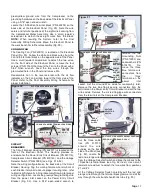
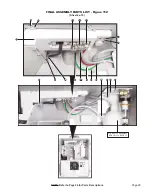
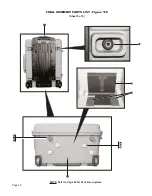
VENTURI & MUFFLER BRACKET ASSEMBLY
The Venturi & Muffler Bracket Assembly is located on the
back side of the Compressor Assembly (Fig. 104). Locate
the Vacuum Hose (PN 730130) leading from the
Compressor Vacuum Head to the Venturi/Muffler Assembly
#2. Use a 7/16" Allen wrench to disconnect the Vacuum
Hose fitting, at the Compressor Head. Then, move Bracket
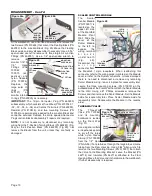
Assembly to the workbench for further disassembly (Fig.
105).
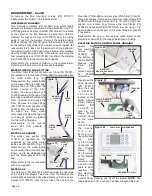
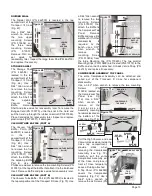
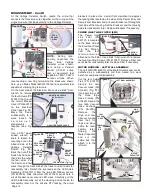
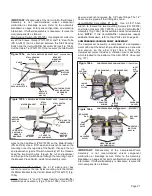
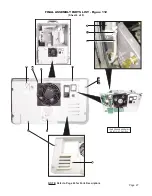
Pressure Switch (PN 830142): On the outboard side of the
Wall (Fig. 102), use a 7/16" open-end wrench to remove the
hose fitting from the pressure switch Elbow (PN 730351) and
disconnect the gray 1/4" Hose (PN AA-95G) end from the
Elbow. Then, on the inboard side of the Wall (Fig. 103),
disconnect the two red wire-connectors from the Pressure
Switch terminals. Use a 1" thin open-end wrench to hold the
Pressure Switch Mounting Nut while spinning off the Elbow
with a 9/16" open-end wrench. Remove Switch, Elbow, and
Washer and set aside for reassembly later.
Figure 102
RIGHT WALL ASSEMBLY
PRESSURE
SWITCH
ELBOW
HOSE FITTING
3-WAY
AIR
VALVE
Figure 103
RIGHT WALL ASSEMBLY
WIRE
CONNECTORS (X2)
PRESSURE SWITCH MOUNTING NUT
SWITCHING
MODULE
MANIFOLD
PRESSURE
SWITCH
ELBOW TO
COMPRESSOR
AIR FILTER
SWITCHING
MODULE
MANIFOLD
MTG SCREWS
(X2)
1/4"
BRAIDED
HOSE
BRAIDED
HOSE
1/8"
TUBES
ELBOW
HOSE
FITTING
3-WAY VALVE
MTG SCREWS
(X2)
CABLE TIE(S)
Figure 104
VENTURI/MUFFLER
ASSY #2
COMPRESSOR
VACUUM
HOSE TO
VENTURI #2
DISCONNECT
THIS VACUUM
HOSE FITTING
VENTURI/MUFFLER ASSY #1
VENTURI & MUFFLER
BRACKET ASSEMBLY