Ascon Tecnologic - K31D - OPERATING INSTRUCTIONS - PAG. 5
instrument and that the load current absorption is no higher
than the maximum electricity current permitted.
As the instrument is a built-in equipment with permanent
connection inside housing, it is not equipped with either
switches or internal devices to protect against current
overloads: the installation must include a two-phase circuit-
breaker, placed as near as possible to the instrument, and
located in a position that can easily be reached by the user
and marked as instrument disconnecting device which inter-
rupts the power supply to the equipment.
It is also recommended that all the electrical circuits con-
nected to the instrument must be protect properly, using
devices (ex. fuses) proportionate to the circulating currents. It
is strongly recommended that cables with proper insulation,
according to the working voltages and temperatures, be used.
Furthermore, the input cable of the probe must be kept separat-
ed from line voltage wiring. If the wiring cables are shielded is
recommended to connect the shield to ground at one side only.
For the electrical supply of the instrument it is recommended
to use an external transformer TCTR, or with equivalent fea-
tures, and to use only one transformer for each instrument
because there is no insulation between supply and input.
m
We recommend that a check should be made that the
parameters are those desired and that the application
functions correctly
before connecting the outputs to
the actuators
so as to avoid malfunctioning that may
cause irregularities in the plant that could cause dam-
age to people, things or animals.
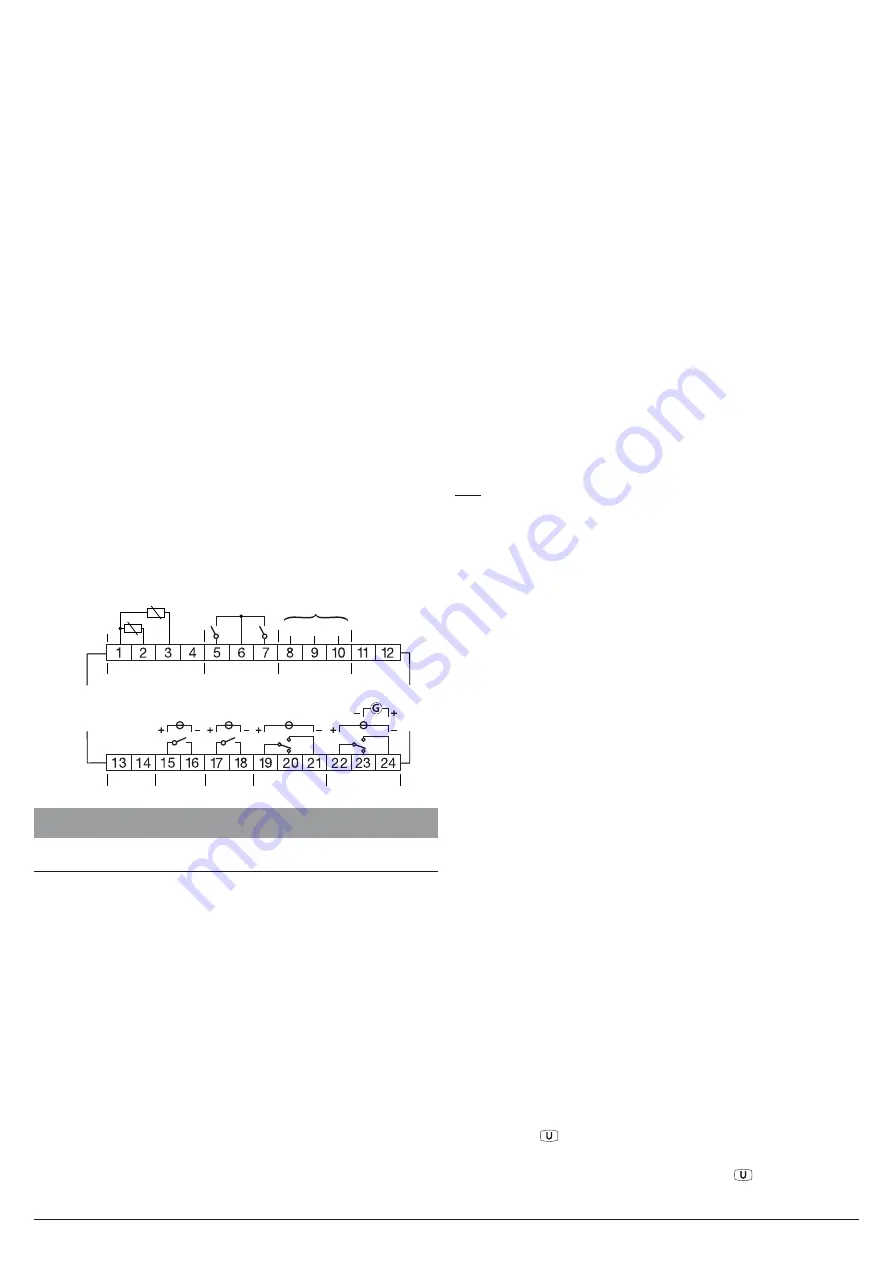
4.3.1
Electrical wiring diagram
OUT1
OUT2
OUT3
OUT4
Power
Supply
Analogue input
Digital input
Serial interface
SSR: Out 1, 2, 3, 4: 10mA/10VDC
Relays: Out-1, 2: 8A-AC1 (3A-AC3)/250VAC
Out-3, 4: 5A-AC1 (2A-AC3)/250VAC
Analog: Out 1: 0/4... 20mA or
0/2... 10VDC
Ptc/Ntc/
Pt1000
Pr1
Pr2
RS485
B GND A
DI2
DI1
5. FUNCTIONS
5.1 Measurement and display
All the parameters referring measurements are contained in
the group
]
InP
.
Using parameter
SEnS
, it is possible to select the probe input
type, which can be:
–
Thermistors PTC KTY81-121 (
Ptc
) or NTC 103AT-2 (
ntc
);
–
ResistanceThermometer Pt1000 (
Pt10
).
Notes: 1.
We recommend to switch ON and OFF the instru-
ment when these parameters are modified, in
order to obtain a correct measuring.
2.
When 2 temperature probes are connected to the
controller they must be of the same type.
Once the type of probe has been chosen, through the
Unit
parameter it is possible to choose the temperature meas-
urement unit (
°C
or
°F
) and through the
dP
parameter, the
desired temperature resolution (
0
=
1°
;
1
=
0.1°
).
If the
Pr2
probe is not used set parameter
Pr2
=
NO
to avoid
an error being indicated when the probe is not connected.
The instrument allows the measurement calibration, that can
be used to recalibrate the instrument according to application
needs. This can be done through parameters
OFS1
,
OFS2
and
rot
.
Setting
rot
=
1000
and
oFS
=
1
/
2
it is possible to set a
posi-
tive
or
negative
offset
that is simply
added
to the value read
by the probe before visualisation, which remains constant for
all the measurements.
If instead, it is desired that the
offset
set should
not be con-
stant
for
all measurements
, it is possible to execute a two
points calibration.
In this case, in order to decide the values to program on
OFSt
and
rot
, the following formulas must be applied:
rot
= (D2 - D1)/(M2 - M1)
oFS
= D2 - (
rot
x M2)
where:
M1
Measured value 1;
D1
Value to be displayed when the instrument measures M1;
M2
Measured value 2;
D2
Value to be displayed when the instrument measures M2;
Follows that the instrument will visualise:
DV
= MV x
rot
+
oFS
Where:
DV
= Displayed value
MV
= Measured value.
E.g.:
It is desired that the instrument displays the value ef-
fectively measured at 20° but that, at 100°, it displays 90° (10°
lower than the measured value).
Therefore: M1 = 20; D1 = 20; M2 = 100; D2 = 90
rot
= (90 - 20)/(100 - 20) =
0.875
oFS
= 90 - (0.875 x 100) =
2.5
With parameter
FiL
it is possible to program time constant
of the software filter for the input value measured, in order to
reduce noise sensitivity (increasing the reading time).
In case of measurement error, the instrument supplies the
power as programmed on parameter
OPE
. This power is calcu-
lated according to cycle time programmed for the PID control,
while for the ON/OFF control the cycle time is automatically
considered to be 20 s (e.g. In the event of probe error with ON/
OFF control and
oPE
=
50
, the control output will be activated
for 10 s, then deactivated for 10 s and so on until the measure-
ment error remains.).
With
InE
parameter it is possible to decide the input error con-
ditions that force the instrument in supplying the output power
programmed with
oPE
parameter.
The possible values for
InE
parameter are:
or
The condition occurs in case of overrange or probe break.
Ur
The condition occurs in case of underrange or probe break.
Our
The condition occurs in case of overrange, underrange
or probe break.
Through the
diSP
parameter of the
]
PAn
group it is possible to
decide which value the display must normally show; this could
be the
Pr1
probe reading (
Pr
1
), the
Pr2
probe reading (
Pr
2
),
the temperatures
Pr1 - Pr2
difference (
P1-2
), the power con-
trol (
Pou
), the
active Set Point
(
SP.F
), the
operative Set Point
when there are ramps activated
(
SP.o
) or the alarm limit
AL 1
,
AL 2
,
AL 3
(
AL1
,
AL2
,
AL3
).
Regardless of
diSP
parameter setting is possible to show the
variables
Pr1
,
Pr2
and
Pr1 - Pr2
in sequentially, pressing and
releasing the
key, the display alternately shows the code that
identifies the variable (
Pr
1
,
Pr
2
,
P1-2
), then and its value.
After 15 seconds following the last time the
key is pressed,
this type of display ends automatically.


