Operating Instructions for Ascoline 700, AGH 2xx, 4xx, 6xx
ascobloc
Gastro-Gerätebau GmbH
D-01156 Dresden, Grüner Weg 29
Germany
Tel. +49 351 4533-0
Fax: +49 351 4537-339
E-mail:
AGH2XX.doc, Status: 23.05.2013
Subject to change without notice!
6
5.2.2 Appliance with gas-fired roasting and baking oven
Inspect the flue gas duct of the oven.
Check the switching function of the oven's temperature controller.
5.2.3 Appliance with electric roasting and baking oven
Bring upper and lower heat separately into operation. The green indicator light for operational readiness
must light up.
Set the knob for the top and/or bottom heat to 50°C. The yellow indicator light must light up. The yellow
indicator light goes out after a short time when the temperature set for the roast/baking oven is reached.
5.3 Operating
5.3.1 Gas burners
Open the gas supply valve within the customer's supply before commissioning. Turn the cooking zone
control knob to “Star” and keep it pressed in. Ignite the pilot flame using the igniter and hold the knob in
the pressed-in position for about 10 seconds.
Parboiling at high power with a “large flame”, simmering on a “small flame”. The setting needed for
simmering depends on the condition of the cooking utensils and the quantity of food to be cooked.
With the knob at the “Star” position, the cooking zone burner is held in readiness; only the pilot flame is
on. Knob at the “Zero” position extinguishes the burner and the pilot flame of the cooking zone. If the
appliance is to be taken out of operation, first set all knobs to “Zero” and then close the gas supply valve
within the customer's supply.
5.3.2 Baking oven (optional)
Electric roasting and baking oven
•
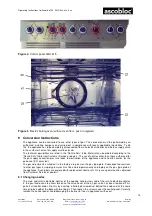
If the oven has convection heating as an extra, the changeover switch (6) must be in mode (II)
•
The temperature is set by turning the knob (temperature controller),
•
separately for top heat (2) and bottom heat (3)
•
When the oven is switched on, the green or the yellow light is on
•
When the preselected temperature is reached, the yellow light goes out
Electric convection oven:
•
Set the changeover switch (6) to convection (I)
•
The temperature is set by turning the knob (2) for top heat. The controller for bottom heat has no
function here.
•
When the oven is switched on, the green or the yellow light is on
•
When the preselected temperature is reached, the yellow light goes out
•
The temperature in convection mode is limited to a maximum of 250°C.
•
Always pre-heat to get the best results when roasting and baking.
Refer to the data sheet for the numbers.
The rocker arm on the oven door can be used to reduce the moisture level in the oven.
Attention: In convection mode, heating and fan remain in operation, even when the door is open!
Gas-fired roasting and baking oven:
Turn the oven control knob to “Star” and keep it pressed in. Light the pilot flame with a gas igniter
underneath the igniter flap in the floor of the oven and hold the oven control knob in the pressed-in
position for a further 10 seconds.
With the oven knob at the “Star” position, the cooking zone is held in readiness; only the pilot flame is on.
Knob at the “Zero” position extinguishes the burner and the pilot flame.
Always preheat the gas-fired roasting and baking oven before use. The gas-fired roasting/baking oven is
thermostatically controlled. You can use the various levels in the gas-fired roasting/baking oven. Only use
one insertion level at any one time.


