


Operating Instructions for Ascoline 700, AGH 2xx, 4xx, 6xx
ascobloc
Gastro-Gerätebau GmbH
D-01156 Dresden, Grüner Weg 29
Germany
Tel. +49 351 4533-0
Fax: +49 351 4537-339
E-mail:
AGH2XX.doc, Status: 23.05.2013
Subject to change without notice!
4
Gas appliance safety:
•
All subsequent constructional modifications to rooms housing the appliances that impair the adequate
supply of combustion air to the gas appliances are not permitted as these not only affect the correct
functioning of the appliances but can also have fatal consequences for those working there.
•
If there is a smell of gas, do not light a flame! Immediately close the gas supply valve on the customer
side! Open windows carefully check whether there is a leak. If the cause cannot be identified or
remedied, immediately inform a gas installation firm or the gas supply utility!
•
If the appliance is to be shut down: First put all gas valves to “Off” and then close the gas supply valve
within the customer's extent of supply. This applies also in the case of repair work.
Appliance with gas-fired roasting and baking oven
•
It must be checked and made sure that the exit gas path of the oven is not obstructed by foreign bodies
or constricted in any way. Only operate the oven with the door closed.
Appliance with electric roasting and baking oven
•
Before repair work is started, the equipment must be disconnected on all poles from the power (using
isolating equipment in the customer's supply, e.g. fuses).
3.3 Instructions for transport
•
Transport ascobloc equipment only in the original packaging. This avoids unnecessary damage and
expense.
•
Check equipment for damage.
•
Do not lift or shift the appliance by holding the top plate, the bottom edges at the sides of the appliance
or by the door handles. The bottom edges at the front and rear of the appliance are provided for this.
4 Installation
•
The manufacturer cannot be made liable for damage due to inexpert transport and installation. Claims
made under the guarantee in such cases are also invalid.
•
Gas transporting elements and electrically live components may only be installed, replaced or modified
by authorised specialist staff.
•
The appliance must be set up in a well-ventilated room, if possible under an extraction hood (see
DVGW Worksheet G 634).
•
The technical data for electricity and gas are to be found on the type plate on the front panel (A) (see
data sheet).
4.1 Setting up
Do not set up the equipment next to walls, kitchen furniture, and decorations or similar which are made of
flammable materials. Otherwise there is danger of fire. See connection diagram with equipment
description for minimum distance. Local fire protection regulations must be kept to absolutely!
It is of importance that the equipment be set up absolutely horizontal (use spirit level for alignment) so
that the doors can be opened and closed without any problem and that they seal tightly when closed.
Equipment with adjustable feet can easily compensate for unevenness in the floor (+/- 20mm) by turning
the bottom ends of the feet. If set up on a plinth, this is to have shims fitted underneath to compensate for
unevenness, if required.
4.1.1 Free-standing set-up
If the equipment is to be set up on its own, suitable means are to be used to protect it against tilting and
shifting.
4.1.2 Setting them up in groups or blocks
When setting up in groups or blocks, the equipment must be joined together by connecting elements
provided for this purpose. This is for the sake of hygiene. Observe equipment setting-up sheets or
assembly diagram (data sheet in annex).
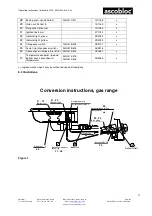
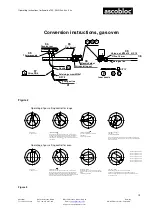
Appliance with gas-fired roasting and baking oven:
The flue gas duct supplied is firmly fixed to the flue gas duct of the oven using the screws supplied. The
slant of the flue gas duct must point to the operating side of the appliance.
Connection location
The connection compartment is accessed from the front. It is located behind the font panel A (see
connection diagram). Once the connection has been made, screw the front panel back in place.