background image

Arriflex 535B Quick Guide, 7/97a, Page 2 

Customer Support
If you have a question or problem, please contact one of our offices at the following addresses. In the case
of inquiries or when ordering parts, please refer to the camera model and serial number. 

Arriflex Corporation, East Coast

617 Route 303, Blauvelt, NY 10913-1109
Voice phone:

914-353-1400

FAX:

914-425-1250

Email:

[email protected]

Website:

http://www.arri.com

Arriflex Corporation, West Coast

600 North Victory Blvd., Burbank, CA 91502-1639
Voice phone:

818-841-7070

FAX:

818-848-4028

About This Quick Guide
If you are viewing the Adobe Acrobat version of this Quick Guide, best viewing and printing results can be
achieved through the use of the Acrobat Reader version 3.0 or later. The Acrobat Reader can be
downloaded for free from the Adobe web site at http://www.adobe.com. 

Safety Specifications
• When transporting the camera, make sure that the sliding door securing the field lens is all the way down. 
• In order to ensure optimal performance, it is essential that you acquaint yourself with this Quick Guide

and that you follow the operating instructions described herein. We strongly recommend that you also
acquaint yourself with the full 535B instruction manual. 

• Assembly and initial operation should only be carried out after carefully reading the instructions and

familiarizing yourself with the equipment and the assembly procedures!

• Use only original ARRI accessories and replacement parts!
• Clean optical surfaces only with an optical brush or a clean optical cloth! In cases of solid dirt, moisten an

optical cloth with pure alcohol (or brand-name lens cleaner).

• Do not use solvents when cleaning the film path!
• When adjusting the mirror shutter, turn the camera off and remove the power cable. Accidentally running

the camera while adjusting the mirror shutter can cause great damage. 

• Do not unscrew any screws which are sealed with locking paint!
• Never run the camera without a lens or a protective cap in the lens mount receptacle. 
• Never place your hand in the lens cavity or the inside of the camera while the camera is running! 
• Never open the movement or gate locking mechanism while the camera is running!

Содержание 535B

Страница 1: ...Support Information 2 Camera Left Front 3 Camera Right Back 4 1 Quick Specs 5 2 Loading Coaxial Magazines 6 3 Threading 8 4 Power On Camera RUN Inching 10 5 Changing Fps 11 6 Changing Shutter Angle 12...

Страница 2: ...performance it is essential that you acquaint yourself with this Quick Guide and that you follow the operating instructions described herein We strongly recommend that you also acquaint yourself with...

Страница 3: ...MODE button SEL button SET button Bubble level Image rotation knob Image rotation release Friction adjustment Viewfinder Viewfinder extension lock PL mount Mirror shutter LCD display Locking slider R...

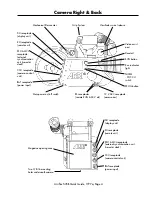
Страница 4: ...er Two 3 8 16 mounting holes underneath camera RS receptacles remote RUN 24 V dc BAT receptacle power input RU receptacle remote unit DU receptacle display unit ESU MCL receptacle external synchroniza...

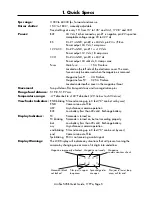
Страница 5: ...claws and two registration pins Flange focal distance 51 98 51 97 mm Temperature range 4 Fahrenheit to 122 Fahrenheit 20 Celsius to 50 Celsius Viewfinder Indicators END blinking Film end coming up in...

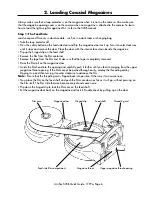
Страница 6: ...ve the tape from the film end Make sure that the tape is completely removed Place the film roll on the magazine door Guide the film head into the opening and carefully push it further until you feel i...

Страница 7: ...ate the magazine display by pressing the MODE button until the letters ft appear in the display Press the left SET button to increase the footage counter value by 100 Press the center SET button to in...

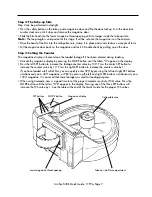
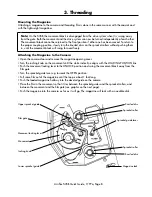
Страница 8: ...nching knob on the movement until the white index line aligns with the LOADING POSITION line Push the movement locking lever to the UNLOCK position and swing the movement block away from the film gate...

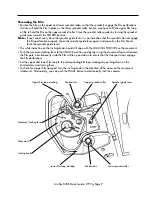
Страница 9: ...ket guide lever The white index line on the inching knob should still align with the LOADING POSITION on the movement Push the movement locking lever to the UNLOCK position and gently swing the moveme...

Страница 10: ...cator light glows red when the camera is in Standby the camera is not ready and pushing the RUN button will have no effect Inching The ARRIFLEX 535B can be inched manually with the inching knob or ele...

Страница 11: ...eed to be changed The display will show full frame speed plus three digits past the decimal point The 1 1000 th of a fps is displayed in the upper right hand corner of the display Note Set the NORM PS...

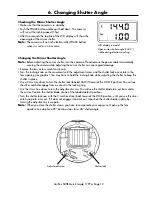
Страница 12: ...opening see graphic You may have to hold the inching knob while adjusting the shutter to keep the shutter in place Use a 2 mm hex driver to turn the shutter lock labeled CATCH towards the LOOSE posit...

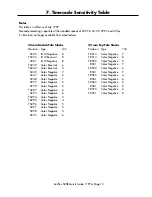
Страница 13: ...tive 6 8531 Color Negative 7 8550 Color Negative 4 8551 Color Negative 6 8560 Color Negative 6 8561 Color Negative 5 8570 Color Negative 6 8571 Color Negative 5 35 mm Kodak Film Stocks Emulsion Type T...

Отзывы: