background image

64

uruchomienie

commissioning

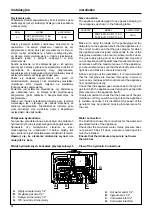
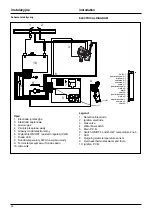
Kontrola regulacji gazu

Sprawdzenie ciśnienia zasilania

1. Zamknąć zawór gazu

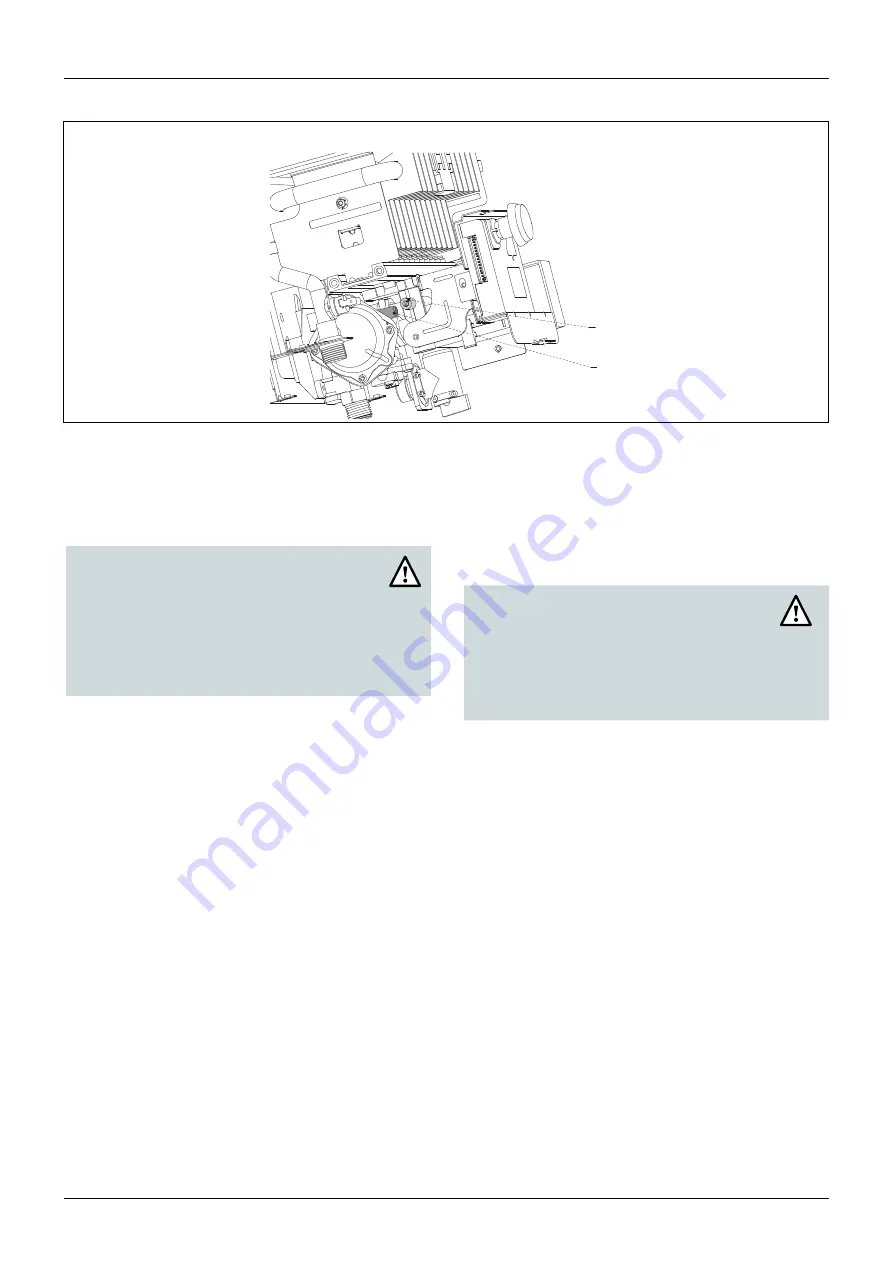
2. Poluzować śrubę b i założyć na króciec rurkę manometru

3. Otworzyć zawór gazu

4. Włączyć  urządzenie  odkręcając  kurek  z  ciepłą  wodą  i

dokonać pomiaru ciśnienia zasilania

5. Wyłączyć urządzenie zamykając kurek z ciepłą wodą

6. Zamknąć zawór gazu

7. Dokręcić szczelnie wkręt króćca b

8. Otworzyć  zawór  gazowy  i  sprawdzić  szczelność

odpowiednimi urządzeniami

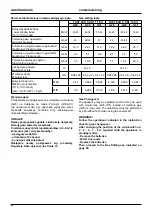
Sprawdzenie i regulacja mocy maksymalnej i 

minimalnej

(patrz Tabela regulacji gazu)

1.

Zamknąć zawór gazu

2.

Poluzować wkręt a i podłączyć do króćca manometru

3.

Otworzyć zawór gazu

4.

Wyciągnąć baterie

5.

Przełączyć mikroprzełącznik 1 w pozycję  ON i założyć

baterie – otworzyć kran z ciepłą wodą – dioda LED miga

na pomarańczowo – tryb serwisowy

6.

Przełączyć  mikroprzełącznik  2  w  pozycję  ON  –

urządzenie pracuje teraz z mocą maksymalną

7.

Ustawić 

ciśnienie 

maksymalne 

za 

pomocą

pomarańczowego potencjometru

8.

Przełączyć  mikroprzełącznik  2  w  pozycję  OFF  –

urządzenie pracuje teraz z mocą minimalną

9.

Ustawić 

ciśnienie 

minimalne 

pomarańczowym

potencjometrem

10. Na  koniec  przełączyć  mikroprzełącznik  1  na  OFF.

Zamknąć kran z ciepłą wodą

11. Dokręcić  szczelnie  wkręt  króćca  a,  otworzyć  zawór

gazu i sprawdzić szczelność za pomocą odpowiedniego
przyrządu

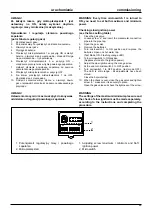
UWAGA!

Jeśli  ciśnienie  zasilania  znacząco  różni 

się  od  nominalnych  wartości  podanych 

w tabeli w niniejszej instrukcji – NIE 

URUCHAMIAĆ URZĄDZENIA!

a

b

Checking the gas settings 

Supply pressure check

1.

Close the gas valve.

2.

Loosen  screw  “b”  and  insert  the  pressure  gauge

connection pipe into the pipe tap.

3.

Open the gas valve.

4.

Switch the appliance ON by opening a DHW tap.

The supply pressure should correspond to the value

established in relation to the type of gas for which the

appliance is designed.

5.

Switch the appliance OFF  by closing the DHW tap.

6.

Close the gas valve.

7.

When the check is over, tighten screw “b” and make sure

it is securely in place.

8.

Open the gas valve and check the tightness of the screw.

Checking the maximum and minimum pressure

(see the Gas setting table)

1.

Close the gas valve.

2.

Loosen screw “a” and insert the manometer connection

pipe into the pipe tap.

3.

Open the gas valve.

4.

Remove the batteries.

5.

Turn microswitch 1 to ON position and re-place the

batteries. Open one hot water tap.

(Test Mode ON - Flashing orange LED).

6.

Turn microswitch 2 to position ON

(Appliance forced to maximum power).

7.

Adjust maximum burner pressure using the orange

screw.

8.

Turn microswitch 2 to OFF position

(Appliance forced to minimum power).

9.  Adjust minimum burner pressure using the orange screw.

10. At the end turn microswitch 1 to OFF position again (test

mode  OFF).  The  LED  is  still  orange  -  all  adjustments

have been stored.

Close the hot water tap.

11. When the check is over, close the gas valve and tighten

screw “a”, make sure it is securely in place

Open the gas valve and check the tightness of the screw.

WARNING!!
Should the power pressure not 

correspond to what indicated on the 

Gas Summary Table, DO NOT ACTIVATE 

THE DEVICE.

Содержание FAST EVO X ONT

Страница 1: ...EBRUIKER TECHNISCHE HANDLEIDINGVOOR INSTALLATIE EN ONDERHOUD MODE D EMPLOI POUR L UTILISATEUR NOTICETECHNIQUE D INSTALLATION ET D ENTRETIEN CHAUFFE EAU INSTANTANÉ À GAZ BADVERWARMER INSTRUKCJA DLA UŻYTKOWNIKA PRZEPŁYWOWY GAZOWY PODGRZEWACZ WODY INSTRUKCJE TECHNICZNEDOTYCZĄCE INSTALACJI OBSŁUGI ...

Страница 2: ...d of its working life the product should be disposed of separately from normal domestic household rubbish it must be disposed of at a waste disposal centre with dedicated facilities for electric and electronic appliances or returned to the retailer when a new replacement product is purchased The user is responsible for the disposal of the product at the end of its life at an appropriate waste disp...

Страница 3: ...zone dopiero po całkowitym napełnieniu wodą Dear Customer Thank you for choosing an ARISTON gas water heater We guarantee that your instantaneous water heater is a reliable and technically sound product This manual provides detailed instructions and recommendations for proper installation use and maintenance Remember to keep this manual in a safe place for future reference i e by the gas meter You...

Страница 4: ...ależy wyłączyć podgrzewacz ustawiając wyłącznik zewnętrzny instalacji elektrycznej na pozycję WYŁĄCZ Nie używać ani nie przechowywać w pomieszczeniu w którym jest zainstalowany podgrzewacz żadnych substancji łatwopalnych THIS BOOK USER S AND INSTALLATION MANUAL IS AN INTEGRAL AND ESSENTIAL COMPONENT OF THE PRODUCT MUST BE KEPT CAREFULLY BY YOU AND WILL ALWAYS ACCOMPANY THE APPLIANCE IN THE EVENT O...

Страница 5: ...to symbols Failure to comply with this warning implies the risk of personal injury in some circumstances even fatal Failure to comply with this warning implies the risk of damage in some circumstances even serious to property plants or animals Do not perform operations which involve opening the appliance Electrocution from live components Personal injury caused by burns due to overheated component...

Страница 6: ...gazu otworzyć okna i powiadomić personel techniczny Uszkodzenia ciała związane z poparzeniami wdychaniem szkodliwych substancji lub zatruciem Gdy wyczuje się silną woń gazu zamknąć główny zawór gazu otworzyć okna i powiadomić personel techniczny Eksplozje pożary lub zatrucia Damage to plastic and painted parts Do not use the appliance for any use other than normal domestic use Damage to the applia...

Страница 7: ...terii zlokalizowany w dolnej części urządzenia założyć 2 baterie 1 5 V LR 20 zachowując biegunowość 1 2 WARNING Installation first ignition and maintenance work must be performed by qualified personnel only in accordance with the instructions provided Incorrect installation may harm individuals animals or property the manufacturer will not be held responsible for any damage caused as a result If t...

Страница 8: ...C może spowodować poważne oparzenia Zawsze sprawdź temperaturę wody przed rozpoczęciem korzystania z urządzenia Battery replacement unhook the battery compartment cover placed on the bottom of the appliance remove the battery and replace observing the polarities indicated on the device ATTENTION Used batteries can not be dispersed in the environment Used batteries can not be utilized Ignition proc...

Страница 9: ...rządzenie Aby całkowicie odłączyć urządzenie należy ustawić pokrętło w pozycji OFF zamknąć zawór gazu i zdemontować baterie Power appliance and Water temperature adjustment The knob lets you adjust the water temperature and power Turn clockwise to increase power and temperature Turn anticlockwise to decrease power and temperature Switching off procedure Turn the knob to OFF position to switch off ...

Страница 10: ...ZANIE TEGO CZUJNIKA MOGĄ BYĆ ŹRÓDŁEM ŚMIERTELNEGO ZATRUCIA TLENKIEM WĘGLA Appliance shut off conditions The appliance is protected from malfunctions by means of internal checks performed by the electronic P C B which stops the appliance from operating if necessary In the event of lockout the red LED lights see table below To restore the system switch ON OFF the device Error code table Red L E D De...

Страница 11: ...gwarancyjnej urzadzenia Anti freeze protection Should the appliance be installed where pipes are subjected to freezing it is recommended to empty it Proceed as indicated below Turn the knob to OFF position to switch off the appliance Remove the batteries Close the cold water inlet isolation valve Open the DHW taps until both the appliance and pipes are completely emptied To fill the appliance agai...

Страница 12: ...troli jego wnętrza 69 Uwagi ogólne 70 Próba funkcjonowania 71 Operacje opróżniania 71 Informacje dla użytkownika 71 Tabliczka z danymi charakterystycznymi 72 Technické údaje 73 Karta produktu 74 Installation and servicing instructions Only for qualified technician overview 47 Advice for the installer 47 Safety regulations 49 product descrption 54 Overall view 54 Water circuit diagram 54 Dimensions...

Страница 13: ...ania spalin należy wyłączyć urządzenie wyciągnąć baterie i zamknąć zawór gazu Po zakończeniu tego rodzaju prac należy zlecić sprawdzenie skuteczności ciągu odprowadzania spalin osobom o odpowiednich kwalifikacjach technicznych Przed czyszczeniem zewnętrznej obudowy urządzenia należy je wyłączyć i wyciągnąć baterie THE INSTALLATION AND FIRST IGNITION OF THE APPLAIANCE MUST BE PERFORMED BY QUALIFIED...

Страница 14: ...może być włączone dopiero po całkowitym napełnieniu wodą When the work has been completed ask a qualified technician to check the efficiency of the ducting and the devices Turn the appliance OFF and remove the batteries to clean the exterior parts of the appliance Clean using a cloth dampened with soapy water Do not use aggressive detergents insecticides or toxic products If the appliance is used ...

Страница 15: ...szczenie w którym ma zostać zainstalowany kocioł oraz instalacje do których ma on zostać podłączony są zgodne z obowiązującymi przepisami Safety regulations Key to symbols Failure to comply with this warning implies the risk of personal injury in some circumstances even fatal Failure to comply with this warning implies the risk of damage in some circumstances even serious to property plants or ani...

Страница 16: ...jest ustawiona stabilnie że jest wystarczająco wytrzymała oraz że jej stopnie nie są uszkodzone ani śliskie Nie przesuwać drabiny gdy ktoś na niej stoi Podczas wykonywania prac na drabinie incorrectly Damage to the appliance caused by improper operating conditions Use suitable manual tools and equipment make sure in particular that the tool is not worn out and that its handle is fixed properly use...

Страница 17: ...ów uderzeniem skaleczeniem ukłuciem a także otarciami naskórka hałasem i wibracjami Ułożyćmateriałyinarzędziawtakisposób aby zapewnić pracownikom możliwość łatwego i bezpiecznego przemieszczania się Nie układać materiałów i narzędzi w cushionedbysemi rigidordeformable surfaces Personal injury caused by falling from a height Make sure the workplace has suitable hygiene and sanitary conditions in te...

Страница 18: ...onych rur lub wadliwych niepodłączonych części Sprawdzić czy rury odprowadzania spalin i dostarczania powietrza są drożne Wybuch pożar lub zatrucie spowodowane niewłaściwą wentylacją lub nieskutecznym odprowadzaniem spalin Sprawdzić czy przewody rurowe instalacji odprowadzania spalin są szczelne Zatrucia spowodowane nieskutecznym odprowadzaniem spalin restarting the appliance Explosions fires or a...

Страница 19: ...szkodzenie podgrzewacza spowodowane niewłaściwym spalaniem Jeśli wyczuwalny jest zapach spalenizny lub z podgrzewacza wydostaje się dym odłączyć urządzenie od instalacji elektrycznej zamknąć zawór dopływu gazu otworzyć okna i wezwać wykwalifikowanego pracownika serwisu Urazy spowodowane oparzeniami wdychaniem spalin zatruciem Jeśli wyczuwalny jest silny zapach gazu zamknąć zawór dopływu gazu otwor...

Страница 20: ...oniczny 9 Czujnik przepływu wody 10 Iskrownik 11 Przełącznik ON OFF i regulacja temperatury 13 Elektroda zapłonowa i jonizacyjna 14 Rama 15 Filtr na wlocie zimnej wody 16 Sonda temperatury wody Overall view Water circuit diagram A Hot water outlet 1 2 B Ingresso Gas 1 2 C Cold water inlet 1 2 Legend 1 Fume sensor 2 Combustion Hood 3 Heat exchanger 4 Burner 5 Gas collector 6 Overheat thermostat 7 G...

Страница 21: ...z na przeznaczonym dla niego miejscu zgodnie ze wszystkimi regułami i zasadami używając przy tym poziomicy A B C A B C b c Ø a d e g m f h i j k l Model Ø a b c d e f g h i j k l m waga weight całkowity gross czysty net 11 l 113 580 40 8 117 234 1 310 47 8 58 8 97 210 8 225 2 25 8 3 23 3 11 0 9 6 14 l 132 72 147 8 264 6 370 22 8 0 12 4 11 0 Overall dimensions A Hot water outlet 1 2 B Ingresso Gas ...

Страница 22: ...prawnego funkcjonowania podgrzewacza temperatury panujące w pomieszczeniu w którym jest on zainstalowany muszą odpowiadać założonym zakresom oraz powinno ono być zabezpieczone przed oddziaływaniem czynników atmosferycznych W trakcie organizacji miejsca instalacji podgrzewacza należy przestrzegać okreoelonych minimalnych odległości od ścian co zagwarantuje dostęp do urządzenia Before installing the...

Страница 23: ...jach zgodnie z zaleceniami krajowych norm dotyczących instalacji tego typu urządzeń i w zgodzie z ewentualnymi przepisami władz lokalnych i jednostek odpowiedzialnych za higienę i zdrowie publiczne Installation location Observe the regulations in force when deciding where to install the device Install the appliance in a PERFECTLY VERTICAL POSITION The device must not be installed near heat sources...

Страница 24: ...e ciśnienie minimalne wynosi nie mniej niż 2 2 bara Widok hydraulicznych końcówek przyłączeniowych A Wypływ ciepłej wody 1 2 B Przyłącze gazowe 1 2 C Dopływ zimnej wody 1 2 G Filtr na wlocie zimnej wody A B C G Gas connection The appliance was designed to use gases belonging to the categories as shown in the following table COUNTRY MODEL CATEGORIES FAST EVO X ONT 11 EU FAST EVO X ONT 14 EU II2H3 M...

Страница 25: ... the regulation in force and instructions provided by the manufacturer WHEN TYPE B INSTALLATION IS USED THE ROOM IN WHICH THE APPLIANCE IS INSTALLED MUST BE VENTILATED USING A SUITABLE AIR INLET WHICH COMPLIES WITH CURRENT LEGISLATION When installing an exhaust system take care of the seals to prevent any flue gas leaking into the air circuit WARNING NEVERTAMPERWITHORDECOMMISSION THE FLUE GAS SENS...

Страница 26: ...wody 9 Termostat przegrzewu i Sonda spalin 10 Iskrownik żółty 15 pomarańczowy 14 brązowy 13 czerwony 12 czerwony 12 czarny 10 pomarańczowy 9 zielony 8 biały 7 czarny 6 pomarańczowy 5 zielony 4 pomarańczowy 3 czerwony 2 czarny 1 ELECTRICAL DIAGRAM Legend 1 Detection Electrode 2 Ignition electrode 3 Gas valve 4 Water flow switch 5 Main P C B 6 Switch ON OFF and D H W temperature knob 7 LED 8 Outgoin...

Страница 27: ...tting ON Regulacja mocy maksymalnej Maximum power adjustment OFF Regulacja mocy minimalnej Minimum power adjustment ON Regulacja powolnego zapalania Soft light adjustment OFF Normalna praca Factory setting OFF ON OFF OFF ON G30 OFF ON OFF G31 14 EU G20 ON OFF OFF OFF ON G30 OFF ON OFF G31 Microswitch Microswitchs position see table below 2 1 ON 1 2 3 4 5 6 7 8 DIP OFF Led Jumper 1 Adjusting screw ...

Страница 28: ...tym roboczym zaworze gazu wewnątrz podgrzewacza nieaktywnym przy podgrzewaczu wyłączonym przez 10 minut licznik gazu nie powinien wykazywać żadnego przepływu Initial procedures To guarantee safety and the correct operation of the appliance the appliance must be prepared for operation by a qualified technician who possesses the skills which are required by law It s necessary check the gas adjustmen...

Страница 29: ...urę wody przed rozpoczęciem korzystania z urządzenia UWAGA Urządzenie może być włączone dopiero po całkowitym napełnieniu wodą First ignition The first start up must be carried out by a QUALIFIED TECHNICIAN Make sure that The gas valve is closed the exhaust duct for combustion products should be suitable and free from any obstructions Any necessary ventilation inlets in the room should be open typ...

Страница 30: ...trukcji NIE URUCHAMIAĆ URZĄDZENIA a b Checking the gas settings Supply pressure check 1 Close the gas valve 2 Loosen screw b and insert the pressure gauge connection pipe into the pipe tap 3 Open the gas valve 4 Switch the appliance ON by opening a DHW tap The supply pressure should correspond to the value established in relation to the type of gas for which the appliance is designed 5 Switch the ...

Страница 31: ...ry time microswitch 1 is turned to ON you need to set both maximum and minimum power Checking slow ignition power see the Gas setting table 1 Close the gas valve 2 Loosen screw a and insert the manometer connection pipe into the pipe tap 3 Open the gas valve 4 Remove the batteries 5 Turn microswitch 1 to ON position and re place the batteries Open one hot water tap Test Mode ON Flashing orange LED...

Страница 32: ...miana gazu Przekształcenie podgrzewacza z działania na metanie G20 na działanie na Gazie Płynnym G30 G31 lub odwrotnie może być dokonane wyłącznie przez Wykwalifi kowanego Technika przy zastosowaniu odpowiedniego Zestawu UWAGA Należy postępować zgodnie z instrukcją dotyczącą zmiany gazu zawartej w zestawie Po zmianie pozycji mikroprzełączników nr 4 5 6 7 8 konieczne jest w trybie standby wyciągnię...

Страница 33: ...UJ CZUJNIKA SPALIN SŁABY CIĄG KOMINOWY LUB ZAKŁÓCENIA WENTYLACJI POWODUJĄCE WYŁĄCZANIE TEGO CZUJNIKA MOGĄ BYĆ ŹRÓDŁEM ŚMIERTELNEGO ZATRUCIA TLENKIEM WĘGLA Appliance shut off conditions The appliance is protected from malfunctions by means of internal checks performed by the electronic P C B which stops the appliance from operating if necessary Switch off the appliance Shut off the gas valve remove...

Страница 34: ...1 Sprawdzić czy woda wypływa bez przeszkód 2 Sprawdzić czy ciśnienie wody nie jest za niskie Zbiorcza tabela kodów błędów Red L E D Description Checks to make Fixed Battery exhausted Replace battery Single flash Incorrect microswitch position 1 Verify the microswitch position see table page 23 Double flash Temperature probe defective 1 Check the cable of the temperature probe 2 Check the water pre...

Страница 35: ...dostać się do wewnątrz urządzenia należy zdjąć pokrętło 19 Odkręcić 3 śruby L Zdjąć obudowę z haków na rami L L L Instructions for opening the casing and performing an internal inspection Before performing any work on the appliance remove the batteries and close the gas valve To access the inside of the appliance you need to Remove the knob Remove the three screws L Fit the casing to the frame usi...

Страница 36: ...ÓCENIA WENTYLACJI POWODUJĄCE WYŁĄCZANIE TEGO CZUJNIKA MOGĄ BYĆ ŹRÓDŁEM ŚMIERTELNEGO ZATRUCIA TLENKIEM WĘGLA Maintenance is an essential part of the safe and efficient operation of the appliance and ensures its durability It should be performed according to the instructions given in current legislation Before beginning maintenance work Remove the batteries Close the gas valve and the domestic hot w...

Страница 37: ... pracy podgrzewacza Sprawdzić szczelność i poprawne działanie instalacji odprowadzania spalin poboru powietrza biorącego udział w spalaniu Sprawdzić czy palnik łatwo się zapala oraz skontrolować wzrokowo płomień palnika Operational test After having carried out the maintenance operations fill the appliance and the water circuit Begin operating the boiler Check the settings and make sure all the co...

Страница 38: ...ses which may be used 20 Temperature ambiante de fonctionnement 22 Max domestic hot water temperature Symbols used on the data plate Disposal and recycling the appliance Our products are designed and manufactured for most of the components of recyclable materials The appliance and its accessories have to be adequately disposed and the various materials diff erentiated where possible The packaging ...

Страница 39: ...n 11 14 Minimalny przepływ CWU D H W Minimum flow rate l min 2 3 Min ciśnienie wody Water pressure maximum bar 0 1 Minimalny przepływ CWU Water pressure minimum bar 10 0 Minimalny strumień powietrza potrzebny do spalania Required flow rate combustion air m3 h 35 9 45 4 Cig minimalny Minimum draft exhaust fumes Pa 8 12 Содержание СО2 CO2 content 6 3 6 7 Temperatura spalin przy nominalnej wydajności...

Страница 40: ...efficiency A A Efektywność energetyczna podgrzewania wody ηWH Water heating energy efficiency ηWH 74 79 Roczne zużycie energii elektrycznej AEC Annual electricity consumption AEC kWh 0 0 Roczne zużycie paliwa AFC Annual fuel consumption AFC GJ 6 12 Thermostat temperature setting Thermostat temperature setting C 55 55 Poziom mocy akustycznej w pomieszczeniu LWA Sound power level indoors LWA dB 60 6...

Страница 41: ......

Страница 42: ...420010936700 ...

Отзывы: