


12
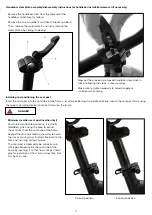
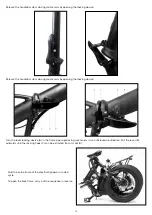
Maximum insertion seat post insertion limit
For structural reasons, to prevent the risk of damage and
to allow proper operation of the spring-loaded rear shock
absorber that connects the saddle column tube and the
vertical frame sheath, it is strictly not recommended to
insert the seatpost groove beyond the lower limit of the
column tube until any contact, or proximity of contact, with
the shock absorber.
Adjust and verify the presence of a suitable distance
between the aforementioned components to ensure
an adequate operating margin commensurate with the
supported load (see: user weight).
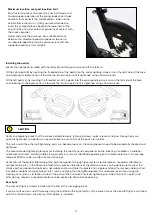
Installing the pedals
Locate the right pedal (marked with the letter R) and left pedal (marked with the letter L).
Fit the right pedal (R) by inserting the threaded pin of the pedal into the corresponding crank arm on the right side of the bike
and screwing it clockwise (turn it towards the front wheel) until it is tightened using a 15mm wrench.
Fit the left pedal (L) by inserting the threaded pin of the pedal into the corresponding crank arm on the left side of the bike
and screwing it anticlockwise (turn it towards the front wheel) until it is tightened using a 15mm wrench.
CAUTION
Verify and regularly check that the various bolted elements, fastening screws, quick releases and pass-through pins are
correctly tightened, and perform an overall check to ensure that all the parts are in order.
The nuts and all the other self-tightening parts can become loose so, these components need to be periodically checked and
tightened.
The recommended tightening torques for fastening the specific parts/components on the bike (e.g. handlebars, handlebar
attachment and stem, saddle, saddle clamp, wheels, etc.) can be identified depending on the relevant elements. An average
torque of 20Nm can be used for all other fastenings.
Verification of the correct tightening of the parts/components through lever systems (quick release, handlebar attachment,
seatpost collar, etc.), in the absence of technically precise indications of the relative values, can be done by testing that the
relative part/component being fixed is not mobile and/or unstable if subjected to a vigorous attempt to remove and/or extract
(handlebar, seatpost channel, wheels, etc.) and by verifying that the tightening lever has adequate resistance during the
closing phase (such as to leave a mark on the palm of the hand used for lever tightening, so-called "imprint on palm") and,
after closing, requires a considerable force to be exerted to allow relative opening.
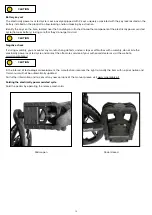
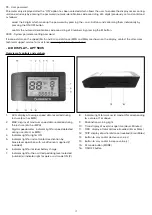
Rear light
The rear LED light is already installed on the end of the rear luggage rack.
It can be switched on and off manually using the button on the light itself or, at the same time as the front LED light is switched
on/off via the control on the display, if this option is included.
Содержание BiMax XL
Страница 1: ...English Italiano Polski e bikes user manual ...
Страница 2: ...01 English 02 Italiano 29 Polski 56 ...


