26 | EN
8. GENERAL PRINCIPLE OF OPERATION
Mechanical control circuit used in the mechanical clock-controlled oven (Module) control of
the oven function, showing the mechanical formats, such as furnace uptime, choose food
from the cooking guide, cooking demonstration of recipes, automatic cooking made from
the cooking guide, showing the cooking time, the timer (set the time counting backwards ,
making a sound when time runs out) and gives the internal temperature of the oven control
facilities.
The
furnace
consists
of
the
following
combined
and
features.
- Depending on the temperature inside the oven
(120 ° C ± 20 ° C (1st stage), 300 ° C ± 20
° C (2nd level there are only pyro oven), between the cooling fan control.
- The internal temperature of the furnace can be adjusted between
40 ° C to 280 ° C (± 5 °
C
accuracy,
±
10
°
C
accuracy
from
250-280C)
- Tim (warning time) can be set between 23 hours and 59 minutes to 1 minute.
- The cooking time can be set from 1 minute to 5 hours and 59 minutes.
-Select
the
endofthecooking
time
memories
-1100
/
2200WHealth
grill
resistance
-1800Whealthturbo
resistance
-Healthupperovenheating
1100W
-Lower
ovenheating1200W
health
-22Wness
Fan
Motor
-The
rotisserie
function
feature
(works
on
the
grill
function.)
(Optional)
Although
.Fır any wrong operation is protected by a bi-metal type thermal breaker. Pyro
ovens Bi-metal type in an external furnace is on the left rear upper side of the chassis and
the operating temperature of the thermal breaker oven
to 250 ° C. When he came inside the
furnace to a temperature of 350-400
° C is separated from the phase conductor feeding **.
* Look Out !!!!! The furnace consists of a situation gone wrong on the furnace when thermal
cutting horse. (Such as the operation of the oven temperature sensor) should resolve the
situation
bulunarak
error
before
forming
replaced.
The cooling fan is connected to the temperature inside the oven
(120 ° C ± 20 ° C (1st
stage), 300
° C ± 20 ° C (2nd level there are only pyro oven), between engaged and ground
inside until it fell to about
160 ° C continues to work. a time to throw heat on the cooling
engine is turned off, even after baking oven control circuit will continue to further study.
Содержание BARBAROS
Страница 1: ...1 EN BARBAROS BUILT IN BI OVEN SERVICE MANUAL ...
Страница 13: ...13 EN ...
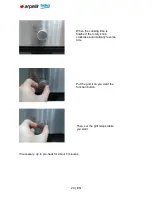
Страница 21: ...21 EN Closing the grid Function button to the off upper position ...
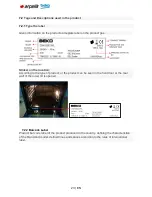
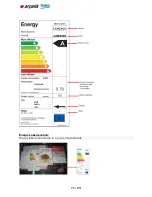
Страница 25: ...25 EN Energy Label lacatıon Energy label products are in a group of periodicals ...
Страница 31: ...31 EN 10 2 Lamp Fault 10 2 1 Furnace is working but the oven does not illuminate ...
Страница 32: ...32 EN 10 2 2 Oven does not work oven lamp does not light ...
Страница 33: ...33 EN 10 3 Termostat Fault 10 3 1 Furnace runs continuosly the thermostat is not tripped ...
Страница 37: ...37 EN 12 COMPONENT ASSEMBLY DISASSEMBLY BE USED IN EQUIPMENT Screwdrivers needlenose Nippers ...
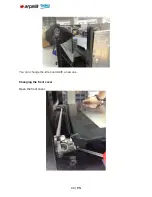
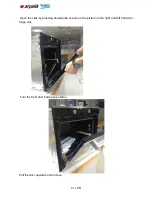
Страница 40: ...40 EN You can change the idle board with a new one Changing the front cover Open the front cover ...
Страница 44: ...44 EN After removing the screws pull as seen in the picture below ...
Страница 45: ...45 EN Remove the vent cover on the side of the decor Get the vent from the metal sheet ...
Страница 47: ...47 EN Pull out the handle grip pins down the drain This can change the blade remains in the grip handle ...
Страница 48: ...48 EN Changing the upper wall Screw off the screws of the top wall Then lift the top wall up ...
Страница 52: ...52 EN View ot the bulbin oven cavity can be seen in the picture ...
Страница 56: ...56 EN By removing the air conditioning thermostat replace the screws Removing the rear wall ...
Страница 57: ...57 EN Remove the 8 screws shown in the picture above ...
Страница 58: ...58 EN Rear wall opens rıgh ward Lift the rear wall up by the area marked red ...
Страница 60: ...60 EN Remove the bottom of the base plate to ground as shown in the parts of the picture ...
Страница 62: ...62 EN Remove the upper left side of the switch is down the drain and replace it in the oven Switch picture ...
Страница 67: ...67 EN Screw off the 2 screws Pull it yourself to remove resistance ...
Страница 75: ...75 EN Replacing the oven lamp Remove the lamp s glass Replace the old lamp with new one ...
Страница 80: ...80 EN Screw off the 2 screws that connect air ventilation with back panel of the oven ...
Страница 84: ...Envelope IV 84 EN ...

