7 | EN
5. PRODUCT ASSEMBLY/ ASSEMBLY RULES/ SETTINGS
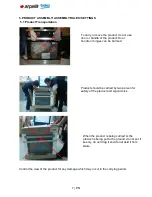
5.1 Product Transportation
Control the view of the product for any damage which may occur in the carrying period.
To carry or move the product, do not use
door or handle of the product. Door,
handle or hinges can be harmed.
Product should be carried by two person for
safety of the product and ergonomics
When the product is being carried or the
product is being put to the ground, do not put it
keenly, do not drag it and do not skid it from
stairs.
Содержание BARBAROS
Страница 1: ...1 EN BARBAROS BUILT IN BI OVEN SERVICE MANUAL ...
Страница 13: ...13 EN ...
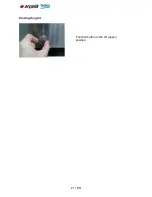
Страница 21: ...21 EN Closing the grid Function button to the off upper position ...
Страница 25: ...25 EN Energy Label lacatıon Energy label products are in a group of periodicals ...
Страница 31: ...31 EN 10 2 Lamp Fault 10 2 1 Furnace is working but the oven does not illuminate ...
Страница 32: ...32 EN 10 2 2 Oven does not work oven lamp does not light ...
Страница 33: ...33 EN 10 3 Termostat Fault 10 3 1 Furnace runs continuosly the thermostat is not tripped ...
Страница 37: ...37 EN 12 COMPONENT ASSEMBLY DISASSEMBLY BE USED IN EQUIPMENT Screwdrivers needlenose Nippers ...
Страница 40: ...40 EN You can change the idle board with a new one Changing the front cover Open the front cover ...
Страница 44: ...44 EN After removing the screws pull as seen in the picture below ...
Страница 45: ...45 EN Remove the vent cover on the side of the decor Get the vent from the metal sheet ...
Страница 47: ...47 EN Pull out the handle grip pins down the drain This can change the blade remains in the grip handle ...
Страница 48: ...48 EN Changing the upper wall Screw off the screws of the top wall Then lift the top wall up ...
Страница 52: ...52 EN View ot the bulbin oven cavity can be seen in the picture ...
Страница 56: ...56 EN By removing the air conditioning thermostat replace the screws Removing the rear wall ...
Страница 57: ...57 EN Remove the 8 screws shown in the picture above ...
Страница 58: ...58 EN Rear wall opens rıgh ward Lift the rear wall up by the area marked red ...
Страница 60: ...60 EN Remove the bottom of the base plate to ground as shown in the parts of the picture ...
Страница 62: ...62 EN Remove the upper left side of the switch is down the drain and replace it in the oven Switch picture ...
Страница 67: ...67 EN Screw off the 2 screws Pull it yourself to remove resistance ...
Страница 75: ...75 EN Replacing the oven lamp Remove the lamp s glass Replace the old lamp with new one ...
Страница 80: ...80 EN Screw off the 2 screws that connect air ventilation with back panel of the oven ...
Страница 84: ...Envelope IV 84 EN ...


