background image

12

If replacing a racing shield (with tear-off posts) with a standard shield (no tear-off posts) it
may be necessary to adjust the shield position. The standard shield is curved top-to-bottom
so as to be more aerodynamic. This may make it too loose if mounted in the same position
as the racing shield, which is less curved top-to-bottom.

If the standard shield is too loose when installed, loosen all four mounting screws on the
base plates, lubricate the eye port trim with the silicone provided, mount the shield and
adjust so that the shield comes all the way of the locked down position and seals tightly
against the eye port trim. Holding the shield firmly in place tighten all four screws then
attach the side holders and test shield operation.

NOTE: The racing shield operation may be stiff compared to a standard shield, but should
close solid and tight. Routine eye port trim lubrication is recommended if shield operation
becomes stiff.

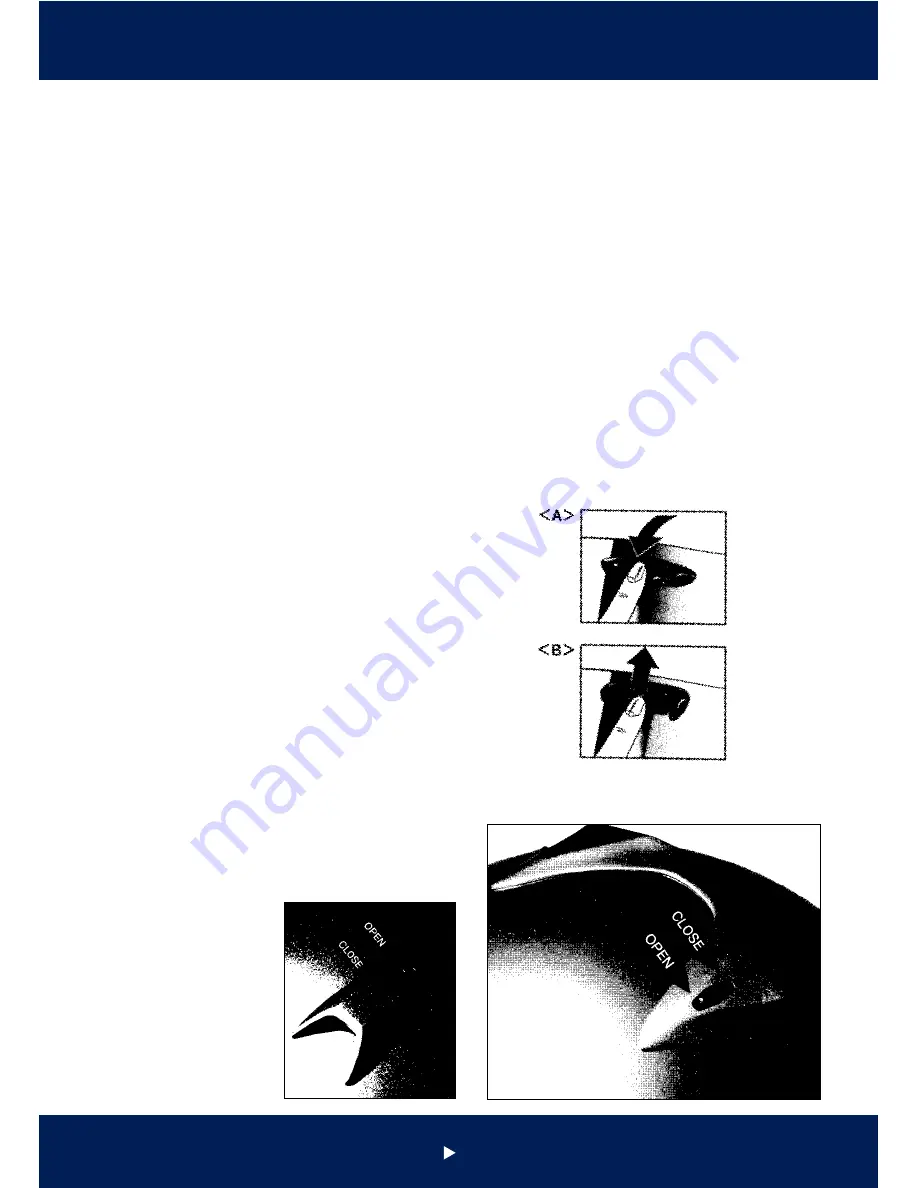
To operate brow vents

Type <A>; The Brow vents are operated from
fully closed through intermediate, to fully
open positions by simply pulling the louver
control down to open, pushing up to close.

Type <B>; The Brow vents are operated from
fully closed through intermediate, to fully
open positions by simply pulling the louver
control up to open, pushing down to close.

To operate top ducts

Simply push the switches on each duct to
open/close the ducts as illustrated. 

Содержание GP-5X

Страница 1: ...English INSTRUCTION MANUAL GP 5X Please read before wearing helmet ...

Страница 2: ... Every Arai helmet which in the opinion of Arai Helmet Europe B V shows any signs of material or manufacturing defects within five years of purchase will be repaired free of charge at the original purchaser or replaced at the discretion of Arai if it is sent carriage paid in the original packaging to the importer in the country of purchase Any alterations effected by the purchaser or third parties...

Страница 3: ...ther in rotation and or fore aft the skin should be pulled by the lining If the lining slips easily over the skin the helmet is too large In the event of an accident you will be subject to impacts that can come from any direction Some may tend to lift the helmet from your head Therefore it is imperative that your chinstrap is securely fastened kee ping your helmet firmly in place whenever you ride...

Страница 4: ... the visor After drying install the visor as described in the owners manual Tip Clean the visor on a regular basis preferably directly after use in order to remove remains of insects and other dirt more easily The space between the shield holder side pod and the helmet can also become very dirty which may have an adverse effect on the visor operation Remove and install the holders in accordance wi...

Страница 5: ...r helmet be sure to protect the entire inside of the helmet from the paint spray by masking all openings with paper and tape as paint can adversely effect the shock absorbing liner and plastic components Use only air drying paint not paints that require heat curing Under any circumstance Do not remove any trim rubber Do not remove the inner shell Do not remove the chinstrap Although your helmet is...

Страница 6: ...competent inspection or discarded and replaced by a new ARAI helmet Do not park helmet on mirror stalks or sissy bars to avoid damage to liner Do not carry helmet on the motorcycle s helmet lock while riding to avoid exhaust pipe burns tire abrasion and strap damage Keep helmet out of the reach of pets to avoid the interior being chewed like a shoe or scratched like a sofa as all too often happens...

Страница 7: ...the end of the strap from flapping in the air stream 2 WARNING It is not part of the retention system and should not be relied upon even when carrying the helmet by the strap as it will release under little stress A D ring release tab is provided to make the loosening of the rings easier Simply pull as illustrated in 3 Storage Always store your Arai helmet at room temperatures in the original clot...

Страница 8: ... To replace posi tion the shield in place and install guides washers and screws as illustrated Notes on shield with tear off posts and instructions for tear off optional Proper tear off optional is for racing use only Never use for street riding Some tear offs come with protective film on one or both sides Be sure to remove any films that may be present A To install tear offs slip the hole of the ...

Страница 9: ...tiple tear offs fold the pull tab of the first tear off so that the large grab hole fits loosely of the shield post and crease the fold flat E Install successive tear offs in the same manner as the first fold the pull tab between each tear off Folding the last tab is not necessary but this will make grabbing it easier Do not stack on too many tear offs as this may distort or diminish vision At hig...

Страница 10: ...ightly against the eye port trim Holding the shield firmly in place tighten all four screws then attach the side holders and test shield operation NOTE The racing shield operation may be stiff compared to a standard shield but should close solid and tight Routine eye port trim lubrication is recommended if shield operation becomes stiff To operate brow vents Type A The Brow vents are operated from...

Страница 11: ...overing at the forward lower edge of the cheek pad assembly This should be re inserted after reinstalling the cheek pad except for G type helmets such as Signet GT and Maverick Hereby the tabs should not be removed at all Pull pad toward the rear of the helmet then inward to release and slide it off the strap Installation in reversed order ensure that chinstrap is in the correct position WARNING N...

Страница 12: ...t to Change Without Notice Contact ARAI HELMET LIMITED 12 Azuma cho 2 chome Saitama City 330 Japan ARAI HELMET AMERICAS LIMITED P O Box 9485 Daytona FL 32120 U S A ARAI HELMET EUROPE B V P O Box 112 3870 CC Hoevelaken The Netherlands ...

Отзывы: