background image

12

             SETTING THE WATER TEMPERATURE

The AquaStar 80 water heater contains a flow
restrictor set at 3 1/4 gpm.  Its purpose is to as-
sure that the hot water temperature will always
be within a comfortable range regardless of how
high one may turn on the hot water faucet or how
many faucets may be turned on.  Your AquaStar
model 80 also has an automatic thermostatic con-
trol with a manual temperature setting (Fig. 2 let-
ter H p. 6).  For energy efficient operation, we
recommend operating this heater at the lowest
temperature which you require in your applica-
tion.  This will provide a more consistent tempera-
ture over a wider range of flow.  Lower tempera-
ture settings help prevent temperature fluctuations
that may occur when other water outlets are used
simultaneously or overall water pressure changes
or excessive cold water has to be added.  In hard
water areas, reducing the water temperature
greatly reduces the potential for mineral scale
build-up in the heat exchanger.

What is the best temperature setting?
Because AquaStar water heaters can deliver
endless hot water at the exact temperature which
you have selected, there is no need to set it for
very hot water and then mix in cold.  It just doesn't
make sense to overheat water then mix in a lot

of cold water to cool it off.  Remember you can-
not run out of hot water with an AquaStar, so set
the dial for the (exact) temperature that you need.

MAINTENANCE AND SERVICE

Approximately once a year, the AquaStar should
be checked, cleaned and serviced as necessary.
The following operations must be performed by
a qualified service person:
Vent System:  Should be checked annually.
Clean and repair as needed.
Water Valve (Part #34343):  The water valve on
this heater should be serviced periodically de-
pending on hardness of water and conditions of
use or whenever signs of corrosion appear at the
gas and water valve joint.  Servicing the water
valve consists of replacing the Push Rod Assem-
bly (part #21107), the Diaphragm (part# 32570),
and the Water Valve Spring Loaded Piston (part
#34542).

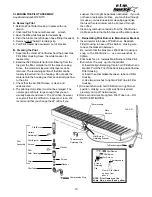
Drainage: Drain the heater if there is any dan-
ger of freezing.  Shut off the water supply, open
all hot water faucets, and disconnect the lowest
AquaStar fittings and the connections to the wa-
ter valve (Fig 2, (R), page 6).  Loosen the 2 re-
taining screws at the connection to the gas valve
and rotate the water valve 360

o

 to empty all the

water.  The pressure-temperature relief valve op-
eration should be checked.  Perform a manual
operation of this valve at least once a year en-
suring that a drain is nearby to receive any dis-
charge (see section 5, page 10).  Take precau-
tions to avoid contact with hot water coming out
of discharge opening and to prevent water dam-
age.  Do not plug the relief valve.  If the relief

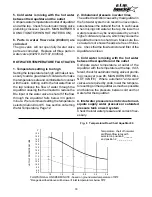
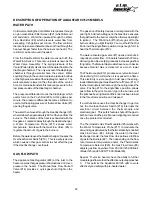
  Note:  105ºF is the maximum recommended
for a hot bath.  The temperature you select will
hold over a range of water flow rates.  (See chart,
Fig. 6, page 18).  You may further vary the tem-
perature by signficantly changing the flow rate,
particularly at the highest temperature settings.

  model "S" version heater.  The model "S"
   is a specifically modified AquaStar which will
  not overheat if inlet water is already hot.

Position "5" on the temperature dial is the pre-
ferred starting point for setting the temperature
control.  This setting provides approximately
130ºF depending on the flow rate.
Positions "2" and "3" provide approximately
105ºF, adequate for a shower depending on flow
rate.
Positions "4" through "6" are intermediate set-
tings between warm and very hot.
Position "8" allows for the hottest temperature of
about 150ºF up to about 1.8 gallons per minute.
WARNING:  150ºF can cause third degree
burns.

Содержание 80 VP

Страница 1: ...s phone Follow the gas supplier s instructions If you cannot reach your gas supplier call the fire department Installation and service must be performed by a qualified installer service agency or the...

Страница 2: ...burners and is ignited by the pilot flame The heat exchanger then absorbs the heat generated by the burners and transfers it to the cold water as it travels through the heat exchanger When the hot wat...

Страница 3: ...GAS PRESSURE FOR HIGH ALTITUDES The pressure regulator provided with the heater is set to deliver the proper gas pressure as indicated on the rating plate and in the manual for altitude up to 2500 fe...

Страница 4: ...stic potable water a mixing valve or other similar device must be provided to reduce scald hazard potential DO NOT CONVERT AN EXISTING CLOSED HOT WATER HEATING SYSTEM TO A COMBINATION SPACE AND POTABL...

Страница 5: ...days 9 Should overheating occur and the gas supply fail to shut off turn off the manual gas control valve to the appliance 10 See instructions on setting the water tempera ture page 12 11 Do not use...

Страница 6: ...P M Z K H J G F D E C B A I Y Fig 2 Parts of AquaStar 80 L T pilot V overheat shut off sensor W draft hood X rating plate serial gas type etc Y incandescent particles tray Z gas pressure testing nippl...

Страница 7: ...t water lines insulated 6 Having a floor drain or sink nearby is handy in case you need to drain water from your heater 7 Place the heater in a location where water leaks will do NO DAMAGE to adjacent...

Страница 8: ...reful not to lose the washers Re move your heater from the Water and Gas Con necting Strip Now you can make your water and gas connections as explained in the following sections When all connections h...

Страница 9: ...lator to the gas piping the indicator arrow on the regulator must be pointed in the direction of gas flow NOTE The regulator supplied with the heater is an appliance level regulator de signed for low...

Страница 10: ...lowing all local ordinances and specifications for installing a gas appliance vent or chimney The gasses to the outdoors under all operating con venting system must be constructed so as to develop a p...

Страница 11: ...r Immediately call a qualified service technician to inspect the appliance and to replace any part of the control system and any gas control which has been under water LIGHTING INSTRUCTIONS 1 STOP Rea...

Страница 12: ...should be serviced periodically de pending on hardness of water and conditions of use or whenever signs of corrosion appear at the gas and water valve joint Servicing the water valve consists of repl...

Страница 13: ...column Yellow flames could be a sign of wrong size gas orifices or dirty burners If some burn ers have yellow flames while others have good flames it is likely that dust lint or spider webs have parti...

Страница 14: ...urnished with the heater is designed for low PILOT WILL NOT LIGHT 1 No gas to the AquaStar A Gas cock on gas line may not be open B AquaStar manual shut off valve at base of heater is not open Turn ha...

Страница 15: ...years old it is very unlikely that they are faulty Before testing reconfirm that 2 is absolutely cor rect and all connections are clean and tight To test the thermocouple disconnect the thermo couple...

Страница 16: ...e is good To test the electromagnet reconnect the thermo couple and take another reading The reading should drop to about 14 mv If it does not re place the electromagnet PILOT LIGHTS BUT GOES OUT DURI...

Страница 17: ...ature selector dial on 4 or 5 For more information see section on Setting Water Temperature Page 12 2 Inlet water temperature is too high as with preheated water Note Only the Model S AquaStar should...

Страница 18: ...t In such cases when mixing cold water at the tap the lower hot water pressure may be overpowered by a much higher cold water presure which may cause the AquaStar burners to shut down Make sure fau ce...

Страница 19: ...Housing b Insert the other Gasket between tube and Filter Housing c Use two wrenches to tighten Pilot Tube to Filter Housing 1 One wrench should hold Pilot Burner in right most position making sure ri...

Страница 20: ...4 Leaving temperature setting at 2 now increase water flow on higher You should see the burner flames increase in size and then decrease when you reduce the water flow 5 Note If all of the above perfo...

Страница 21: ...omponents O Ring and Steel Wedge prior to installing the replacement thermostat 1 Shut off gas to the heater by turning the handle on the main gas valve 2 Shut off the water supply to the heater and o...

Страница 22: ...s Flow Shut off Valve 14 provides a quick gas shut off right on the heater The gas shut off safety devices are integrated with the pilot light An Electro Magnet in the Gas Valve ensures thatgasflowsto...

Страница 23: ...LY 9 PILOTLIGHT 10 PILOTLIGHTORIFICE 11 PILOTLIGHTGASFILTER 12 THERMOCOUPLE 13 ELECTROMAGNET GAS FLOW SHUT OFF VALVE 14 MANUAL GAS FLOW SHUT OFF VALVE 15 PILOT STARTER KNOB 16 THERMOSTATIC MODULATOR A...

Страница 24: ...RIGHT SIDE PANEL 38799 LEFT SIDE PANEL 22527 TEMPERATURE SELECTOR KNOB 23617 PANELRETAINING SCREW 28329 PILOT STARTER KNOB 36540 FRONT PANEL 33993 INCANDESCENT PARTICLETRAY HOUSING COMPONENTS DIAGRAM...

Страница 25: ...LECTING STRIP 25776 WASHER 25779 HEAT EXCHANGER FRAME RETAINING SCREW 27126 WASHER 29596 THERMOCOUPLE ELECTROMAGNET LEAD WIRE TERMINAL RETAINING SCREW 29910 INLET WATER FLOW RESTRICTOR 31851 COLD HOT...

Страница 26: ...S 36546 BURNER MANIFOLD WITH LP INJECTORS 36548 LP GAS SLOW IGNITION MEMBRANE ASSEMBLY 36549 LP MAIN VALVE ASSEMBLY 36650 NG MAIN VALVE ASSEMBLY 37167 MODEL S GAS MAIN VALVE ASSEMBLY 37613 MODEL S NG...

Страница 27: ...opane Natural Gas Model 80 25 100 150 170 NR 25 80 Model 80 15 50 100 125 NR 20 50 100 170 NR NR 35 70 Flex tubing greatly reduces capacity and therefore is not recommended Minimum Vent Size and Heigh...

Страница 28: ...l use and service within the applicable periods specified below in accordance with the terms of this warranty The CEC replacement will be warranted for the unexpired portion of the original warranty T...

Отзывы: