Aqualisa OPTIC Q Скачать руководство пользователя страница 10

Adjustable Head

To avoid water dripping from the shower head after 
use, we advise to tilt the head back to allow residual 
water to drain out.
The above recommendation applies to both adjustable  
and fixed shower heads.
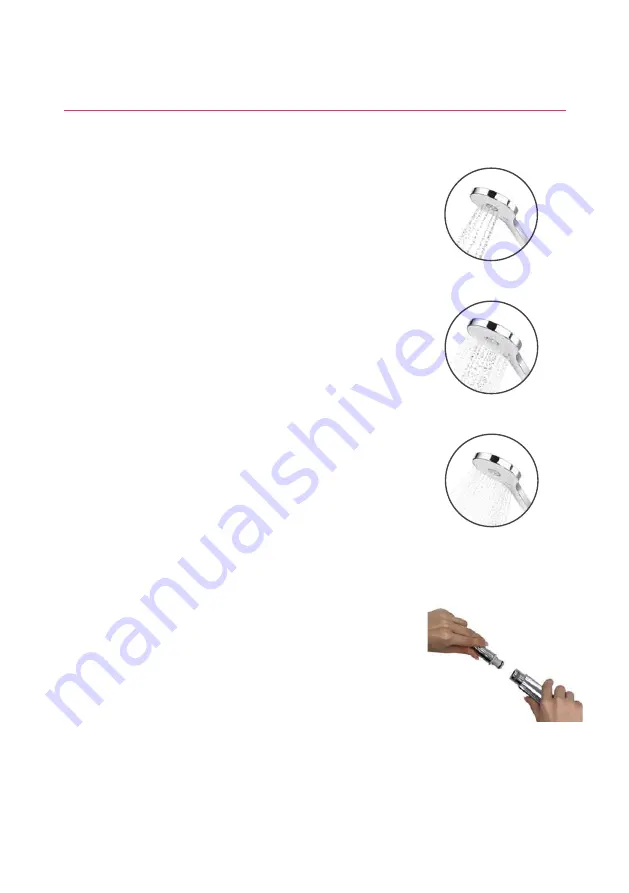
Rotate the spray plate lever clockwise or anticlockwise 
to select the desired spray pattern.
To select the preferred height for the shower head, 
squeeze the side levers together to allow the handset 
holder to move up or down the rail.
Angular adjustment is made by carefully but firmly 
pulling forwards or pushing back the shower head 
against the ratchet in the holder.
Removing the shower head: With the hose still 
attached, disengage the pivot clip by pushing in the 
outer grey button located on the front of the shower 
head (near to the hose connection). Remove the 
threaded spigot from the bottom of the handset by 
using the hose to pull clear. To reattach: Ensure the 
hose washer is in the correct position, tighten the 
threaded spigot into the hose using a suitable spanner, 
taking care not to over-tighten. Reinsert the spigot 
into the handset and engage the pivot clip prior to 
placing the handset into the handset holder.

3. Outer

2. Middle

1. Inner

Vita™ Head

10

Содержание OPTIC Q

Страница 1: ...OPTIC USER GUIDE...

Страница 2: ...ory or mental capabilities or lack of experience and knowledge if they have been given supervision or instruction concerning use of the appliance in a safe way and understand the hazards involved Chil...

Страница 3: ...o date with latest features for the Aqualisa app and voice activation by visiting the Aqualisa website Download and open the free Aqualisa app Find instructions on page 15 Connecting to the App If you...

Страница 4: ...Push and hold QTM lever for over 3 seconds then release when desired outlet icon appears Adjust during showering only Adjust before or during showering Divert models only You can prepare your temperat...

Страница 5: ...rds the controller the display wakes up and is ready to go You can disable this feature in the Settings menu see page 12 Wake up The proximity sensor detects any object directly in front at approximat...

Страница 6: ...the shower STARTING YOUR SHOWER To activate the controller use the proximity sensor or touch the power symbol until the screen wakes up then push and release the lever to start the shower The Get Rea...

Страница 7: ...urn clockwise to increase the temperature While the temperature is adjusting the screen will flash and the display will show Warming When the desired temperature is reached the display will stop flash...

Страница 8: ...w 39 FLOW FEEDBACK DISPLAY After adjusting the flow the display will return to the temperature Home screen after a few seconds From the Home screen you can adjust the flow during showering by moving t...

Страница 9: ...ernate between outlets by pushing and holding the lever for over 3 seconds and releasing when the desired outlet icon appears This can be done upon starting the shower or during showering OUTLET ICONS...

Страница 10: ...ly but firmly pulling forwards or pushing back the shower head against the ratchet in the holder Removing the shower head With the hose still attached disengage the pivot clip by pushing in the outer...

Страница 11: ...erfilled this may not be sufficient to prevent the bath from overflowing depending on system conditions The angle of the fixed shower head can be adjusted The shower head is mounted on a multi directi...

Страница 12: ...pear to confirm your choice Settings Optic Q features optional settings to enhance your shower To enter Settings from the Home Screen move the lever left or right until the Settings screen appears Pus...

Страница 13: ...e shower functionality using your personal smart devices Wifi Auto Wake up AUTO WAKE UP This setting allows the Wake Up feature to be turned off This may be required if you have a small shower enclosu...

Страница 14: ...installation When you have selected the icons your choice will be confirmed with OK This setting enables you to choose the icons that represent your outlets If you have multiple outlets you can also s...

Страница 15: ...ort can be raised To trigger the Instabug service either shake your smartphone from side to side or tap on the message bubble then simply follow the instructions Home Wifi Network Before starting you...

Страница 16: ...www aqualisa co uk smartapp Set up Shower Wifi The Aqualisa app will direct you to the Wifi settings menu on your mobile device From the list of available Networks select QSVC XXXX The password is Sm...

Страница 17: ...that baths and showers in operation are not left unattended Auto Wake up The Proximity Sensor AUTO WAKE UP The controller has a proximity sensor so as you approach or move your hand towards the contr...

Страница 18: ...rocedure should be completed regularly as often as once a week in some hard water areas as scale build up can affect the spray pattern and cause the shower to perform poorly Failure to descale the sho...

Страница 19: ...e flow starts to splutter stop moving the temperature control until the flow again stabilises then continue to move the dial towards the hottest setting Restriction in the waterway Check for debris in...

Страница 20: ...t the filters are clear check with the local water authority Separate stand alone pump not activating Standard Aqualisa SmartValveTM only Ensure sufficient flow to activate the flow switches of the pu...

Страница 21: ...es not stabilise Hot water supply issue Check another hot water outlet to ensure that hot water is available Mixed water supplies Water supplies MUST be from the same source MUST NOT be gravity hot an...

Страница 22: ...ring Diagram Section in the Smart Installation Guide Outlets not configured Turn off the power supply to the Aqualisa SmartValveTM leave isolated for at least 2 minutes Reinstate power supply and then...

Страница 23: ...n selected wait a few seconds and then return to the Aqualisa app Ensure that you are keying your SSID home Wifi and password correctly The operation could not be completed when trying to start shower...

Страница 24: ...a totally free of charge 1 year parts and labour guarantee You can easily increase your FREE guarantee to 5 years simply by registering your product Please keep your receipt to validate your guarante...

Страница 25: ...ak to our Customer Service team on 01959 560010 Use Live Chat at aqualisa co uk Or email us at enquiries aqualisa co uk Instabug reporting platform for the Aqualisa app Accessed in the app by Shaking...

Страница 26: ...Notes 26...

Страница 27: ...Notes 27...

Страница 28: ...right to alter change or modify the product specifications without prior warning Registered Trademark Aqualisa Products Limited Q5285 Part No 705145 Issue 03 Dec 20 THE FLYERS WAY WESTERHAM KENT TN16...

Отзывы: