56
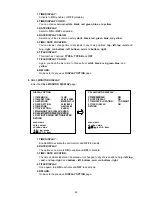
5. ALARM SETTING:
Use the shuttle ring to choose
ENABLE
or
DISABLE
.
During the scheduled time you can set another alarm setting to override the normal alarm settings.
Press the
enter
button to ENTER the scheduled ALARM SETTING page. You can set the various
alarm-related functions in this page. Please refer to 5.6.1 for more details.
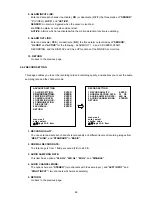
6. RECORD SETTING:
Use the shuttle ring to choose
ENABLE
or
DISABLE
.
During the scheduled time you can set the schedule record quality and rate to override the normal
recording settings. Press the
enter
button to ENTER the scheduled RECORD SETTING page. You can
set the motion detection and other functions. Please refer to 5.6.2 for more details.
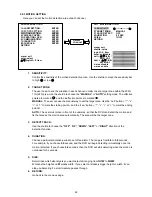
7. MOTION SETTING:
Use the shuttle ring to choose
ENABLE
or
DISABLE
.
Each and every channel can be set to override the normal motion settings and has a separate
scheduled motion detection setting during the scheduled time. Press the
enter
button to ENTER
the scheduled MOTION SETTING page. Please refer to 5.6.3 for more details.
8. RETURN:
Go back to the previous page.
NOTE: If the times of schedules are the same and there are different settings for each one,
then the schedules listed under the smaller numbers have precedence over the others with
the bigger numbers.
5.6.9 RETURN
To exit the “
ADVANCED
SETTING
” page choose “
RETURN
” and go back to the “
MAIN
MENU
” page.
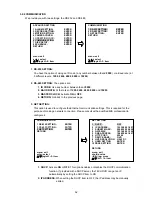
5.7 DEFAULT SETTING
This page enables you to save and reload the default settings.
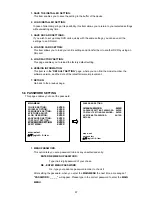
ADVANCED SETTING
1 ALARM SETTING:
ENTER
2 RECORD SETTING:
ENTER
3 MOTION SETTING:
ENTER
4 CAMERA COVER:
ENTER
5 OPERATION LOCK:
ENTER
6 COMMUNICATION:
ENTER
7 DISK SETUP:
ENTER
8 SCHEDULE:
ENTER
RETURN
menu: exit
enter: select
▲
/
▼
/jog/ch1~8: item
MAIN MENU
1 QUICK SETTING:
ENTER
2 DISPLAY OPTION:
ENTER
3 SEQUENCE SETTING:
ENTER
4 PICTURE ADJUST:
ENTER
5 LOG OPERATION:
ENTER
6 ADVANCED SETTING:
ENTER
7 DEFAULT SETTING:
ENTER
8 PASSWORD SETTING:
ENTER
9 EXIT MENU:
ENTER
enter: select
▲
/
▼
/jog/ch1~9: item
MAIN MENU
1 QUICK SETTING:
ENTER
2 DISPLAY OPTION:
ENTER
3 SEQUENCE SETTING:
ENTER
4 PICTURE ADJUST:
ENTER
5 LOG OPERATION:
ENTER
6 ADVANCED SETTING:
ENTER
7 DEFAULT SETTING:
ENTER
8 PASSWORD SETTING:
ENTER
9 EXIT MENU:
ENTER
enter: select
▲
/
▼
/jog/ch1~9: item
DEFAULT SETTING
1 SAVE INSTALLER SETTING: ENTER
2 LOAD INSTALLER SETTING: ENTER
3 SAVE SD CARD SETTING:
ENTER
4 LOAD SD CARD SETTING:
ENTER
5 LOAD FACTORY SETTING:
ENTER
6 VERSION INFORMATION:
ENTER
RETURN
menu: exit
enter: select
▲
/
▼
/jog/ch1~6: item
Содержание DVR-3016, DVR-3016D
Страница 2: ......
Страница 100: ...98 Figure 7 RMN040200255 V5 2 ...

