AHM-6XX6A User Manual
16
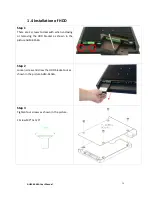
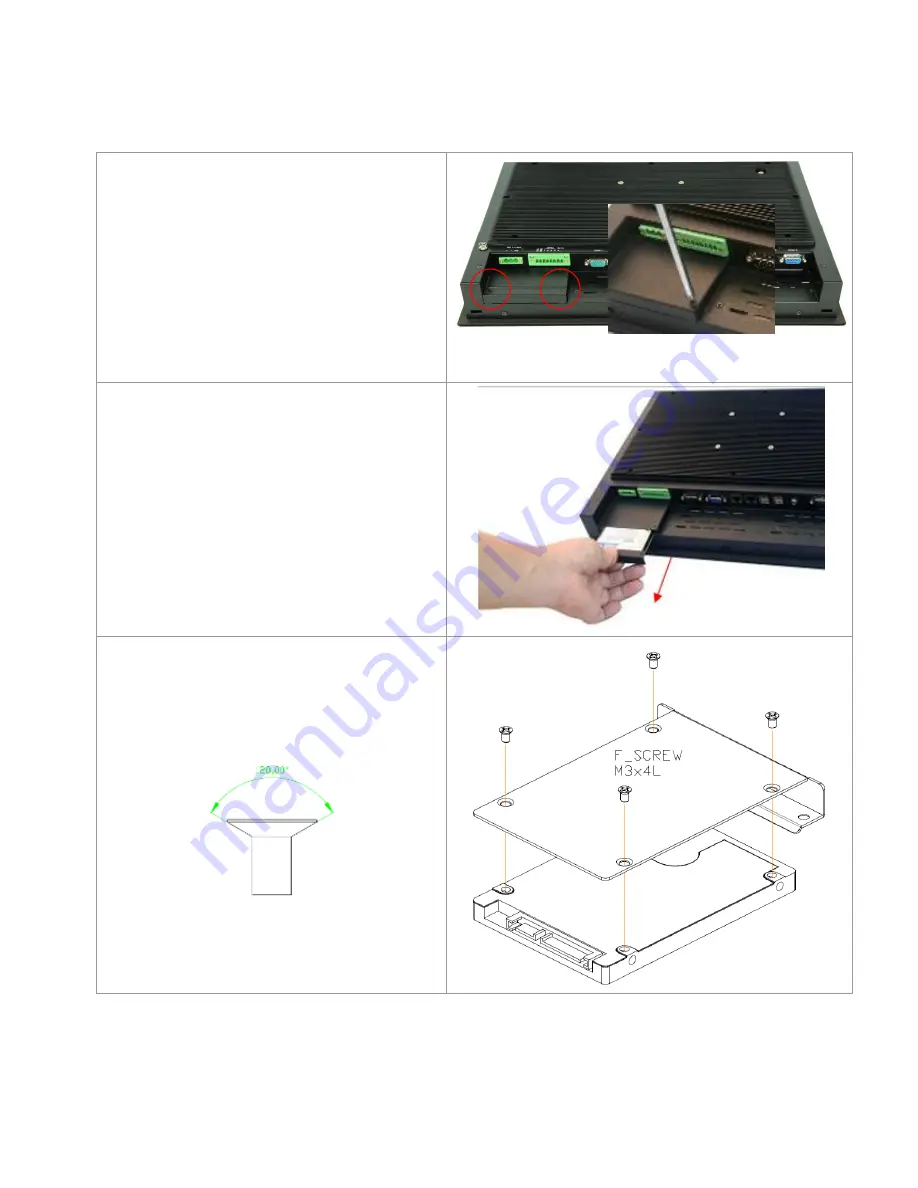
1.4 Installation of HDD
Step 1
There are 2 screws to deal with when enclosing
or removing the HDD bracket as shown in the
picture AHM-6156A.
Step 2
Loosen screw and draw the HDD bracket out as
shown in the picture AHM-6156A.
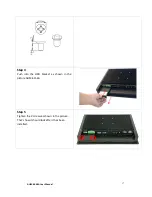
Step 3
Tighten four screws as shown in the picture.
F Screw M3*5L 120°
Содержание AHM-6XX6A
Страница 9: ...AHM 6XX6A User Manual 8 1 2 Dimensions Figure 1 1 Dimensions of the AHM 6086A ...
Страница 10: ...AHM 6XX6A User Manual 9 Figure 1 2 Dimensions of the AHM 6126A ...
Страница 11: ...AHM 6XX6A User Manual 10 Figure 1 3 Dimensions of the AHM 6156A ...
Страница 12: ...AHM 6XX6A User Manual 11 Figure 1 4 Dimensions of the AHM 6176A ...
Страница 13: ...AHM 6XX6A User Manual 12 Figure 1 5 Dimensions of the AHM 6196A ...
Страница 15: ...AHM 6XX6A User Manual 14 Figure 1 8 Front View of AHM 6126A Figure 1 9 Front View of AHM 6156A ...
Страница 16: ...AHM 6XX6A User Manual 15 Figure 1 10 Front View of AHM 6176A Figure 1 11 Front View of AHM 6196A ...
Страница 35: ...AHM 6XX6A User Manual 34 3 4 Advanced Settings 3 4 1 CPU Configuration Max CPUIO Value Limit Disabled Enabled ...
Страница 63: ...AHM 6XX6A User Manual 62 ...
Страница 66: ...AHM 6XX6A User Manual 65 ...
Страница 67: ...AHM 6XX6A User Manual 66 ...
Страница 69: ...AHM 6XX6A User Manual 68 Follow the step by step installation process to install the LAN driver ...
Страница 70: ...AHM 6XX6A User Manual 69 ...
Страница 72: ...AHM 6XX6A User Manual 71 Follow the step by step installation process to install the Realtek HD Audio driver ...
Страница 73: ...AHM 6XX6A User Manual 72 Click FINISH A Driver Installation Complete ...
Страница 77: ...AHM 6XX6A User Manual 76 5 Installing ...
Страница 78: ...AHM 6XX6A User Manual 77 6 The Install Shield Wizard Completed appears Click Finish ...


