background image

9

10

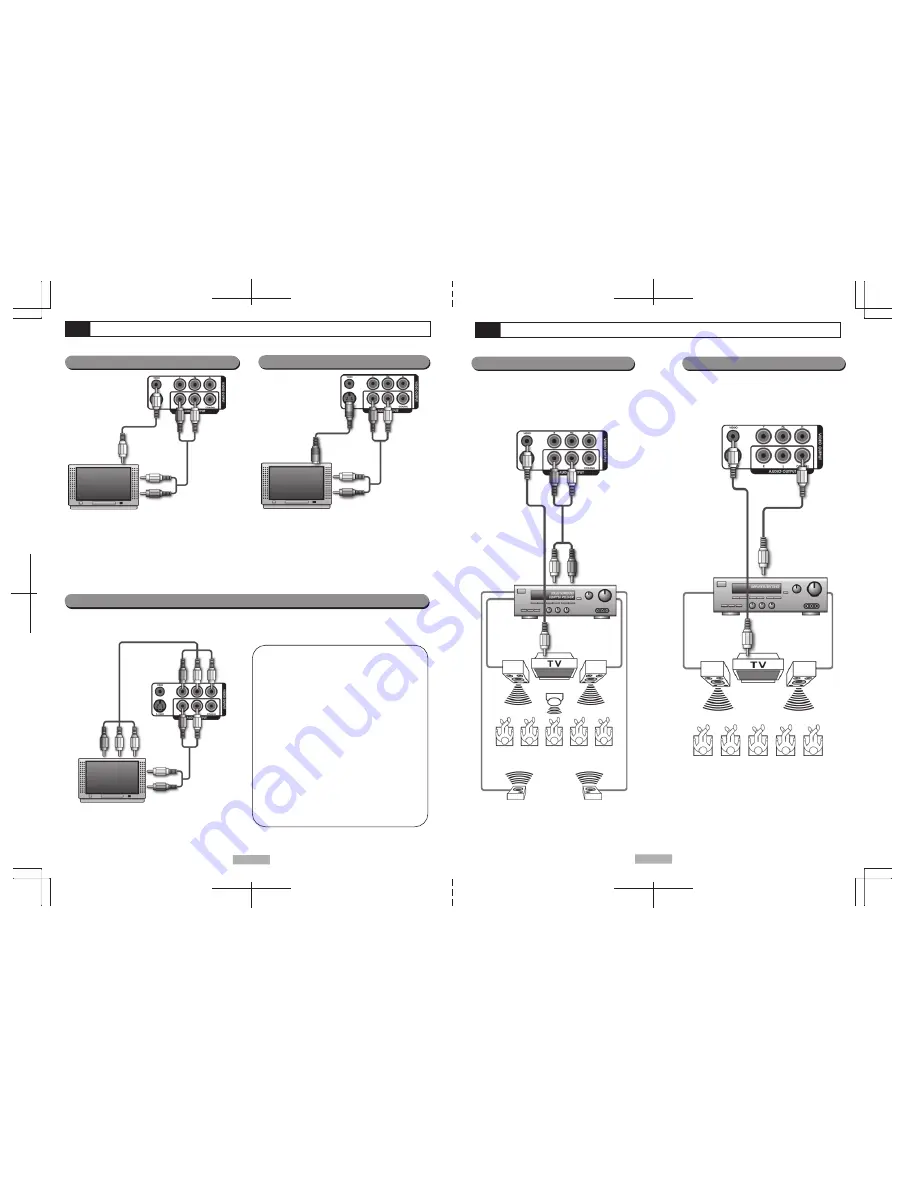
How to Connect Your Player To A Television

Y

Pb

Pr

Y

Pb

Pr

To Progressive Scan Video Input

Red

White

To TV Audio L, R Input

Good - Composite

Better - S-Video

Yellow

To S-Video Input on TV

Red

White

To TV Audio L, R Input

How to Connect your Player To An Amplifier/Receiver

The AD 1118 is ready for use simply by connecting to your TV using the composite or S-Video diagrams below (S-Video cable not included).

Best - Component

For better quality, connect the DVD video player with an optional 
S-Video cable if the TV has an S-Video input. Do not connect the 
yellow video cable if using an S-Video cable. Connect the supplied 
audio (red & white) cables as shown.
To view, cycle through your TV input sources from your TV remote 
(Video  1,  2,  etc.)  to  select  the  source  that  your  DVD  player  is 
connected to.
If  there  is  no  picture  present,  remove  any  disc  from  the  player. 
Press  the

  I/P

  button  on  your  DVD  player’s  remote  control 

repeatedly to access the S-Video Mode.

Connect  the  supplied  video  (yellow)  and  audio  (red  &  white) 
cables as shown.
To view, cycle through your TV input sources from your TV remote 
(Video  1,  2,  etc.)  to  select  the  source  that  your  DVD  player  is  
connected to.

Yellow

To Tv Video Input

Red

White

To TV Audio L, R Input

Connect  the  optional  Component  (Y,  Pb,  Pr)  video  cables  and 
audio (red & white) cables to your HDTV/EDTV set as shown.
To view, cycle through your TV input sources from your TV remote 
(Video  1,2,  etc.)  to  select  the  source  that  your  DVD  player  is 
connected to.
Press 

STOP 

button then press 

I/P

 button repeatedly.

The AD 1118 incorporates the Progressive Scan feature for use with HDTV/EDTV sets for the best possible video quality. Check your 
television manual for compatibility to utilize this feature.

IMPORTANT:

Do  not  connect  the  Component  (Y,  Pb,  Pr 
and S-Video connectors simultaneously.

Note: Use the interlaced setting when using a standard TV. If 
you  view  a  black  and  white  distorted  picture  on  your  TV, 
press I/P (your installation may be interlaced and it may have 
been put into Progressive Scan Mode by mistake).

Note: Your Apex DVD Player is equipped with Progressive 
Scan  Output  (Y,  Pb,  Pr  /  Component  Video  Outputs) 
otherwise known as 480P (P=Progressive). The 480P image 
offers  the  best  quality  picture  and  eliminates  virtually  all 
motion artifacts. This feature is designed for newer EDTV or 
HDTV sets only.

Note:  To  switch  back  and  forth  between  Interlace  and 
Progressive Video Mode, press  I/P on your  remote control 
to cycle between the three modes. Please refer to page 18 in 
this manual to learn more about this function.

Good

Better

Enjoy the dynamic and realistic sound of Dolby Pro Logic 
Surround by connecting an amplifier and speaker system 
(right and left front speakers, a center speaker, and one or 
two rear speakers).

Yellow

To TV Video Input

Surround Right

Speaker

Front Right

Speaker

Center Channel

Front Left

Speaker

Surround Left

Speaker

Red

White

To Dolby Surround
Equipped Receiver
(L+R Audio Input)

Dolby Surround

Connection Example

Yellow

To TV Video Input

Front Right

Speaker

Front Left

Speaker

To Amplifier/Receiver
with Digital Coaxial Input

2 Channel Digital Audio

Connection Example

(Continued on p 11)

Enjoy  the  dynamic  sound  of  2  Channel  Digital  Audio  by 
connecting an amplifier equipped with a coaxial digital input 
(coaxial cable sold separately).

For cinema quality sound, connect the audio cables directly to your home theater equipment for maximum audio enjoyment.

Содержание AD1118

Страница 1: ...ough the TV and not through any other source like a VCR What you re viewing is the effect of the copy protection circuitry required on all DVD players You must purchase an RF adapter from your local dealer RF adapters are also available for purchase online at www shop apex com Place the disc with the graphics side up Place the disc on the disc tray correctly inside the guides Make sure the disc is...

Страница 2: ... at plugs convenience receptacles and the point where they exit from the apparatus Only use attachments accessories specified by the manufacturer Use only with the cart stand tripod bracket or table specified by the manufacturer or sold with the apparatus When a cart is used use caution when moving the cart apparatus combination To avoid injury from tip over Unplug this apparatus during lightning ...

Страница 3: ...en Display Menu 15 Disc Title Menu 15 GOTO a desired selection 15 Repeat 16 A B Repeat 17 Numeric Key Pad Direct Program access 17 Multi Angle 17 I P Progressive Scan 18 Multi Subtitle 18 Multi Audio Soundtrack 18 AFF Active Full Screen Function 19 Zoom 19 Mute 19 Volume Up Down 20 Shuffle Play 20 What is MP3 21 About MP3 21 Program Settings 22 CD MP3 DVD program menu 22 How to Play Kodak Picture ...

Страница 4: ...ds will permanently damage the disc surface Do not attach paper or tape to the disc A video disc contains high density compressed data that requires proper Handling Remove the battery compartment cover Load two fresh AAA batteries into the battery compartment Make sure that the batteries have been inserted properly matching to the symbols marked in the battery compartment Close the battery compart...

Страница 5: ...n player on off after engaging power button on unit p12 Numeric Entry Pad p16 17 Skip Forward p13 Skip Backward p13 Direction Keys p12 14 16 18 19 22 23 Enter Play p12 13 14 16 18 22 23 24 Stop p13 18 Menu p15 Setup p23 24 Audio p18 Resume Program p25 Shuffle p20 I P S Video Interlace Progressive Scan p9 18 Angle p17 22 Disc Tray Open Close p12 13 Volume Adjust p20 Repeat p16 Mute p19 A B Repeat p...

Страница 6: ...sets for the best possible video quality Check your television manual for compatibility to utilize this feature IMPORTANT Do not connect the Component Y Pb Pr and S Video connectors simultaneously Note Use the interlaced setting when using a standard TV If you view a black and white distorted picture on your TV press I P your installation may be interlaced and it may have been put into Progressive...

Страница 7: ...tial unpublished works 1992 1997 Dolby Laboratories Inc All rights reserved How To Play A Disc Turn on the player Turn on your TV Home Theater System Load a disc Normally when a MP3 disc is loaded the unit will take a longer time to download the initial data A DVD disc that does not match the region code cannot be played by this player This DVD player will play Region 1 DVDs only To return to the ...

Страница 8: ...st video frame displayed To resume press ENTER button Function Buttons Continued Skip Forward Backward Search Forward Backward Slow Motion Forward Press button to skip forward to the next chapter track Press button to skip backward to the previous chapter track Player will not advance or reverse during the WARNING section of a disc Press button to search forward rapidly Press repeatedly to change ...

Страница 9: ...TO button to enter the Track Search mode Press the GOTO button again to enter Disc Search mode Track Search Disc Search Within a Track Input time hh mm ss Hour Minute Second Track Input track number XXX Track Number Press ENTER button Press the GOTO button to select GOTO mode Press the LEFT RIGHT DIRECTIONS KEYS to highlight a desired item Search Within a Chapter Time Input time hh mm ss Hour Minu...

Страница 10: ...rom each of these different angles using the ANGLE button The recorded angles vary depending on the disc programmed If a DVD disc contains Multi Angle material viewing angles may be selected During playback repeatedly press the ANGLE button to select the desired viewing angle Status will be displayed on screen NOTE Certain DVD discs may not allow A B RPT Repeat functionality A B RPT function does ...

Страница 11: ...ea when playing a widescreen formatted DVD on a standard 4 3 television Depending on the aspect ratio of the DVD presentation the size of the black bars may vary NOTE The picture quality is degraded as the picture is zoomed Mute Press the MUTE button To mute or temporarily turn off sound Press again to resume normal sound output Volume Up Down Shuffle Play While playing back a disc Press the VOLUM...

Страница 12: ...er followed by the chapter numbers desired 3 Use the DIRECTION KEYS to select the next program input Repeat step 2 until programming is completed To clear the last input press CLEAR button To clear all the inputs highlight the Clear All icon press ENTER button to confirm To quit the Program Menu press PROGRAM button 4 Highlight the Play Program icon then press ENTER button to start program playbac...

Страница 13: ...aptions Select between on and off 3 Video Output Select based on your connection from the DVD player to your TV S Video interlace or Progressive see p 9 18 Various features of the player can be adjusted in the Setup Menu Setup Menu Options Continued TV shape Rating Enter this menu to setup the Rating setting Press SETUP button Highlight Rating Press ENTER button rating sub menu appears Highlight t...

Страница 14: ...ncludes but is not limited to prerecorded material whether copyrighted or not Shipment and service to a NON AUTHORIZED repair facility HOW TO OBTAIN WARRANTY SERVICE After following the operating instructions the Troubleshooting Guide and the FAQ pages on DVD players found at our website www apexdigitalinc com Should it be necessary to contact Customer Service Center directly call 866 427 3946 Mon...

Отзывы: