background image


  Chapter 7: AP-5004 Moible DVR 3G / GPS configuration

107

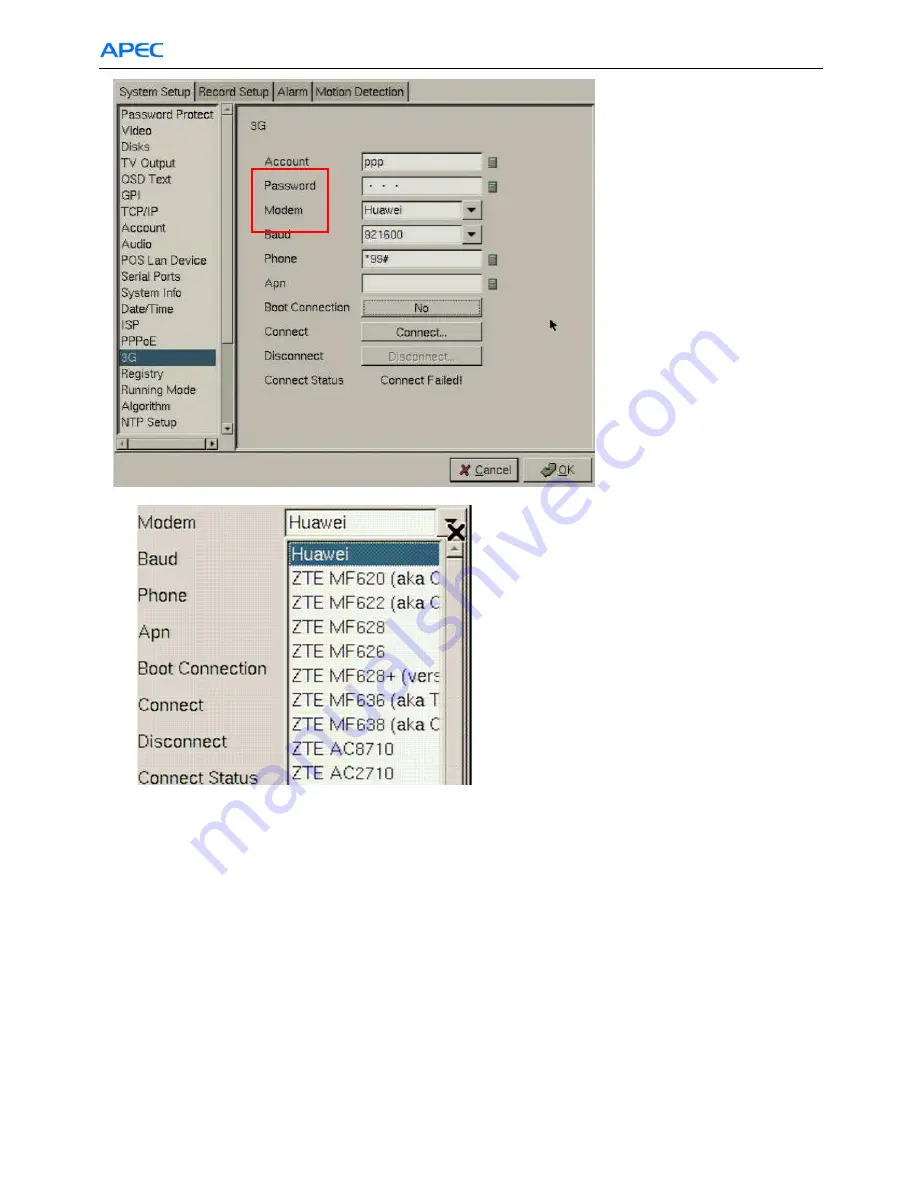
Other fields of Fig. 7-3 are as below: 

Baud rate 

:  921600  by default. 

Phone: 

 Phone number to dial. In Taiwan is *99#. It may vary depending on the ISP. 

APN:

 Access Point Name. Provided by ISP. Blank for Taiwan ISP provider. 

Boot Connection: 

Γ

Yes: 

AP-5004 will try to connect automatically during the startup using 3G modem as configured. 

Γ

No:  

It does not connect automatically. 

Connect:

  Click this button to manually start the connection. 

Disconnect:  

Click this button to manually start the disconnection. 

Connection Status: 

Γ

"Connect Failed!":

Failed to establish connection. 

Γ

"Connecting

Ξ

Ξ

Ξ

Ξ

": 

 Connection in progress. 

Γ

"Connect OK!":  

Connection successfully established. 

Γ

"Disconnecting

Ξ

Ξ

Ξ

Ξ

"

:  Disconnection in progress. 

Γ

"Disconnected!":

  Connection closed.

Fig. 7-3 

Fig. 7-4 

Содержание AP-5004

Страница 1: ...ifficult to have stable and high speed communication link between the vehicle and control center This is important for emergency event handling The mobile DVR needs to have the capability of communica...

Страница 2: ...Playback GPS tracking with e Map support Two way audio communication between CMS the AP 5004 on the vehicle Video Quality 720x480 60 fps 360x240 120 fps MPEG4 compression Dual stream support for diffe...

Страница 3: ...X You can also get this information after running up AP 5004 by entering advanced set up system information from GUI screen 2 1 Power connection Connect the terminals on the power plug to the correct...

Страница 4: ...nfiguration 2 3 TV monitor The S Video output on Fig 1 3 is to connect to a TV monitor 2 4 DIO connector AP 5004 can support 4IN and 4OUT dry contact IO points Plug the IO cable that comes with AP 500...

Страница 5: ...e GPS tracking with e Map support on SecuTrack CMS then you will need a GPS modem Please refer to the documentations FW MDVR1 x 2 x 3G GPS configuration guide and 3G basic Knowledge for more informati...

Страница 6: ...more than 4 channels are NOT workable on AP 5004 2 1 Main screen After AP 5004 boots up you can see its main screen as Fig 2 1 You can see the camera videos on local VGA screen The graphical user inte...

Страница 7: ...running mode to mouse running mode 1 Press the Menu button on the remote control to display the setup menu on screen Fig 2 2 2 Use the up and down arrow buttons to highlight the Running Mode option a...

Страница 8: ...rmation including date time total hard disk size and LAN status Camera status R M Color Recording Mode Gray No video signal Blue No recording Red Full recording G Color Status of each DI and DO device...

Страница 9: ...o switch back normal live video E IO control button Click to bring up GPIO status panel as Fig 3 5 On Fig 3 5 the top row of yellow points indicate current status of GPI It becomes RED when GPI is act...

Страница 10: ...ars Click it and you will get a pop up window as Fig 3 6 Click OK and then you will be asked to select a back up device Then click Backup to save the image After that you need to click Quit to leave t...

Страница 11: ...arm log 3 Backing up the data 4 Thumbnail Browse 5 Search by Event 6 Search by Text Calendar Function buttons Play buttons Split screen buttons Recording data status information Basic information indi...

Страница 12: ...not be erased when cyclic recording Step1 Select a date from calendar Step2 Select an hour from time line Step3 Select camera to playback Step4 Click anywhere on recording data score bar to start play...

Страница 13: ...reen display buttons Split screen display buttons enables you to define which split screen is displayed on screen 3 3 3 Video adjustment when playback Fig 3 9 You can do camera image adjustments for b...

Страница 14: ...record file The yellow bars Motion indicate the instance when motion was detected On Fig 3 10 camera 1 had motion trigger started from around 22 00 till 32 00 minutes in this hour Fig 3 10 Click GPI s...

Страница 15: ...s POS event etc User can search alarm log by specific time and double click one of the alarm log on the list to playback the video Fig 3 13 Bookmark 1 During playing recording file user can click book...

Страница 16: ...isk Then click OK to bring up Fig 3 15 If you answer OK AP 5004 will clear all data on the USB Flash Disk If you click Cancel then Fig 3 16 shows you how much space left on the USB Flash Drive before...

Страница 17: ...default speed is X5 Note It takes some time for AP 5004 to get video data before it can start the back up process 3 3 8 Thumbnail Browse Finds video images and selects them for processing individuall...

Страница 18: ...tures based on evenly divided time slots in this hour Then if any one of these pictures is selected to do Zoom in it goes into the third layer This layer displays 16 pictures from left to right that a...

Страница 19: ...lated to that camera on the screen as Fig 3 24 On Fig 3 24 you can do play list all files of the search select next or go previous record There is a date time and camera indication window to show you...

Страница 20: ...your selection of the motion detection area Fig 3 25 1 Select motion detection of the camera you want 2 Select the time period you want It can be All Time Range Today Yesterday or User Define 3 Click...

Страница 21: ...d ending string of a bill and search the text you want in this deal You can define 3 fields of search text in logical AND combination to search This gives you unique results of the search The Device S...

Страница 22: ...ottom of the screen You can then click any one record in the list to play On Fig 3 24 the playback is single camera based POS text is overlay on the camera video in white color There is a POS text win...

Страница 23: ...I 23 Fig 3 28 Note Click the search result list button to show the record list of search overlay POS text POS text panel scroll up down to see complete POS text search result list when checked enable...

Страница 24: ...es X Click SAVE button and you will get a pop up image on the playback screen as Fig 3 30 You need at least one USB pen disk inserted on AP416 as back up device If you answer OK then you will be promp...

Страница 25: ...k the system immediately The passwords are encrypted so that you need to enter twice for confirmation If you enter number of seconds in Autolock field you will need to enter password when you want to...

Страница 26: ...eo signal format Choose NTSC in the US or PAL in Europe and most Asian countries If you are not sure about this option select Auto AP 5004 will detect the video standard automatically Brightness adjus...

Страница 27: ...corded if needed PTZ Device Select PTZ model from the support list If you can t find it please contact your reseller PTZ baud rate each camera have different baud rate please set correctly PTZ time ou...

Страница 28: ...re based De interlace support Use mouse to set each field Ensure each field is set correctly before clicking OK If parameters are set incorrectly it could result in the display becoming unreadable and...

Страница 29: ...tatus of the input devices such as switches sensors etc When the switches or sensors change state the GPIs show the status of these input devices The GPI devices can be NC normally closed or NO normal...

Страница 30: ...ers password permissions can be configured on the system Select the user number and assign a Name and password to it Click the PTZ Playback and Audio fields to enable access to these properties for th...

Страница 31: ...as ONLY one audio source from mother board so you have ONLY one choice here 3 6 10 POS Lan Device This function is NOT available on firmware version MDVR 2 0 Fig 3 41 Fig 3 40 selectable audio source...

Страница 32: ...ne and its LAN port to the hub or switch that connects AP416 The AP 204 units that connect to the same AP416 DVR should have same IP segment First select its IP prefix under NetIO section of Fig 3 41...

Страница 33: ...have Data capture The meaning of configuration here is you want to connect the Port selected to a physical external device For example when Port is COM1 you can connect it to a modem or GPIO that has...

Страница 34: ...the new time zone after click OK 3 6 14 ISP If you are using dial up access to the Internet use the ISP menu to enter the necessary details for login to your Internet Service Provider The TCP IP data...

Страница 35: ...esses If you use URL here then you need to set the DNS physical IP correctly at Fig 3 38 You can click the Disconnect button to break the Internet connection and the Connection Status field shows Conn...

Страница 36: ...e refer to chapter 7 Mobile DVR 3G GPS configuration for more detail 3 14 15 Registry This function is useful ONLY when you are using dynamic IP address for the AP 5004 machine when connecting to Inte...

Страница 37: ...n is used for synchronization the system clock of AP 5004 with a NTP Network Time Protocol server You can set up how many hours you want to do the synchronization Select a NTP server from the default...

Страница 38: ...y pro So if you plug in a key pro you don t need to key in the license number again on Fig 3 52 There are three POS License to three levels Level 1 Single POS unit Can connect ONLY one cash register S...

Страница 39: ...e key click Register to complete the process 3 14 20 System Log System log includes operations performed at local VGA screen and remote operations User can search system log by year date time Not all...

Страница 40: ...n in the field 3 Click Backup button to start to backup configuration data 4 When user sees vpcfg _ your DVR name _ Mac ID bin was saved in the field it mean the backup was done 5 Click ok button to l...

Страница 41: ...s Select Yes here and click OK button to restore default setting to AP 5004 The default administrator name and password are webmonitor and oyo Default IP address is 192 168 10 10 Fig 3 56 Fig 3 57 sel...

Страница 42: ...be asked to select the device that is to be used for revise firmware Select the device and firmware file then click OK to start the process After completed the machine will do reboot into new firmware...

Страница 43: ...lic Recording continues to record until disk space runs out and then overwrites the oldest records Click OK to save changes 3 15 2 Record schedule On Fig 3 61 weighted recording is for setting special...

Страница 44: ...n is NOT available on firmware version MDVR 2 0 3 15 2 7 Camera recording mode Selectable No Normal Motion Alarm Motion Alarm POS text Intelligent here Please be noted in Motion Alarm the means logica...

Страница 45: ...two selections for each camera POS event and Text POS Event is defined at Alarm set up section This refers to some kind of special characters from POS machine Text means as long as there is character...

Страница 46: ...ully 3 16 2 GPI Alarm At Fig 3 66 you define the actions when GPI1 triggers Message means show alert text on VGA screen Beep is to alert with audio Video Popup is to pop up the camera video which rela...

Страница 47: ...ific camera The setting is similar to Fig 3 66 except the camera selection 3 16 4 Video Lost This alarm triggers when AP 5004 detects there is no video from the camera that connects to it Only Beep al...

Страница 48: ...sending e Mail can be configured 3 16 6 Disk Error This alarm triggers when AP 5004 detects disk error That means AP 5004 can not access read or write to the disk Pop up message on VGA screen or audio...

Страница 49: ...reen of Fig 3 71 The Procedure is 1 Camera Select the camera you want to do configuration 2 Enable Yes No Turn On Off the motion detection function 3 Sensitivity Select sensitivity level default value...

Страница 50: ...lay the main menu on screen Use the Up and Down arrow buttons to select one of the four options and press OK button to confirm your choice 4 3 System setup The System Setup menu enables you to change...

Страница 51: ...sets the admin password User Pass sets the user password Auto lock After enables password protection after the specified time interval Lock Now enables password protection immediately To set the user...

Страница 52: ...irm your choice To lock the system immediately 1 Highlight the Lock Now Function in the Password Protect menu 2 Use the Left or Right arrow buttons to confirm the operation 4 3 2 Video Use the Video m...

Страница 53: ...n for each camera Water Mark Sets water mark on the video image Local Display enables viewing the selected camera video signal on the local display If this option is set to Off the camera is still opt...

Страница 54: ...ubject FOCUS adjust the focus of the camera Speed Adjust the speed of the selected PTZ camera Pan and tilt Adjust the pan and tilt of the selected camera 4 3 3 Video input This function is to map phys...

Страница 55: ...rol to highlight the Test option 2 Press the OK button to confirm the choice The test result will appear on the screen To save disk parameters 1 Use the Up and Down arrow buttons on the remote control...

Страница 56: ...lues Increasing the value of Y moves the text down the screen Increasing the value of X moves the text to the right To alter the text position 1 Use the Up and Down arrow buttons on the remote control...

Страница 57: ...characters or numbers only To change the TCP IP parameters 1 Select the field to change using the Up and Down arrow buttons 2 Press the Right arrow button to confirm 3 Use the number pad on the remote...

Страница 58: ...on the remote control to display the on screen keyboard 4 Use the Arrow buttons to select the letters you require and the OK button to confirm 5 When the field is correct press the Key Pad button to...

Страница 59: ...ker Camera setup which camera mapping to which audio channels Audio1 is the audio input from motherboard The other audio inputs are from video capture card Note Make sure that audio is enabled when re...

Страница 60: ...3 Press the OK button when the field is set correctly Note 1 You can use the Prev Page and Next Page buttons on the remote control to toggle between the COM1 menu and COM2 menu 2 When an optional GPI...

Страница 61: ...ted you can set the alarm notification through a beep a message a video popup or E mail The Alarm menu has the following submenus E Mail enables you to set up an E mail address and verify it is workin...

Страница 62: ...and the Right arrow button to increase the time 3 Press the OK button to save your settings Set Action Use the Set Action option to define what action is taken by the AP 5004 when an event occurs The...

Страница 63: ...nt TCP IP set up automatic or manual TCP IP If the AP 5004 is connecting through a DHCP server an IP address is assigned to it automatically If you want to set the IP address of the device manually se...

Страница 64: ...better but the data rate is also high The H 263 and MPEG4 algorithm provides a good video quality with low data rate To set up the algorithm 1 Use the Up and Down arrow buttons to select a field to ch...

Страница 65: ...are two ways to grant POS license One is key in license key the other one is plug in a key pro So if you plug in a key pro you don t need to key in the license number again in the license setup menu U...

Страница 66: ...To change the AP 5004 mode 1 Select the Mode option from the AP 5004 submenu using the Up and Down arrow buttons on the remote control 2 Use the Left and Right buttons to select either Cyclic Recordi...

Страница 67: ...meras If set to No you can manually set up the individual frame rates for each camera Weight recording weight recording is setting special recording frame rate when an alarm of one of camera was trigg...

Страница 68: ...tion Use the Arrow buttons to move the cursor ii Press the OK button to cut off any areas where you want to disable motion detection If you want motion detection enabled in the entire field of vision...

Страница 69: ...ach camera can be set separately and you can record up to 300 frames To set the Pre Alarm frame capture 1 Use the Up and Down arrow buttons to select Pre Alarm option from the Record Setup menu 2 Pres...

Страница 70: ...the camera A indicates that the file was recorded after a GPIO event An asterisk before the date indicates that the file is locked 2 Press the OK button to confirm The chosen recording is played back...

Страница 71: ...search for a recorded file 1 While viewing the play list press the Menu button to display the menu 2 Select one of the following options using the Up or Down arrow buttons Search by Time searches the...

Страница 72: ...lock a file 1 While viewing the play list use the Up Down arrow buttons to select the desired file 2 Press the Menu button to display the menu 3 Select the Lock File option using the Up or Down arrow...

Страница 73: ...lect one of the five options and press the OK button to confirm your choice 4 6 1 Alarm log Any alarm will be written into alarm log include video loss disk error etc User can search alarm log by spec...

Страница 74: ...tion to reset all configurable parameters to their factory default settings When the Default Settings option is chosen from the System Setup menu a message is displayed asking you to confirm Press the...

Страница 75: ...drive or a USB thumb drive Connect the device to the AP 5004 and then use this option 4 7 System Shutdown Use the System Shutdown option to shut down or reboot the system To shut down or reboot the sy...

Страница 76: ...ser when the device is connected on the same network as your PC or if it is connected through a cable or xDSL modem to the Internet Refer to the hardware manual for more information about making conne...

Страница 77: ...ack record files Please refer to section 5 12 for detail operations Fig 5 7 5 5 Remote PTZ control When click the single split window button on Surveillance Screen Panel as of Fig 5 6 if that camera i...

Страница 78: ...lco D type PTZ control You can do Auto Pan Patrol Fig 5 9 1 and open OSD menu in addition to what you can do on Fig 5 9 The PTZ functions and screen layout here is different for different brands middl...

Страница 79: ...m Setup Click the SETUP button to display the setup screen as Fig 5 11 Fig 5 10 Use the setup screen to change user definable parameters for the AP 5004 Choose a submenu from the list on the left and...

Страница 80: ...configure the camera for PTZ control here The Camera Control Device field is for PTZ camera model selection You need also to fill in Baud Rate and PTZ ID which need to match the setting with PTZ came...

Страница 81: ...utput points are open and when ON it means close Fig 5 14 5 6 4 System configuration Use the System Configuration page to set the following parameters for the AP 5004 Running mode Select Network Mode...

Страница 82: ...ood for AP 5004 that is working at ISP mode or dynamic IP It directs AP 5004 to do registry at a registry server and then remote PC client can access through registry server to find the AP 5004 unit T...

Страница 83: ...d to see the video Please be noted it is better to search by MAC ID or using a unique server name in order to get the machine you really want 5 6 5 Set user s authority Users created here can ONLY log...

Страница 84: ...ophone and speaker The arrow button on top of Fig 5 19 is to click for two way audio communication between remote PC client to AP 5004 After click it the audio panel is brought up as Fig 5 20 The gree...

Страница 85: ...for successful modem connection Hardware Flow Control should be Disable for modem device and Enable for PTZ camera control The serial port device can be PTZ Camera Control GPIO or Data capture selecta...

Страница 86: ...an have multiple VP 204 units on the LAN The Device Type for VP 204 is Data Capture The ID shows MAC ID of the selected AP 204 and Status shows if it is alive on the LAN Fig 5 22 5 6 8 Set POS Here yo...

Страница 87: ...o display the System Information page Fig 5 24 No information on this page is changeable 5 6 10 Set time and date select camera for POS text overlay select POS machine model select serial device to co...

Страница 88: ...er to configure a NTP Network Time Protocol server for synchronization of AP 5004 internal system clock Select a server and enable it using the drop down menus Enter a time period using keyboard for t...

Страница 89: ...ss POS event etc User can search alarm log by specific time and double click one of the alarm log on the list to play specification recording data Fig 5 28 5 7 Record Set Up 5 7 1 DVR setup Use DVR Se...

Страница 90: ...record continuously 2 Motion Detection recording Record when motion trigger 3 GPI trigger recording Record when GPI trigger Fig 5 30 4 Motion GPI trigger Recording Record when Motion Detection OR GPI...

Страница 91: ...ncurrent triggers to the cameras you may not have the exact frame rate you set for weight recording 5 7 3 GPI Trigger Recording Click GPI Trigger Recording to bring up Fig 5 31 There are max 8 GPI to...

Страница 92: ...alarm happens The maximum number of frames a camera can record for Pre Alarm is 300 frames Fig 5 33 select POS event or text When POS event only special text string defined as event triggers the recor...

Страница 93: ...mages to attached with the e mail The Global Settings area is for configuration of mail server data and is common for all kinds of alarm You need a mail server account to send mails The Interval field...

Страница 94: ...dicates that motion is being detected You can use mouse drag or click the small rectangles one by one to assign the areas that you want to do detection Fig 5 35 selectable GPI Motion Detection Video L...

Страница 95: ...it is empty AP 5004 will generate the file name automatically in following format IP CH yymmddhhnn xx where IP is the IP address of AP 5004 CH is the channel number of the camera yymmddhhnn is the yea...

Страница 96: ...a OR combination These features give you unique results to find the records contain the videos of what you really want After you get the record file list as Fig 5 38 click the one you want for play b...

Страница 97: ...atus On Fig 5 33 you see this field is selected as Data and the status bar is full of Blue That means video data was written continuously within this hour If you select Motion then you may get status...

Страница 98: ...back up for multiple machine set up or when abnormal condition occurs the system manager of AP 5004 can restore previous configured data to the machine The operation is straight forward Select Backup...

Страница 99: ...Chapter 5 APEC Network Operation 99 Fig 5 44...

Страница 100: ...d and install the DCS Requirements PC OS Windows Xp Vista Guides Installation in Windows Vista Installation in Windows XP IE7 Windows Vista 1 Login to Windows Vista using an Administrator level accoun...

Страница 101: ...llation Guide v3 0 101 Fig 6 3 6 The DCS will start to install after downloading the dcs cab Please be aware that the download can take a few minutes depending on the bandwidth of your connection to A...

Страница 102: ...ing a Administrator level account 2 If you have DCS Secuwatch Secuwatch Client installed in the PC please uninstall it first 3 Open Internet Explorer and key in the IP of the DVR 4 It will ask you for...

Страница 103: ...Guide v3 0 103 6 The DCS will start to install after downloading the dcs cab Please be aware that the download can take a few minutes depending on the bandwidth of your connection to AP 5004 DVR Clic...

Страница 104: ...Chapter 6 DCS Plugin Installation Guide v3 0 104 7 After the installation you will be able to access AP 5004 DVR remotely Fig 6 12 Fig 6 13...

Страница 105: ...5 Z 7 2 3 ONDA MT503HS ONDA MT505UP 7 2 4 AIKO 83D 7 2 5 Novatel Ovation MC950D 7 2 6 Merlin XU950D 7 2 7 Ovation 930D 7 2 8 Novatel U727 Novatel U760 7 2 9 Alcatel One Touch X020 aka OT X020 aka MBD...

Страница 106: ...has a PIN code you need to disable it using this software as Fig 7 2 7 4 Configure AP 5004 7 4 1 3G modem Enter advanced set up system configuration 3G to get Fig 7 3 Here the account password are the...

Страница 107: ...AP 5004 will try to connect automatically during the startup using 3G modem as configured No It does not connect automatically Connect Click this button to manually start the connection Disconnect Cli...

Страница 108: ...rnal world can access it from remote Please refer to section 5 6 4 for more detail about using registry AP 5004 needs reporting to its registry server its IP address every certain minutes and we need...

Страница 109: ...AN connection 5 The LAN status will become gray as Fig 7 9 if the 3G connection is successful 7 6 How to configure GPS AP 5004 will search for USB GPS modem ONLY when power on start up Please make sur...

Страница 110: ...7 6 5 GPS USB modem supporting list Theoretically all modem that uses Profilic USB Serial driver is compatible with the firmware of AP 5004 Please connect the GPS USB device to Windows install the dri...

Страница 111: ...d ONLY if AP 5004 had connected successfully to 3G before the connection broken A 2 How to disable auto re connect feature When auto connect feature is activated and AP 5004 had been connected success...

Страница 112: ...SB modem model brand 4 Please check the username password APN Phone Number Contact your 3G provider company if you are not sure if these information are correct 5 The PIN code is disabled If not pleas...

Отзывы: