


Tip:
When you fail to overclock, you could:
1.
Clear CMOS (JP14) to restore the default setting.
2.
After turning power on, press “Home”
immediately until the screen appears.
Setting CPU Voltage & Frequency
Setting CPU Core Voltage
This motherboard supports Voltage ID (VID) function to detect CPU voltage
automatically during power-on.
Setting CPU Frequency
This motherboard is CPU jumper-less design, you can set CPU frequency through
1MHz stepping CPU Overclocking in the BIOS. CPU Core Frequency = CPU external
frequency x CPU Ratio. However, all CPU now selling in the market belong to "Fixed
Multiplier". That means users can not adjust the CPU Ratio but only change CPU
FSB clock to achieve overclocking.
(Users do the overclocking at their own risk!!)
BIOS Setup > Frequency / Voltage Control > CPU Bus Frequency
CPU Ratio
4x, 5x… 17x, 18x, 20x
CPU FSB
(Adjustment manually)
FSB = 400MHz - 533MHz by 1MHz
Stepping CPU Overclocking
Processor
Number
Architecture
Clock
Speed
Front
Side Bus
Cache
Ratio
Pentium M 770
90nm
2.13GHz
533MHz
2MB L2
16x
Pentium M 760
90nm
2.00GHz
533MHz
2MB L2
15x
Pentium M 750
90nm
1.86GHz
533MHz
2MB L2
14x
Pentium M 740
90nm
1.73GHz
533MHz
2MB L2
13x
Pentium M 730
90nm
1.60GHz
533MHz
2MB L2
12x
Pentium M 765
90nm
2.10GHz
400MHz
2MB L2
21x
Pentium M 755
90nm
2.00GHz
400MHz
2MB L2
20x
Pentium M 745
90nm
1.80GHz
400MHz
2MB L2
18x
Pentium M 735
90nm
1.70GHz
400MHz
2MB L2
17x
Pentium M 725
90nm
1.60GHz
400MHz
2MB L2
16x
Pentium M 715
90nm
1.50GHz
400MHz
2MB L2
15x
Pentium M 705
130nm
1.50GHz
400MHz
1MB L2
15x
Celeron M 370
90nm
1.50GHz
400MHz
1MB L2
15x
Celeron M 360
90nm
1.40GHz
400MHz
1MB L2
14x
Celeron M 350
90nm
1.30GHz
400MHz
1MB L2
13x
Celeron M 340
130nm
1.50GHz
400MHz
512KB L2
15x
Celeron M 330
130nm
1.40GHz
400MHz
512KB L2
15x
Note
:
With CPU speed changing rapidly, there might be faster CPU on the market by the time
you received this installation guide. This table is kindly for your references only.
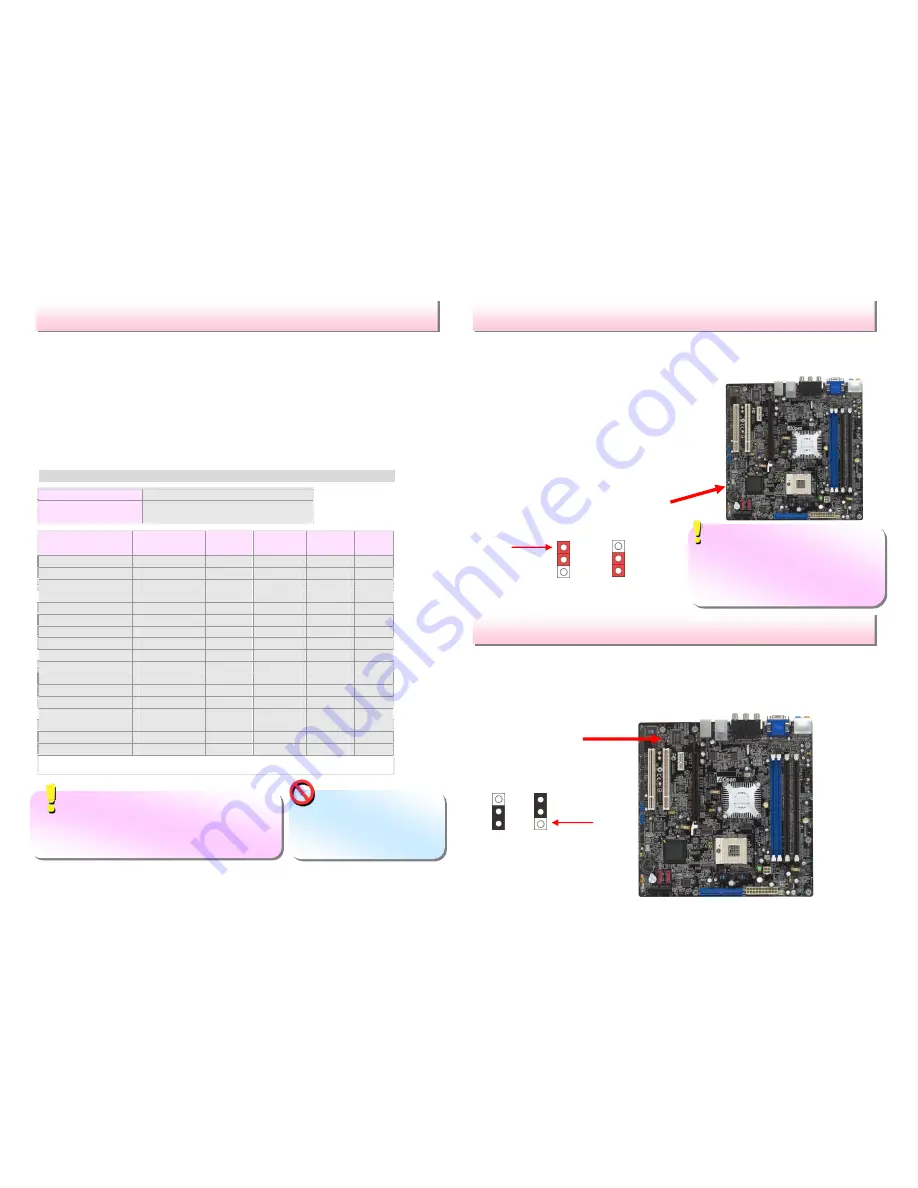
JP14 Clear CMOS
JP28 Keyboard/Mouse Wakeup Jumper
This motherboard provides keyboard / mouse wake-up function. You can use JP28
to enable or disable this function, which could resume your system from suspend
mode with keyboard or mouse. The factory default setting is “Disable” (1-2), and
you may enable this function by setting the jumper to 2-3.
1.
Turn off the system and unplug the AC
power.
2.
Remove ATX power cable from connector
PWR2.
3.
Locate JP14 and short pins 2-3 for a few
seconds.
4.
Return JP14 to its normal setting by shorting
pin 1 & pin 2.
5.
Connect ATX power cable back to connector
PWR2.
Pin 1
Tip: When should I Clear CMOS?
1. Boot fails because of overclocking…
2. Forget password…
3. Troubleshooting…
Warning:
Intel 915GM
chipset support maximum
533MHz (133MHz*4) system
bus; higher clock setting may
cause serious system damage.
You can clear CMOS to restore system default setting. To clear the CMOS, follow
the procedure below.
JP14 Clear CMOS Jumper
1
1
Pin 1
Normal
(Default)
Clear CMOS
Disabled
(Default)
Enabled
JP28 PS2 KB/Mouse
Wakeup Jumper
1
1


