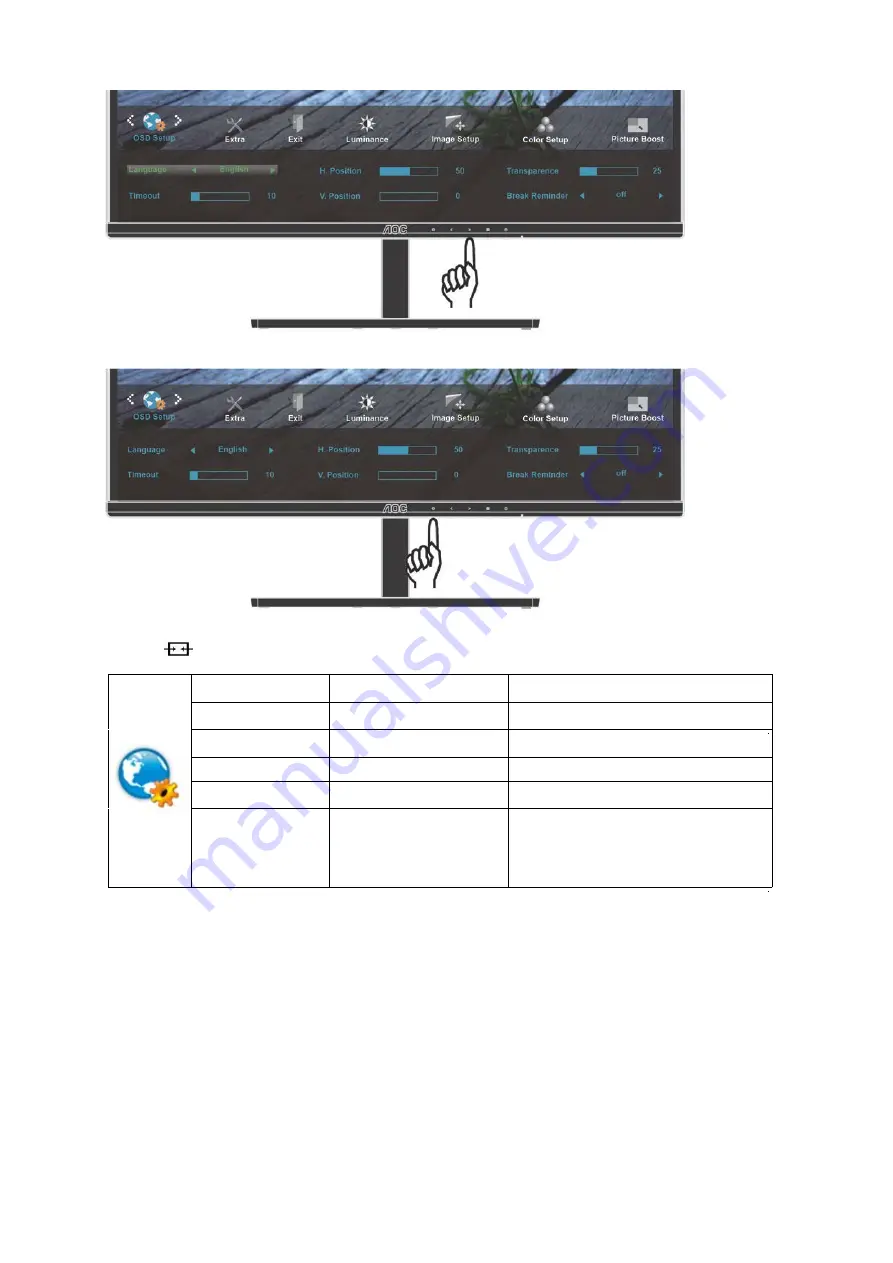
AOC I2279VW Скачать руководство пользователя страница 32


H. Position 

0-100 

Adjust the horizontal position of OSD. 

V. Position  

0-100  

Adjust the vertical position of OSD. 

Timeout 

5-120 

Adjust the OSD Timeout. 

Transparence

0-100

Adjust 

the transparence of OSD. 

Language  

Select the OSD language. 

Break Reminder 

on or off 

Disable or Enable   

(1 hour of work, break ?) / 

(2 hours of work, break ?) 

4 Press < or > to adjust. 

5 Press 

to exit

32

Содержание I2279VW

Страница 1: ...www aoc com 2015 AOC All Rights Reserved LCD Monitor User Manual LED Backlight I2279VW I2279VWH I2279VWHE I2379V I2379VH I2379VHE...

Страница 2: ...Picture Boost 29 OSD Setup 31 Extra 33 Exit 35 LED Indicator 36 Driver 37 Monitor Driver 37 i Menu e Saver Screen 5 Troubleshoot 5 Specification 5 General Specification I2279VW I2279VWHE I2279VWH 5 P...

Страница 3: ...Star 6 Service 6 WEEE Declaration for India 6 Warranty Statement for Europe 6 Warranty Statement for Middle East and Africa MEA 6 RoHS Declaration for India 6 AOC International Europe B V 6 Warranty...

Страница 4: ...sed as follows NOTE A NOTE indicates important information that helps you make better use of your computer system CAUTION A CAUTION indicates either potential damage to hardware or loss of data and te...

Страница 5: ...ips and extension cords Overloading can result in fire or electric shock To ensure satisfactory operation use the monitor only with UL listed computers which have appropriate configured receptacles ma...

Страница 6: ...sories recommended by the manufacturer A product and cart combination should be moved with care Never push any object into the slot on the monitor cabinet It could damage circuit parts causing a fire...

Страница 7: ...the stain instead of strong detergent which will cauterize the product cabinet When cleaning make sure no detergent is leaked into the product The cleaning cloth should not be too rough as it will scr...

Страница 8: ...vibration or high impact conditions during operation Do not knock or drop the monitor during operation or transportation For display with glossy bezel the user should consider the placement of the dis...

Страница 9: ...signal cables Power Analog DVI HDMI Audio will be provided for all countries and regions Please check with the local dealer or AOC branch office for confirmation DVI Cable Power Cable Monitor Base Ana...

Страница 10: ...Setup Stand Base Please setup or remove the base following the steps as below Setup Remove I2279VW I2279VWHE I2379V I2379VHE 10...

Страница 11: ...Setup Stand Base Please setup or remove the base following the steps as below Setup Remove I2279VWH I2379VH 11...

Страница 12: ...monitor when you change the monitor s angle You are able to adjust the monitor s angle as below NOTE 5 23 Do not touch the LCD screen when you change the angle It may cause damage or break the LCD scr...

Страница 13: ...n on your monitor and computer 3 4 Connect one end of the 15 pin D Sub cable to the back of the monitor and connect the other end to the computer s D Sub port Optional Requires a video card with HDMI...

Страница 14: ...Adjusting Setting Optimal Resolution Windows 10 For Windows 10 Right click START Click CONTROL PANEL Click DISPLAY 14...

Страница 15: ...Click on the Change display settings button Set the resolution SLIDE BAR to Optimal preset resolution 15...

Страница 16: ...Windows 8 For Windows 8 Right click and click All apps at the bottom right of the screen Set the View by to Category Click Appearance and Personalization 16...

Страница 17: ...Click DISPLAY Set the resolution SLIDE BAR to Optimal preset resolution 17...

Страница 18: ...Windows 7 For Windows 7 Click START Click CONTROL PANEL Click Appearance Click DISPLAY 18...

Страница 19: ...Click on the Change display settings button Set the resolution SLIDE BAR to Optimal preset resolution 19...

Страница 20: ...he input source showed in the message bar press Menu Enter button to change to the source selected Widescreen 4 3 switch 1 2 3 4 5 4 3 or wide image ratio When there is no OSD press hotkey continuousl...

Страница 21: ...ar Vision Demo on will be display on the screen for a duration of 5 seconds Press Menu or Exit button the message will disappear Press and hold button for 5 seconds again Clear Vision Demo will be off...

Страница 22: ...t steps 2 3 4 OSD Lock Function To lock the OSD press and hold the MENU button while the monitor is off and then press power button to turn the monitor on To un lock the OSD press and hold the MENU bu...

Страница 23: ...Luminance 1 Press Menu to display menu 2 Press or to select Luminance and press to enter to enter 3 Press or to select submenu and press 23...

Страница 24: ...rd Standard Mode Text Text Mode Internet Internet Mode Game Game Mode Movie Movie Mode Sports Sports Mode Gamma Gamma1 Adjust to Gamma 1 Gamma2 Adjust to Gamma 2 Gamma3 Adjust to Gamma 3 DCR Off Disab...

Страница 25: ...Image Setup 1 Press Menu to display menu 2 Press or to select Image Setup and press to enter 3 Press or to select submenu and press to enter 25...

Страница 26: ...se 0 100 Adjust Picture Phase to reduce Horizontal Line noise Sharpness 0 100 Adjust picture sharpness H Position 0 100 Adjust the horizontal position of the picture V Position 0 100 Adjust the vertic...

Страница 27: ...Color Setup 1 Press Menu to display menu 2 Press or to select Color Setup and press to enter 3 Press or to select submenu and press to enter 27...

Страница 28: ...r Green Green Gain Digital register Blue Blue Gain from Digital register DCB Mode Full Enhance on or off Disable or Enable Full Enhance Mode Nature Skin on or off Disable or Enable Nature Skin Mode Gr...

Страница 29: ...Picture Boost 1 Press Menu to display menu 2 Press or to select Picture Boost and press to enter 3 Press or to select submenu and press to enter 29...

Страница 30: ...Adjust Frame Brightness Contrast 0 100 Adjust Frame Contrast H position 0 100 Adjust Frame horizontal position V position 0 100 Adjust Frame vertical position Bright Frame on or off Disable or Enable...

Страница 31: ...OSD Setup 1 Press Menu to display menu 2 Press or to select OSD Setup and press to enter 3 Press or to select submenu and press to enter 31...

Страница 32: ...t the vertical position of OSD Timeout 5 120 Adjust the OSD Timeout Transparence 0 100 Adjust the transparence of OSD Language Select the OSD language Break Reminder on or off Disable or Enable 1 hour...

Страница 33: ...Extra 1 Press Menu to display menu 2 Press or to select Extra and press to enter to enter 3 Press or to select submenu and press 33...

Страница 34: ...time Image Ratio wide or 4 3 Select wide or 4 3 format for display DDC CI yes or no Turn ON OFF DDC CI Support Reset yes or no Reset the menu to default Information Show the information of the main i...

Страница 35: ...Exit 1 Press Menu to display menu 2 Press or to select Exit and press to enter Exit Exit the main OSD 3 Press AUTO to exit 35...

Страница 36: ...LED Indicator Status LED Color Full Power Mode White Active off Mode Orange 36...

Страница 37: ...Driver Monitor Driver Windows 10 Start Windows 10 Right click START Click Control Panel Click on the Display icon 37...

Страница 38: ...Click on the Change display settings button Click the Advanced Settings button 38...

Страница 39: ...tab and then click the Properties button Click the Driver tab Open the Update Driver Software Generic PnP Monitor window by clicking on Update Driver and then click the Browse my computer for driver...

Страница 40: ...utton and navigate to the following directory X Driver module name where X is the drive letter designator for the CD ROM drive Select the xxx inf file and click the Open button Click the OK button Sel...

Страница 41: ...tem will automatically select the maximum refresh rate and corresponding Color Matching Profiles Windows 8 Start Windows 8 Right click and click All apps at the bottom right of the screen Click on the...

Страница 42: ...Click on the Display icon Click on the Change display settings button Click the Advanced Settings button 42...

Страница 43: ...Click the Monitor tab and then click the Properties button Click the Driver tab 43...

Страница 44: ...click the Browse my computer for driver software button Select Let me pick from a list of device drivers on my computer Click the Have Disk button Click on the Browse button and navigate to the follow...

Страница 45: ...ct your monitor model and click the Next button The files will be copied from the CD to your hard disk drive Close all open windows and remove the CD Restart the system The system will automatically s...

Страница 46: ...Windows 7 Start Windows 7 Click on the Start button and then click on Control Panel Click on the Display icon Click on the Change display settings button 46...

Страница 47: ...Click the Advanced Settings button Click the Monitor tab and then click the Properties button Click the Driver tab 47...

Страница 48: ...click the Browse my computer for driver software button Select Let me pick from a list of device drivers on my computer Click the Have Disk button Click on the Browse button and navigate to the follow...

Страница 49: ...ct your monitor model and click the Next button The files will be copied from the CD to your hard disk drive Close all open windows and remove the CD Restart the system The system will automatically s...

Страница 50: ...s Windows 7 Windows Vista Windows XP nu to i Menu so enus instead o oftware by AO of the OSD bu OC i Menu ma utton on the m akes it easy to monitor To com o adjust your m mplete installat monitor disp...

Страница 51: ...n The software Supported operating systems Windows 7 Windows Vista Windows XP Under each of the four PC status you may choose from the pull down menu the desired time in minutes you re your monitor to...

Страница 52: ...s and each panel displays a different window You only need to drag the window to a corresponding pane when you want to access it It supports multiple monitor display to make your task easier Please fo...

Страница 53: ...en If the initial screen the login screen appears boot the computer in the applicable mode the safe mode for Windows ME XP 2000 and then change the frequency of the video card Refer to the Setting the...

Страница 54: ...bent Make sure your computer is operational by hitting the CAPS LOCK key on the keyboard while observing the CAPS LOCK LED The LED should either turn ON or OFF after hitting the CAPS LOCK key Missing...

Страница 55: ...l Analog 0 7Vp p standard 75 OHM TMDS Power Source 19VDC 1 31A Power Consumption Off timer 0 24 hrs Physical Characteristics VGA DVI I2279VW VGA HDMI Connector Type Detachable Signal Cable Type Enviro...

Страница 56: ...GA 56 476 70 069 XGA 60 023 75 029 60 000 60 000 SXGA 63 981 60 020 79 976 75 025 55 935 59 887 65 290 59 954 VGA 640 480 67Hz 35 000 66 667 SVGA 800 600 56Hz 35 156 56 250 67 500 60 000 SXGA WXGA WSX...

Страница 57: ...tandard 75 OHM TMDS Power Source 19VDC 1 31A Power Consumption Off timer 0 24 hrs Physical Characteristics VGA DVI I2379V VGA HDMI I2379VHE 9 Connector Type Detachable Signal Cable Type Environmental...

Страница 58: ...725 74 551 XGA 48 363 60 004 XGA 56 476 70 069 XGA 60 023 75 029 60 000 60 000 SXGA 63 981 60 020 79 976 75 025 55 935 59 887 65 290 59 954 VGA 640 480 67Hz 35 000 66 667 SVGA 800 600 56Hz 35 156 56...

Страница 59: ...24 Pin Color Display Signal Cable Pin Number 24 Pin Color Display Signal Cable 1 TMDS data 2 13 TMDS data 3 2 TMDS data 2 14 5V Power 3 TMDS data 2 4 Shield 15 Ground for 5V 4 TMDS data 4 16 Hot Plug...

Страница 60: ...e a 2 a 2 Shield a 2 a 1 a 1Shield a 1 a 0 a 0 Shield Pin No 9 T 10 T 11 T 12 T 13 C 14 R 15 S 16 S Signal Name TMDS Data 0 TMDS Clock TMDS Clock S TMDS Clock CEC Reserved N C SCL SDA e Shield C on de...

Страница 61: ...DDC STANDARD It allows the monitor to inform the host system of its identity and depending on the level of DDC used communicate additional information about its display capabilities The DDC2B is a bi...

Страница 62: ...etermined by turning the equipment off and on the user is encouraged to try to correct the interference by one or more of the following measures Reorient or relocate the receiving antenna Increase the...

Страница 63: ...waste Instead it is your responsibility to dispose of your waste equipment by handing it over to a designated collection point for the recycling of waste electrical and electronic equipment The separa...

Страница 64: ...R is a U S registered mark As an ENERGY STAR Partner AOC International Europe BV and Envision Peripherals Inc have determined that this product meets the ENERGY STAR guidelines for energy efficiency F...

Страница 65: ...on the address label Put the RMA number on the shipping carton AOC International Europe B V will pay the return shipping charges within one of the countries specified within this warranty statement A...

Страница 66: ...EUROPE B V OBLIGATIONS AND YOUR REMEDIES HEREUNDER ARE SOLELY AND EXCULSIVELY AS STATED HERE AOC INTERNATIONAL EUROPE B V LIABILITY WHETHER BASED ON CONTRACT TORT WARRANTY STRICT LIABILITY OR OTHER TH...

Страница 67: ...y as per the product ID serial number and for such exceptional cases Original Invoice Proof Of Purchase Receipt is mandatory If the product appears to be defective please contact your AOC authorized d...

Страница 68: ...INCLUDING THE WARRANTIES OF MERCHANTABILITY AND FITNESS FOR A PARTICULAR PURPOSE ARE LIMITED IN DURATION TO A PERIOD OF ONE 1 to THREE 3 YEARS FOR PARTS AND LABOR FROM THE ORIGINAL DATE OF CONSUMER PU...

Страница 69: ...ceptable defect levels for each type In order to qualify for repair or replacement under warranty the number of pixel defects on a TFT monitor panel must exceed these acceptable levels Pixels and Sub...

Страница 70: ...ges EPI is not responsible for damage to inbound product that was not properly packaged EPI will pay the return shipment charges within one of the countries specified within this warranty statement EP...

Страница 71: ...LY TO YOU ALTHOUGH THIS LIMITED WARRANTY GIVES YOU SPECIFIC LEGAL RIGHTS YOU MAY HAVE OTHER RIGHTS WHICH MAY VARY FROM STATE TO STATE In the United States of America this limited warranty is only vali...

Страница 72: ...ours after you are approved for our program If your monitor qualifies for the EASE program AOC will pay for freight both ways Step 1 Phone our TECH Department at 888 662 9888 Step 2 Fill out and retur...

Отзывы: