background image

rev 1C 

S10 User Manual         5


1.1 

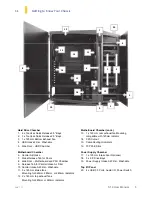
Getting to Know Your Chassis 

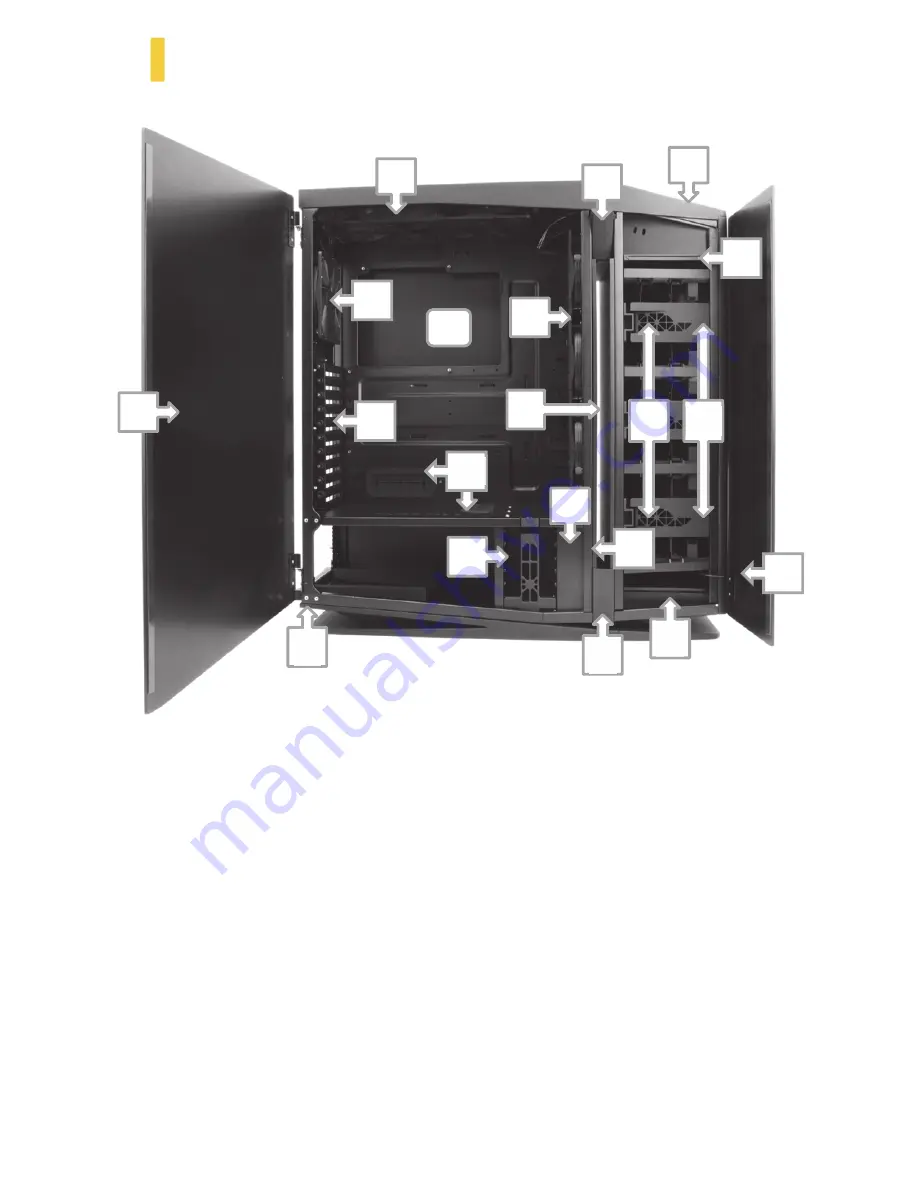
Hard Drive Chamber 

1. 6 x Tool-less Quick Release 3.5” Bays
2. 3 x Tool-less Quick Release 2.5” Bays
3. 1 x 120 mm Bottom Exhaust Fan
4. HDD Intake Filter - Washable
5. Side Door – HDD Chamber

Motherboard Chamber 

6. Central Air Intake
7. Quick Release Tab for Doors
8. Side Door – Motherboard and PSU Chamber
9. Release Tab for Central Intake Air Filter
10. Central Intake Air Filter - Washable
11. 3 x 120 mm intake fans

Mounting for 360mm, 280mm, or 240mm radiators

12. 2 x 140 mm top exhaust fans

Mounting for 280mm or 240mm radiators

Motherboard Chamber (cont.)


13. 1 x 120 mm rear exhaust fan Mounting

compatible with 120mm radiator 

14. CPU 

Cutout

15. Cable 

Routing 

Grommets

16. 10 PCI-E Slots

Power Supply Chamber 

17. 1 x 120 mm Intake Fan (Optional)
18. 5 x 2.5” Drive Bays
19. Power Supply Intake Air Filter - Washable

Top I/O Panel 

20. 4 x USB 3.0 Ports, Audio I/O, Power Switch

12

20

13 

14 

16 

15 

19 

18 

10 

17

11 

1

1

1

2

Содержание Signature S10

Страница 1: ...User Manual...

Страница 2: ...e you can effectively fine tune cooling elements to meet your needs maximizing performance and minimizing system noise The advanced cooling system of the S10 includes seven 7 strategically placed fans...

Страница 3: ...ower Supply Installation 12 2 5 Removing Replacing Air Filters 13 2 6 3 5 Hard Disk Drive Installation 14 2 7 2 5 Solid State Drive Installation 15 Section 3 Front I O Ports 3 1 USB 3 0 Ports 17 3 2 H...

Страница 4: ...4 S10 User Manual rev 1C Section 1 Introduction...

Страница 5: ...take Air Filter 10 Central Intake Air Filter Washable 11 3 x 120 mm intake fans Mounting for 360mm 280mm or 240mm radiators 12 2 x 140 mm top exhaust fans Mounting for 280mm or 240mm radiators Motherb...

Страница 6: ...240 mm radiator for water cooling 1 x 120 mm rear exhaust fan included compatible with 120 mm radiator for water cooling Comes with Quick Release air filter washable Maximum CPU Cooler Height 6 5 in 1...

Страница 7: ...urself periodically by touching an unpainted metal surface or by using a wrist grounding strap Before you connect a cable ensure that both connectors are correctly aligned and oriented Bent pins can b...

Страница 8: ...o support the chassis on a flat surface Grab both sides of the metal chassis as shown figure 1 to lift it up Please be careful as the case is very heavy even without any components installed WARNING D...

Страница 9: ...rev 1C S10 User Manual 9 Section 2 Hardware Installation...

Страница 10: ...ift up and remove the motherboard Screw in the brass standoffs to the threaded holes that line up with the motherboard 3 Place the motherboard on the brass standoffs Screw in the motherboard to the st...

Страница 11: ...trated in Section 2 1 Figure 4 2 Mount the power supply into the power supply mounting plate with the screws provided There are two ways of orienting the power supply Option 1 Mount the power supply w...

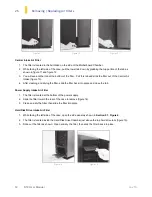
Страница 12: ...ying the filter slide the filter back into place and close the tab Power Supply Intake Air Filter 1 The filter is located at the bottom of the power supply 2 Slide the filter toward the rear of the ca...

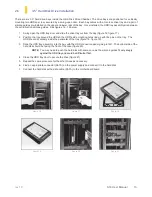
Страница 13: ...he HDD s side mounting holes line up with the pins on the tray The HDD should sit entirely inside the perimeter of the tray figure 18 figure 19 3 Slide the HDD tray assembly into the bay with the HDD...

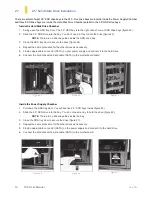
Страница 14: ...gure 24 4 Repeat the same procedure for the other drives as necessary 5 Find an appropriate connector SATA on your power supply and connect it to the hard drive 6 Connect the hard disk with a data cab...

Страница 15: ...rev 1C S10 User Manual 15 Section 3 Front I O Ports...

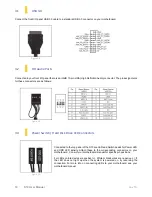
Страница 16: ...ard Disk Drive LED Connectors Connected to the top panel of the S10 are LED and Switch Leads for Power LED and HDD LED activity Attach these to the corresponding connectors on your motherboard Consult...

Страница 17: ...rev 1C S10 User Manual 17 Section 4 Cooling System...

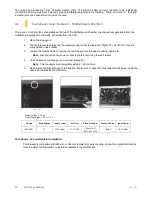
Страница 18: ...osen the thumbscrews to remove the fan bracket from the upper housing figure 32 Note Disconnect the fan power connector before removing the fan bracket 4 You can service the fans as you wish now figur...

Страница 19: ...side the case and reinstall the thumbscrews For 360 mm 280 mm 240 mm Radiator Installation This bracket is compatible with 360 mm 280 mm or 240 mm radiator for water cooling Follow the original instru...

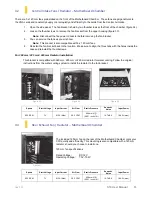
Страница 20: ...recommend checking the air filter at least once a month initially The frequency will change depending on system usage users whose systems run 24 7 will likely have to check clean more often than those...

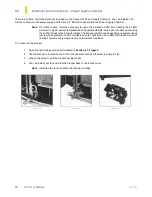
Страница 21: ...et back into its location Push the bracket in until you hear a click indicating the bracket is secured Note Install the fan in the direction that allows air intake 4 6 Opening the Top Panel In a rare...

Страница 22: ...com Europe 31 0 10 208 8919 europe rma antec com Asia 886 0 800 060 696 apsupport antec com Copyright 2015 Antec Inc All rights reserved All trademarks are the property of their respective owners Spec...

Страница 23: ...Manual del Usuario...

Страница 24: ...aja Al separar cada zona termal se pueden ajustar eficazmente los elementos refrigerantes hasta conseguir el efecto deseado maximizando as el rendimiento y minimizando el ruido en todo el sistema El a...

Страница 25: ...Unidad de Disco Duro 3 5 14 2 7 Instalaci n de la Unidad Solid State 2 5 15 Secci n 3 Puertos Frontales I O 3 1 Puertos USB 3 0 17 3 2 Puertos Audio HD 17 3 3 Interruptor de Encendido Conectores LED d...

Страница 26: ...4 S10 User Manual rev 1C Secci n 1 Introducci n...

Страница 27: ...e entrada central 10 Filtro de aire de entrada central Lavable 11 3 ventiladores de toma de 120 mms Montaje para radiadores de 360 280 o 240mms 12 2 ventiladores altos de salida de 140 mms Montaje par...

Страница 28: ...120 mms incluido compatible con un radiador de 120 mms para refrigeraci n por agua Viene con un filtro de aire de r pida extracci n lavable Altura m xima del refrigerador de la CPU 165 mms Compartime...

Страница 29: ...nte tocando una superficie de metal no pintada o use una cinta de pulsera de toma de tierra Antes de conectar cualquier cable aseg rese de que ambos conectores est n correctamente alineados y orientad...

Страница 30: ...s sobre una superficie plana Agarre los dos lados del chasis de metal como se muestra imagen 1 para levantarla Por favor tenga cuidado ya que la caja es muy pesada incluso sin tener ning n componente...

Страница 31: ...rev 1C S10 User Manual 9 Secci n 2 Instalaci n del Hardware...

Страница 32: ...a madre Atornille en los agujeros que se alinean con la placa 3 Coloque la placa en los pins de lat n y atorn llela con el destornillador Phillips o de estrella que se incluye 2 3 Organizaci n del cab...

Страница 33: ...uestra en la Secci n 2 1 Imagen 4 2 Monte la fuente de alimentaci n en su bandeja de montaje con los tornillos que se incluyen Hay dos maneras posibles de orientar la fuente de alimentaci n Opci n 1 M...

Страница 34: ...lo de nuevo en su lugar y cierre la barra Filtro de toma de la fuente de alimentaci n 1 Este filtro est situado en la parte baja de la fuente 2 Arrastre este filtro hacia atr s para sacarlo imagen 14...

Страница 35: ...del HDD hasta que sus agujeros laterales de montaje se alineen con los pins de la bandeja El HDD debe asentarse completamente dentro del per metro de su bandeja imagen 18 imagen 19 3 Arrastre el ensam...

Страница 36: ...HDD para proteger el disco imagen 24 4 Repita en su caso el mismo proceso con los otros discos 5 Encuentre un conector SATA apropiado en su fuente y con ctelo al disco duro 6 Conecte el disco duro con...

Страница 37: ...rev 1C S10 User Manual 15 Secci n 3 Puertos Frontales I O...

Страница 38: ...dad de disco duro Conectados al panel alto de la S10 est n dos interruptores LED y de corriente para tener actividad de Power LED y HDD LED Ajuste estos a sus conectores correspondientes en su placa m...

Страница 39: ...rev 1C S10 User Manual 17 Secci n 4 Sistema de Refrigeraci n...

Страница 40: ...n este montaje 3 Afloje los tornillos para sacar el montaje del ventilador desde la parte alta imagen 32 Nota Desconecte el conector de corriente del ventilador antes de sacar el montaje del mismo 4 P...

Страница 41: ...de dentro de la caja y vuelva a atornillar Para la instalaci n de radiadores de 360 mm 280 mm 240 mm Este montaje es compatible con radiadores de refrigeraci n por agua de 360 280 o 240 mms Siga las...

Страница 42: ...comendamos revisar el filtro del aire una vez al mes como m nimo inicialmente La frecuencia variar dependiendo del uso del sistema usuarios de sistemas que funcionan todo el tiempo deber n probablemen...

Страница 43: ...e el montaje del ventilador otra vez en su sitio Apriete el montaje hasta que oiga un click esto indicar que el montaje est sujeto Nota Instale el ventilador en la direcci n que permita el paso de air...

Страница 44: ...europe rma antec com Asia 886 0 800 060 696 apsupport antec com Copyright 2015 Antec Inc All rights reserved Todas las marcas registradas son propiedad de sus respectivos due os Las especificaciones e...

Страница 45: ...Manuel d utilisation...

Страница 46: ...pouvez affiner le refroidissement afin de r pondre au mieux vos besoins maximiser les performances et minimiser le bruit du syst me Le syst me de refroidissement avanc du S10 inclus 7 ventilateurs str...

Страница 47: ...tation 12 2 5 Enlever Replacer les filtres air 13 2 6 Installation disque dur 3 5 14 2 7 Installation SSD 2 5 15 Section 3 Ports entr e sortie en fa ade 3 1 Ports USB 3 0 17 3 2 Ports HD Audio 17 3 3...

Страница 48: ...4 S10 User Manual rev 1C Section 1 Introduction...

Страница 49: ...raction filtre air central 10 Filtre air central Lavable 11 3 x ventilateurs 120 mm aspiration Emplacement radiateurs 360 mm 280 mm ou 240 mm 12 2 x ventilateurs 140 mm Emplacements radiateurs 240 mm...

Страница 50: ...x ventilateur 120 mm arri re inclus compatible avec radiateur 120 mm pour refroidissement liquide Fourni avec filtre air lavable extraction rapide Hauteur maximum refroidisseur CPU 165 mm Compartiment...

Страница 51: ...e lectrostatique d magn tisez vous de mani re r guli re en touchant une surface de m tal non peinte ou en utilisant un bracelet antistatique Avant de connecter un c ble assurez vous que l ensemble des...

Страница 52: ...our le maintenir sur une surface plane Saisissez les cot s du ch ssis en m tal comme sur le sch ma figure 1 pour le soulever Faites attention car le boitier est tr s lourd m me non int gr ATTENTION Ne...

Страница 53: ...rev 1C S10 User Manual 9 Section 2 Installation du mat riel...

Страница 54: ...e 2 Soulevez et retirer la carte m re Vissez les espaceurs en laitons dans les trous taraud s afin de les aligner avec la carte m re 3 Placez la carte m re sur les espaceurs en laiton Vissez la carte...

Страница 55: ...e expliqu en Section 2 1 Figure 4 2 Montez le bloc d alimentation sur le plateau de r tention l aide des vis fournies Il existe 2 modes d orientation du bloc d alimentation Option 1 Montez le bloc d a...

Страница 56: ...oir nettoy et s ch le filtre remettez le en place et verrouillez la languette Filtre air bloc d alimentation 1 Le filtre se situe en bas du bloc d alimentation 2 Glissez le filtre vers l arri re du bo...

Страница 57: ...igure 17 2 Positionnez le plateau de fa on aligner les broches du bon cot du HDD Le HDD doit recouvrir l int gralit du plateau figure 18 figure 19 3 Repositionnez le plateau HDD ainsi assembl dans la...

Страница 58: ...cteur figure 24 4 R p tez l op ration pour les autres SSD autant que n cessaire 5 Trouvez un connecteur appropri SATA sur l alimentation et connectez le au disque 6 Connectez le disque l aide d un c b...

Страница 59: ...rev 1C S10 User Manual 15 Section 3 Ports entr e sortie en fa ade...

Страница 60: ...r t Connecteurs LED disque dur Des connecteurs pour activit s HDD LED et Power switch LED se trouvent connect s au panneau sup rieur du S10 Attachez les aux connecteurs appropri s sur votre carte m re...

Страница 61: ...rev 1C S10 User Manual 17 Section 4 Syst me de refroidissement...

Страница 62: ...support 3 Desserrez les vis pour retirer le support du ventilateur du boitier sup rieur figure 32 Note D connectez le connecteur d alimentation du ventilateur avant de retirer le support de ventilateu...

Страница 63: ...l int rieur du boitier et replacez les vis Pour l installation des radiateurs 360 mm 280 mm 240 mm Le support est compatible avec les radiateurs 360mm 280 mm ou 240 mm pour le refroidissement liquide...

Страница 64: ...ommandons de v rifier le filtre au moins une fois par mois dans les premiers temps La fr quence variera en fonction de l usage les utilisateurs qui font tourner leur PC 24 7 devront contr ler plus fr...

Страница 65: ...le support jusqu ce que vous entendiez un clic vous indiquant que le support est correctement repositionn Note Installez le ventilateur dans une direction qui permet l aspiration d air 4 6 Ouverture...

Страница 66: ...10 208 8919 europe rma antec com Asia 886 0 800 060 696 apsupport antec com Copyright 2015 Antec Inc All rights reserved Toutes les marques d pos es sont la propri t de leurs propri taires respectifs...

Страница 67: ...Benutzer Handbuch...

Страница 68: ...fortschrittliche K hlsystem des S10 beinhaltet sieben 7 strategisch sinnvoll platzierte L fter und die Vorrichtung f r einen weiteren optionalen L fter Es ist geeignet f r die Installation mehrerer R...

Страница 69: ...filter 13 2 6 Einbau des 3 5 Zoll Laufwerks 14 2 7 Einbau der 2 5 Zoll SSD Solid State Drive 15 Bereich 3 Frontseitige I O Anschl sse 3 1 USB 3 0 Anschl sse 17 3 2 HD Audio Anschl sse 17 3 3 Einschalt...

Страница 70: ...4 S10 Benutzer Handbuch rev 1C Bereich 1 Einleitung...

Страница 71: ...9 Schnellverschluss f r zentralen Zuluftfilter 10 Zentraler Zuluftfilter abwaschbar 11 3 x 120 mm Ansaugl fter Vorrichtung f r 360 280 oder 240 mm Radiatoren 12 2 x 140 mm Abluftl fter oben Vorrichtu...

Страница 72: ...20 mm r ckseitiger Abluftl fter inklusive geeingnet f r 120 mm Radiatoren f r Wasserk hlung Inklusive Luftfilter mit Schnellverschluss abwaschbar Maximale CPU K hlerh he 165 mm Netzteil Kammer 1 x 120...

Страница 73: ...nd am Handgelenk Bevor Sie ein Kabel anschlie en stellen Sie vorher sicher dass beide Stecker korrekt ausgerichtet sind Verbogene Pins sind sehr schwer zu reparieren und erfordern h ufig einen komplet...

Страница 74: ...eifen Sie beide Seiten des Geh uses gleichzeitig wie oben im Bild 1 zu sehen um es hochzuheben Bitte seien Sie vorsichtig denn das Geh use ist sehr schwer auch ohne bereits eingebaute Komponenten WARN...

Страница 75: ...rev 1C S10 Benutzer Handbuch 9 Bereich 2 Einbau Ihrer Hardware...

Страница 76: ...es bevor Sie die Messing Abstandshalter wie gerade geplant ausgerichtet in die Gewindel cher schrauben 3 Platzieren Sie das Mainboard auf die Messing Abstandshalter und schrauben Sie es nun mit den m...

Страница 77: ...itenpanel wie in Bild 4 Bereich 2 1 gezeigt 2 Setzen Sie das Netzteil in die Netzteil Vorrichtung und fixieren Sie es mit den passenden Schrauben Es gibt zwei M glichkeiten das Netzteil einzusetzen Op...

Страница 78: ...d getrocknet haben schieben Sie Ihn einfach wieder hinein und schlie en Sie den Schnellverschluss Netzteil Zuluftfilter 1 Der Filter befindet sich unter dem Netzteil 2 Ziehen Sie den Filter vorsichtig...

Страница 79: ...m Einschub so dass die seitlichen Befestigungsl cher des Laufwerks in den Pins des Einschubs einrasten Das Laufwerk sollte sich komplett im Umfang des Einschubs befinden Blid 18 und 19 3 Schieben Sie...

Страница 80: ...rholen Sie die obigen Schritte f r weitere SSD Laufwerke 5 Finden Sie einen passenden Anschluss SATA Power am Netzteil und schlie en diesen an das Laufwerk an 6 Verbinden Sie das SSD Laufwerk mit dem...

Страница 81: ...rev 1C S10 Benutzer Handbuch 15 Bereich 3 Frontseitige I O Anschl sse...

Страница 82: ...die LEDs und Schalter f r das Ein und Ausschalten sowie die LEDs f r die Festplatten Aktivit t Verbinden Sie diese mit den dazugeh rigen Anschl ssen an Ihrem Mainboard Schauen Sie ggf im Handbuch Ihre...

Страница 83: ...rev 1C S10 Benutzer Handbuch 17 Bereich 4 K hlungssystem...

Страница 84: ...en um die L fterhalterung vom oberen Geh useteil zu l sen Bild 32 BEMERKUNG Trennen Sie die Steckverbindung des L fters bevor Sie die L fterhalterung l sen 4 Sie k nnen die L fter nun nach Belieben re...

Страница 85: ...s der L fterhalterung Bild 36 in den f r sie vorgesehenen L chern stecken bevor Sie die Schrauben wieder einsetzen und festdrehen Installation von 360 280 240 mm Radiatoren Diese Halterung ist geeigne...

Страница 86: ...enigstens einmal monatlich berpr fen und ggf reinigen Die H ufigkeit h ngt nat rlich von der Nutzungsintensit t Ihres Systems Nutzer deren System 24 Std am Tag l uft werden evtl h ufiger reinigen m ss...

Страница 87: ...vorsichtig hinein bis Sie ein Klicken h ren BEMERKUNG Installieren Sie den L fter so dass er die Luft ansaugt 4 6 ffnen der Oberblende In seltenen F llen kann es vorkommen dass Sie die Oberblende ffn...

Страница 88: ...sien 886 0 800 060 696 apsupport antec com Copyright 2015 Antec Inc Alle Rechte vorbehalten Alle Markenzeichen sind Eigentum ihrer jeweiligen Besitzer Die Spezifikationen sind ohne vorherige Ank ndigu...

Страница 89: ...Manuale d uso...

Страница 90: ...golandoli separatamente per soddisfare le vostre esigenze Massimizzando le prestazioni e minimizzando il rumore del sistema Il sistema di raffreddamento avanzato del S10 comprende sette ventole 7 stra...

Страница 91: ...mozione filtri aria 13 2 6 Installazione HDD da 3 5 14 2 7 Installazione SSD HDD da 2 5 15 Sezione 3 Panello I O frontale 3 1 Porte USB 3 0 17 3 2 Porte Audio HD 17 3 3 LED Alimentazione Hard Disk 17...

Страница 92: ...4 S10 Manuale d uso rev 1C Sezione 1 Introduzione...

Страница 93: ...centrale 10 Filtro aria Lavabile 11 3x ventole da 120 mm d aspirazione spazio per installare un radiatore da 240 280 360 mm 12 2x ventole da 140 mm di scarico e spazio per installare un radiatore da...

Страница 94: ...osteriore da 120 mm compatibile con radiatori da 120 mm per raffreddamento a liquido Pulsanti di rilascio veloce filtro aria lavabile Altezza massima supportata per CPU cooler 165 mm Scomparto aliment...

Страница 95: ...ttrostatiche scaricare a terra periodicamente toccando una superficie metallica non verniciata o utilizzando un braccialetto antistatico Prima di collegare un cavo accertarsi che entrambi i connettori...

Страница 96: ...una superficie piana Afferrare entrambi i lati del telaio metallico come mostrato figura 1 per sollevarlo Si prega di prestare attenzione in quanto il case molto pesante anche senza alcun componente i...

Страница 97: ...rev 1C S10 Manuale d uso 9 Sezione 2 Installazione Hardware...

Страница 98: ...2 Sollevare e rimuovere la scheda madre Avvitare i distanziatori in ottone nei fori filettati allineati con la scheda madre 3 Posizionare la scheda madre sui distanziatori in ottone Avvitare la sched...

Страница 99: ...ro come dimostrato nella sezione 2 1 figura 4 2 Montare l alimentatore nella piastra di montaggio di alimentazione con le viti in dotazione Ci sono due modi di orientare l alimentatore Opzione1 Montar...

Страница 100: ...ere il filtro in posizione e chiudere la linguetta Filtri aspirazione alimentatore 1 Il filtro situato sul fondo dello scomparto 2 Scorrere il filtro verso il retro del telaio per rimuovere figura 14...

Страница 101: ...fori di montaggio siano allineati con i perni sul vassoio L HDD deve essere alloggiato interamente all interno del perimetro del vassoio figura 18 figura 19 3 Fare scorrere l HDD montato nel vassoio...

Страница 102: ...ssoio HDD per bloccare l unit figura 24 4 Ripetere le stesse procedure 1 3 per installare altri SSD 5 Trovare un connettore adeguato SATA dall alimentatore e collegarlo al disco rigido 6 Connettere l...

Страница 103: ...rev 1C S10 Manuale d uso 15 Sezione 3 Pannello I O Frontale...

Страница 104: ...Collegati al pannello superiore del S10 sono presenti i LED per l alimentazione e dell attivit HDD Attaccare questi ai corrispondenti connettori sulla scheda madre Consultare il manuale della scheda...

Страница 105: ...rev 1C S10 Manuale d uso 17 Sezione 4 Sistema di Raffreddamento...

Страница 106: ...lla staffa 3 Allentare le viti ad alette per rimuovere la staffa delle ventola dal case figura 32 Nota Scollegare i connettori di alimentazione delle ventole prima di rimuoverle 4 Potete disporre dell...

Страница 107: ...i fori all interno del case e reinstallare le viti Per l installazione di radiatori da 240 o 280 o 360 mm Questo supporto compatibile radiatori per il raffreddamento ad acqua da 240 280 360 mm Seguire...

Страница 108: ...pi elevati e possibili problemi di stabilit Si consiglia di controllare il filtro dell aria almeno una volta al mese La frequenza pu variare in base all uso del sistema aumentare la frequenza per sist...

Страница 109: ...affa fino a sentire un clic che indica la staffa stata fissata Note Installare la ventola nella direzione che permette presa d aria 4 6 Apertura pannello superiore Nell eventualit rara dovesse essere...

Страница 110: ...Europe 31 0 10 208 8919 europe rma antec com Asia 886 0 800 060 696 apsupport antec com Copyright 2015 Antec Inc Tutti i diritti riservati Tutti i marchi sono di propriet dei rispettivi titolari Le s...

Страница 111: ......

Страница 112: ...2 S10 rev 1C S10 S10 ATX S10 CPU S10 7 Quad SLIready PCI E 12 5 PCI E S10 High Current Pro Edge ATX 2015 4 1 Antec S10...

Страница 113: ...rev 1C S10 3 1 1 6 1 2 7 1 3 8 1 4 S10 9 2 1 11 2 2 11 2 3 11 2 4 12 2 5 13 2 6 3 5 14 2 7 2 5 15 I O 3 1 USB 3 0 17 3 2 HD 17 3 3 LED 17 4 1 19 4 2 20 4 3 20 4 4 21 4 5 22 4 6 22...

Страница 114: ...4 S10 rev 1C...

Страница 115: ...120mm 4 HDD 5 HDD 6 7 8 PSU 9 10 11 3 120mm 360mm 280mm 240mm 12 2 140mm 13 1 120 mm 120mm 14 CPU 15 16 10 PCI E 17 1 120mm 18 5 2 5 19 I O 20 4 USB 3 0 I O 12 20 8 13 14 16 15 7 6 4 19 18 10 9 17 3 5...

Страница 116: ...n x 9 05 in x 23 22 in 602 mm x 230 mm x 590 mm 39 05 lbs 17 71 kg 2x140 280 240 3x 120 360 280 240 1 120 120 1x120 1x120 6 3 5 8 2 5 Mini ITX Micro ATX Standard ATX XL ATX E ATX up to 12 x 13 12 5in...

Страница 117: ...rev 1C S10 7 1 3 S10 S10 Antec CPU RAM CPU...

Страница 118: ...8 S10 rev 1C 1 4 S10 S10 1 S10 2 1 2...

Страница 119: ...rev 1C S10 9...

Страница 120: ...10 S10 rev 1C 2 1 4 11 2 2 CPU 1 2 3 2 3 S10 SATA NOTE 6 7 HDD PSU 6 7 5 3 4...

Страница 121: ...rev 1C S10 11 2 4 1 Section 2 1 Figure 4 2 1 2 10 9 8...

Страница 122: ...12 S10 rev 1C 2 5 1 2 11 12 3 13 4 1 2 14 3 1 2 1 Figure 4 2 15 3 13 12 11 15 14...

Страница 123: ...rev 1C S10 13 2 6 3 5 S10 3 5 16 19 1 16 17 2 HDD 18 19 3 20 NOTE 4 21 5 HDD 6 SATA 7 SATA 16 17 18 19 20 21...

Страница 124: ...Solid State Drive Installation S10 8 2 5 SSD 3 5 HDD HDD HDD 1 2 5 SSD HDD 22 2 2 5 SSD SSD 23 NOTE SSD 3 24 4 SSD 5 SATA 6 SATA 1 SSD 2 5 SSD 25 2 2 5 SSD SSD 26 NOTE SSD 7 SSD 27 8 SSD 9 SATA 10 SA...

Страница 125: ...rev 1C S10 15 I O...

Страница 126: ...16 S10 rev 1C 3 1 USB 3 0 USB 3 0 3 2 HD Intel 10 HDA 3 3 LED S10 LED LED LED 28 29 30...

Страница 127: ...rev 1C S10 17...

Страница 128: ...0 S10 7 4 1 2 140mm CPU 1 2 31 2 140mm 3 32 4 33 2 120 mm 5 Rated Voltage DC 12V Operating Voltage 7 0V 13 2 V 800 RPM 7V 0 12A Max 41 2 CFM 0 28mm H2O 0 011 inch H2O 14 dBA 1 4 W Max 280mm 240mm 280m...

Страница 129: ...m 4 360 mm 280mm 240mm 360mm 280mm 240mm 4 3 120mm CPU 120mm 120mm DC 12V 7 0V 13 2V 900 RPM 7V 0 12A Max 39 5 CFM 0 54mm H2O 0 021 inch H2O 14 7 dBA 1 44 W max 900 RPM 7V 0 12A Max 39 5 CFM 0 54mm H2...

Страница 130: ...20 S10 rev 1C 4 4 120mm 120mm 5x 2 5 SSD 24 1 2 1 4 2 38 3 39 4 38 39 40...

Страница 131: ...120mm 1200rpm 1 2 1 4 2 41 3 42 4 5 4 6 1 2 4 1 31 3 There are six tabs holding the top panel Three tabs on each side 4 5 6 7 tabs I O T 1200 RPM 7V 0 25A Max 45 6 CFM 1 1mm H2O 0 043 inch H2O 21 7 d...

Страница 132: ...com Europe 31 0 10 208 8919 europe rma antec com Asia 886 0 800 060 696 apsupport antec com Copyright 2015 Antec Inc All rights reserved All trademarks are the property of their respective owners Spec...

Страница 133: ......

Страница 134: ...2 S10 rev 1C S10 S10 ATX S10 CPU S10 7 Quad SLIready PCI E 12 5 PCI E S10 High Current Pro Edge ATX 2015 4 1 Antec S10...

Страница 135: ...rev 1C S10 3 1 1 6 1 2 7 1 3 8 1 4 S10 9 2 1 11 2 2 11 2 3 11 2 4 12 2 5 13 2 6 3 5 14 2 7 2 5 15 I O 3 1 USB 3 0 17 3 2 HD 17 3 3 LED 17 4 1 19 4 2 20 4 3 20 4 4 21 4 5 22 4 6 22...

Страница 136: ...4 S10 rev 1C...

Страница 137: ...5 3 1 120mm 4 HDD 5 HDD 6 7 8 PSU 9 10 11 3 120mm 360mm 280mm 240mm 12 2 140mm 280mm 240mm 13 1 120 mm 120mm 14 CPU 15 16 10 PCI E 17 1 120mm 18 5 2 5 19 I O 20 4 USB 3 0 I O 12 20 8 13 14 16 15 7 6...

Страница 138: ...n x 9 05 in x 23 22 in 602 mm x 230 mm x 590 mm 39 05 lbs 17 71 kg 2x140 280 240 3x 120 360 280 240 1 120 120 1x120 1x120 6 3 5 8 2 5 Mini ITX Micro ATX Standard ATX XL ATX E ATX up to 12 x 13 12 5in...

Страница 139: ...rev 1C S10 7 1 3 S10 S10 Antec CPU RAM CPU...

Страница 140: ...8 S10 rev 1C 1 4 S10 S10 1 S10 2 1 2...

Страница 141: ...rev 1C S10 9...

Страница 142: ...10 S10 rev 1C 2 1 4 11 2 2 CPU 1 2 2 3 S10 SATA 6 7 HDD PSU 6 7 5 3 4...

Страница 143: ...rev 1C S10 11 2 4 1 2 1 4 2 1 2 10 9 8...

Страница 144: ...12 S10 rev 1C 2 5 1 2 11 12 3 13 4 1 2 14 3 1 2 1 4 2 15 3 13 12 11 15 14...

Страница 145: ...rev 1C S10 13 2 6 3 5 S10 3 5 16 19 1 16 17 2 HDD 18 19 3 20 4 21 5 HDD 6 SATA 7 SATA 16 17 18 19 20 21...

Страница 146: ...S10 rev 1C 2 7 2 5 SSD S10 8 2 5 SSD 3 5 HDD HDD HDD 1 2 5 SSD HDD 22 2 2 5 SSD SSD 23 SSD 3 24 4 SSD 5 SATA 6 SATA 1 SSD 2 5 SSD 25 2 2 5 SSD SSD 26 SSD 3 SSD 27 4 SSD 5 SATA 6 SATA 22 23 24 25 26 2...

Страница 147: ...rev 1C S10 15 I O...

Страница 148: ...16 S10 rev 1C 3 1 USB 3 0 USB 3 0 3 2 HD Intel 10 HDA 3 3 LED S10 LED LED LED 28 29 30...

Страница 149: ...rev 1C S10 17...

Страница 150: ...S10 rev 1C S10 S10 7 4 1 2 140mm CPU 1 2 31 2 140mm 3 32 4 33 2 120 mm 5 DC 12V DC 7 0V 13 2 V 800 RPM 7V 0 12A Max 41 2 CFM 0 28mm H2O 0 011 inch H2O 14 dBA 1 4 W Max 280mm 240mm 280mm 240mm 31 32 3...

Страница 151: ...4 360 mm 280mm 240mm 360mm 280mm 240mm 4 3 120mm CPU 120mm 120mm DC 12V DC 7 0V 13 2V 900 RPM 7V 0 12A Max 39 5 CFM 0 54mm H2O 0 021 inch H2O 14 7 dBA 1 44 W max 900 RPM 7V 0 12A Max 39 5 CFM 0 54mm H...

Страница 152: ...20 S10 rev 1C 4 4 120mm 120mm 5x 2 5 SSD 24 1 2 1 4 2 38 3 39 4 38 39 40...

Страница 153: ...rev 1C S10 21 4 5 120mm 1200rpm 1 2 1 4 2 41 3 42 4 5 4 6 1 2 4 1 31 3 4 5 6 7 I O 1200 RPM 7V 0 25A Max 45 6 CFM 1 1mm H2O 0 043 inch H2O 21 7 dBA 3 W Max 41 42...

Страница 154: ...com Europe 31 0 10 208 8919 europe rma antec com Asia 886 0 800 060 696 apsupport antec com Copyright 2015 Antec Inc All rights reserved All trademarks are the property of their respective owners Spec...

Страница 155: ......

Страница 156: ...2 S10 rev 1C S10 Antec S10 HDD PSU ATX CPU PSU HDD CPU HDD PSU S10 7 1 Antec S10 Quad SLI PCI E 10 4 S10 PSU PSU ATX Antec HCP EDGE S10 2015 4 1 Antec S10...

Страница 157: ...3 1 1 1 PC 6 1 2 7 1 3 8 1 4 S10 9 2 2 1 11 2 2 11 2 3 11 2 4 PSU 12 2 5 13 2 6 3 5 HDD 14 2 7 2 5 SSD 15 3 I O 3 1 USB 3 0 17 3 2 HD Audio 17 3 3 HDD LED 17 4 4 1 19 4 2 20 4 3 20 4 4 PSU 21 4 5 HDD...

Страница 158: ...4 S10 rev 1C 1...

Страница 159: ...mm 4 HDD 5 HDD 6 7 8 PSU 9 10 11 3 x 120 mm 360mm 280mm 240mm 12 2 x 140 mm 280mm 240mm 13 1 x 120 mm 120mm 14 CPU 15 16 10 x PCI E PSU 17 1 x 120 mm 18 5 x 2 5 19 PSU I O 20 4 x USB 3 0 Audio I O 12...

Страница 160: ...71 kg 2 x 140 mm 280 mm 240 mm 3 x 120 mm 360 mm 280 mm 240 mm 1 x 120 mm 120 mm CPU 6 5 in 165 mm PSU 1 x 120 mm HDD 1 x 120 mm 6 x Quick Release 3 5 Bays HDD 8 x Quick Release 2 5 Bays SSD Mini ITX...

Страница 161: ...rev 1C S10 7 1 3 S10 Antec PC CPU RAM CPU...

Страница 162: ...8 S10 rev 1C 1 4 S10 S10 S10 2 1 2...

Страница 163: ...rev 1C S10 9 2...

Страница 164: ...10 S10 rev 1C 2 1 2 4 11 2 2 CPU 1 2 3 2 3 HDD PSU HDD HDD S10 SATA 4 NOTE HDD PSU 6 7 5 3 4 6 7...

Страница 165: ...rev 1C S10 11 2 4 PSU PSU PSU 1 2 1 4 2 PSU PSU 2 1 PSU 2 PSU PSU 10 9 8...

Страница 166: ...12 S10 rev 1C 2 5 1 2 11 12 3 13 4 PSU 1 PSU 2 14 3 HDD 1 2 1 4 2 HDD 15 3 13 12 11 15 14...

Страница 167: ...rev 1C S10 13 2 6 3 5 HDD HDD 6 3 5 HDD 2 2 HDD 16 19 1 HDD 16 17 2 HDD HDD HDD 18 19 3 HDD HDD 20 HDD 4 HDD 21 5 HDD 6 PSU SATA HDD 7 SATA 16 17 18 19 20 21...

Страница 168: ...7 2 5 SSD S10 8 2 5 SSD 5 PSU 3 HDD 3 5 HDD 1 HDD 2 5 SSD HDD 22 2 2 5 SSD 23 SSD 3 HDD 24 4 SSD 5 PSU SATA SSD 6 SATA PSU 1 SSD 5 2 5 SSD 25 2 2 5 SSD 26 SSD 3 HDD 27 4 SSD 5 PSU SATA SSD 6 SATA 22...

Страница 169: ...rev 1C S10 15 3 I O...

Страница 170: ...16 S10 rev 1C 3 1 USB 3 0 I O USB 3 0 3 2 HD Audio I O HD Audio Intel 10 HDA High Definition Audio 3 3 HDD LED S10 HDD LED LED LED 28 Figure 29 Figure 30...

Страница 171: ...rev 1C S10 17 4...

Страница 172: ...0 rev 1C S10 S10 4 1 140 mm 2 CPU 1 2 2 31 140 mm 2 3 32 4 33 2 x 120 mm 5 3 DC 12V 7 0V 13 2 V 800 RPM 7V 0 12A Max 41 2 CFM 0 28mm H2O 0 011 inch H2O 14 dBA 1 4 W Max 280 mm 240 mm 280 mm 240 mm 31...

Страница 173: ...60 mm 280 mm 240 mm 360 mm 280 mm 240 mm 4 3 120 mm CPU 120 mm 120 mm DC 12V 7 0V 13 2V 900 RPM 7V 0 12A Max 39 5 CFM 0 54mm H2O 0 021 inch H2O 14 7 dBA 1 44 W max 900 RPM 7V 0 12A Max 39 5 CFM 0 54mm...

Страница 174: ...20 S10 rev 1C 4 4 PSU PSU 120 mm 120mm PSU 2 5 SSD 1 7 1 2 1 4 2 38 3 39 4 38 39 40...

Страница 175: ...rev 1C S10 21 4 5 HDD 120 mm 1 HDD HDD 1200 rpm 1 Section 2 1 4 2 HDD 41 3 42 4 5 4 6 1 2 Section 4 1 31 3 3 4 5 6 7 I O 1200 RPM 7V 0 25A Max 45 6 CFM 1 1mm H2O 0 043 inch H2O 21 7 dBA 3 W Max 41 42...

Страница 176: ...x 510 770 1288 www antec com Antec B V Stuttgartstraat 12 3047 AS Rotterdam The Netherlands tel 49 40 226139 22 fax 31 0 10 437 1752 US Canada 1 800 22ANTEC support antec com 31 0 10 208 8919 europe r...

Страница 177: ......

Страница 178: ......

Страница 179: ...tom Exhaust Fan 15 Elevated Base for increased air flow 16 Top panel S10 Proview ES F cil de usar 1 Puerta Lateral Compartimento de la Placa Madre y la fuente de alimentaci n 2 Puerta lateral Comparti...

Страница 180: ...tion 120mm inf rieur 15 Base sur lev e 16 Panneau sup rieur S10 Proview DE Einfachste Handhabung 1 Seitenpanel Mainboard und Netzteil Kammer 2 Seitenblende Laufwerkskammer 3 Zentraler Zuluftfilter 4 N...

Страница 181: ...pido 9 10 x slot PCI E 10 5 25 piastra di copertura per il pannello di controllo Sistema di raffreddamento avanzato 11 1 x ventola d aspirazione da 120 mm Opz 12 2x ventole da 140mm di scarico e spazi...

Страница 182: ...PCI E 10 5 25 11 1 120mm 12 2 140mm 280mm 240mm 13 3 120mm 360mm 280mm 240mm 14 1 120mm 15 16 S10 Proview JP 1 PSU 2 HDD 3 4 PSU 5 HDD 6 Quiet Computing 7 6 x 3 5 8 8 x 2 5 9 10 x PCI E 10 5 25 11 1...

Страница 183: ......

Страница 184: ...com Europe 31 0 10 208 8919 europe rma antec com Asia 886 0 800 060 696 apsupport antec com Copyright 2015 Antec Inc All rights reserved All trademarks are the property of their respective owners Spec...

Отзывы: