background image

Evaluation Board User Guide 

UG-061 


Rev. 0 | Page 13 of 3


FINDING ASSIGNED COM PORT NUMBER 

Install the drivers for the USB-to-UART converter on each USB 
port used with the board. After installation, the PC detects the 
drivers as a regular communication port. Note that there is no 
serial number assigned to either the USB-to-UART board or the 
emulator pod and, therefore, several boards can be used on the 
same USB port without the need to install the driver. To 
determine which COM port number has been assigned to the 
connected board, open the 

Device Manager

 under Windows 

using the following steps: 
1.


Click the 

Start

 button located at the bottom left-hand 

corner of the desktop. 

2.


Select 

Control Panel

, then 

System

 to open the 

System 

Properties

 window.  

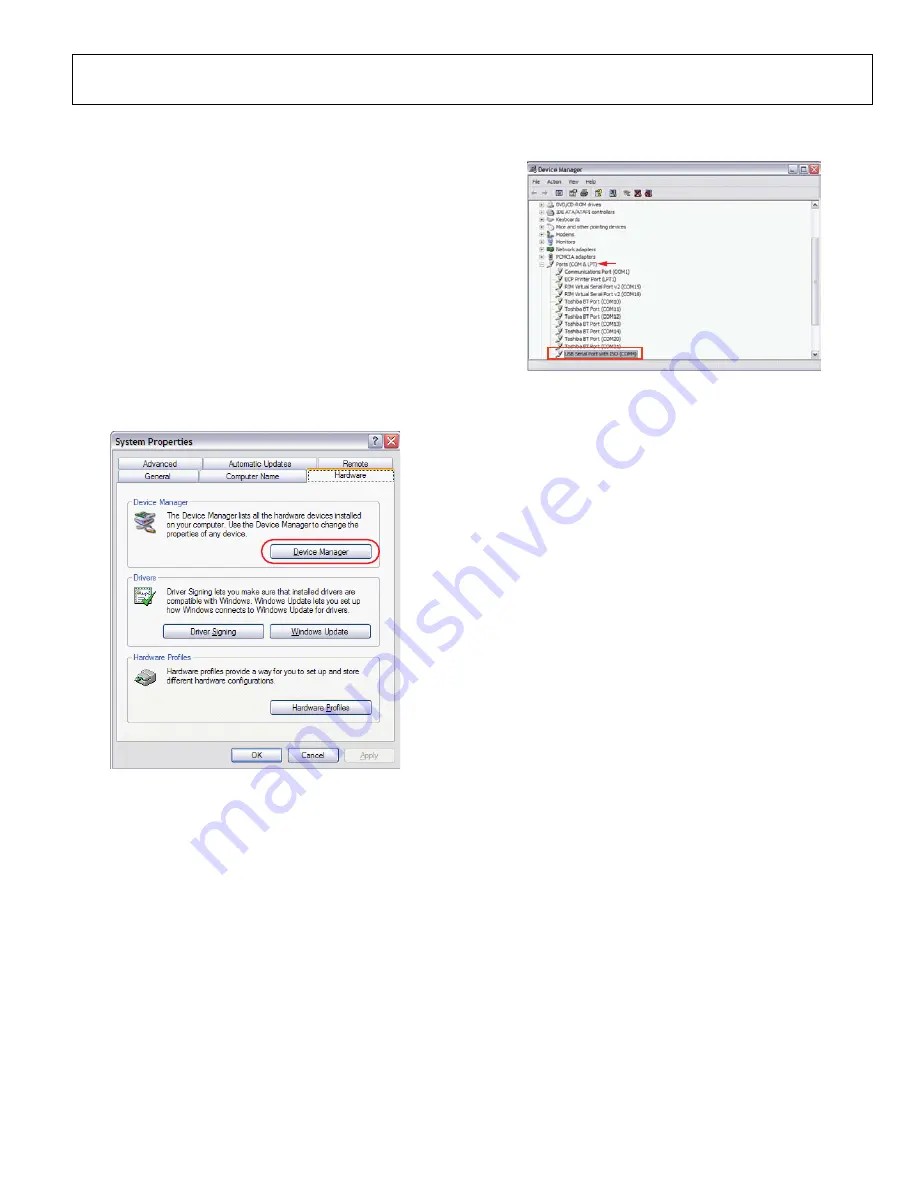
3.


Select the 

Hardware

 tab and click 

Device Manager 

(see 

Figure 14). 

08600-

017


Figure 14. System Properties Window 

If the driver is installed properly, the attached device appears 
under 

Ports (COM & LPT),

 as shown in Figure 15. 

08600-

018


Figure 15. Device Manager Window 

REMOVING THE DRIVERS 

The USB-to-UART drivers can be easily removed using the 

Add 

or Remove Programs

 feature in the 

Control Pane

l. Click the


Start

 button located at the bottom left-hand corner of the 

desktop, select 

Control Panel

, then 

Add or Remove Programs

and click the drivers to remove them. 

Содержание UG-061

Страница 1: ...led EVAL ADE5169EBZ 2 comes with ADE5169 IC installed DOCUMENTS NEEDED ADE7116 ADE7166 ADE7169 ADE7566 ADE7569 data sheet ADE5166 ADE5169 ADE5566 ADE5569 data sheet SOFTWARE NEEDED PC based evaluation...

Страница 2: ...o UART Board ADE8052Z DWDL1 Driver 12 Finding Assigned COM Port Number 13 Removing the Drivers 13 HyperTerminal Communication 14 IAR Kickstart Tools 15 Installing the IAR Kickstart Tools 15 Creating a...

Страница 3: ...in emulator connector three push buttons and a prototype area Evaluation Kit CD CD containing all associated software and support documentation for the evaluation kit 9 V DC Power Adapter 220 V and 11...

Страница 4: ...ftware An additional LabVIEW program is provided to work with the ADE51xx ADE55xx energy metering IC IAR KickStart1 Embedded Workbench KickStart version IAR Embedded Workbench KickStart version featur...

Страница 5: ...s of this user guide When the procedures in Figure 3 have been followed and the evaluation board is operational the energy metering IC can be evaluated using the accompanying LabVIEW evaluation softwa...

Страница 6: ...n the PC Prior to using the USB to UART board the driver must be installed See the Installing the Drivers section for full details on the installation procedure SAFETY Exercise caution when connecting...

Страница 7: ...lters before being presented to the analog inputs of the energy metering IC CURRENT SENSE INPUTS P11 P11 is a three way connection block that allows the ADE71xx ADE75xx ADE51xx ADE55xx to be connected...

Страница 8: ...he software supplied with the ADE7169 ADE5169 evaluation board allows user adjustment of the phase calibra tion register See the Evaluation Board Software section for more information The maximum anal...

Страница 9: ...reduce the loop area which in turn reduces antenna effects A connection for the common mode voltage can be made at the connection point for the current carrying conductor For an antitamper configurati...

Страница 10: ...the analog input VN is connected to AGND via the antialias filter R14 C15 Jumper JP9 should be left open The voltage attenuation network is made up of R12 R13 and R15 The maximum signal level permiss...

Страница 11: ...e using internal charge pump Voltage Channel Input JP4 JP5 JP6 and JP9 open Using the on board resistor divider network for voltage attenuation Current Channel Input JP1 JP11 JP13 JP14 JP16 and JP19 o...

Страница 12: ...gure 10 USB2UART Found 2 Click the Install from a list or specific location Advanced option and then click Next 3 Select Include this location in the search and use the Browse button to locate the Dri...

Страница 13: ...ager under Windows using the following steps 1 Click the Start button located at the bottom left hand corner of the desktop 2 Select Control Panel then System to open the System Properties window 3 Se...

Страница 14: ...a name for the new connection 3 Click OK 4 In the Connect Using drop down box select the COM port that the USB cable is connected to and click OK 5 On the properties window select 9600 as the baud ra...

Страница 15: ...Software Installations option 4 Click the KickStart Edition option shown in Figure 19 08600 021 Figure 19 IAR Software Installation 5 A series of windows appears with installation options Select the...

Страница 16: ...templates folder by clicking the symbol next to the folder 5 Expand the Analog Devices folder by clicking the symbol next to the folder A list of Analog Devices products appears see Figure 23 08600 0...

Страница 17: ...Target Selection The default project settings of the ADE7169Fxx and ADE5169Fxx C and assembly templates configure the project to execute in an ADE7169Fxx or ADE5169Fxx target If this is not desired t...

Страница 18: ...cause the IAR protocol is not supported Creating a Hexadecimal File The user can configure the project options so that IAR gene rates a hexadecimal file each time the project is built This hexadecimal...

Страница 19: ...releasing the RESET push button S3 The SDEN 08600 033 push button S2 should then be released Once in serial download mode click the Find Device and Reset button on the serial downloader interface The...

Страница 20: ...anges made to the flash protection should be written to the part using the WRITE command Note that when the WRITE button is clicked the flash memory is directly modified and therefore once a page has...

Страница 21: ...Alternatively select ADE51xxFxx Eval Software and then ADE51xxFxx_eval_softare for the ADE51xx ADE55xx evaluation software REMOVING THE EVALUATION SOFTWARE The ADE71xx ADE75xx ADE51xx ADE55xx evaluat...

Страница 22: ...e or voltmeter to probe both the VDD and VINTD pins Ensure that the USB to UART board connects to the P2 header and the necessary drivers are installed see the Installing the Drivers section To verify...

Страница 23: ...iew the block diagram of the power sources to the ADE71xx ADE75xx in the power management window This window is shown in Figure 44 08600 046 Figure 44 Power Management Window The user can view or chan...

Страница 24: ...ibration registers can be written to in the Offsets window In all windows any changes made are not written to the part until the corresponding WRITE button is clicked Active Reactive and Apparent Ener...

Страница 25: ...METERING MENU Figure 49 shows the waveform sampling window 08600 051 Figure 49 Waveform Sampling Window The waveform sampling window allows you to view multiple waveforms in the signal chain including...

Страница 26: ...ALL R48 R47 DO NOT INSTALL DO NOT INSTALL R46 DO NOT INSTALL R45 CLKIN CLKOUT 3 1 4 2 VR1 ZSR330GTA 1 3 2 4 Y2 32 768KHZ VDD1 VUART VSWOUT VSWOUT 0 1UF C32 VSWOUT BCTRL INT1 P0 0 R54 1K INT0B 1K R53 A...

Страница 27: ...Evaluation Board User Guide UG 061 Rev 0 Page 27 of PCB LAYOUT COMPONENT PLACEMENT 08600 054 Figure 51 Silkscreen...

Страница 28: ...UG 061 Evaluation Board User Guide Rev 0 Page 28 of PCB LAYOUT COMPONENT SIDE 08600 055 Figure 52 Layer 1...

Страница 29: ...Evaluation Board User Guide UG 061 Rev 0 Page 29 of PCB LAYOUT SOLDER SIDE 08600 056 Figure 53 Layer 2...

Страница 30: ...tion SMD header 0 100 Samtec TSM 122 01 T SV 1 P13 Vertical 3 position SMD header 0 100 Samtec TSM 133 01 T SV 1 P14 Right angle 3 position 0 100 tin connector Digi Key A19461 ND 1 P15 50 position hea...

Страница 31: ...Evaluation Board User Guide UG 061 Rev 0 Page 31 of 3 NOTES...

Страница 32: ...on or use of evaluation boards Information furnished by Analog Devices is believed to be accurate and reliable However no responsibility is assumed by Analog Devices for its use nor for any infringeme...

Страница 33: ...Mouser Electronics Authorized Distributor Click to View Pricing Inventory Delivery Lifecycle Information Analog Devices Inc EVAL ADE5169EBZ 2 EVAL ADE7169EBZ 2...

Отзывы: