Evaluation Board User Guide
UG-154
Rev. 0 | Page 5 of 16
09
11
3-
1
07
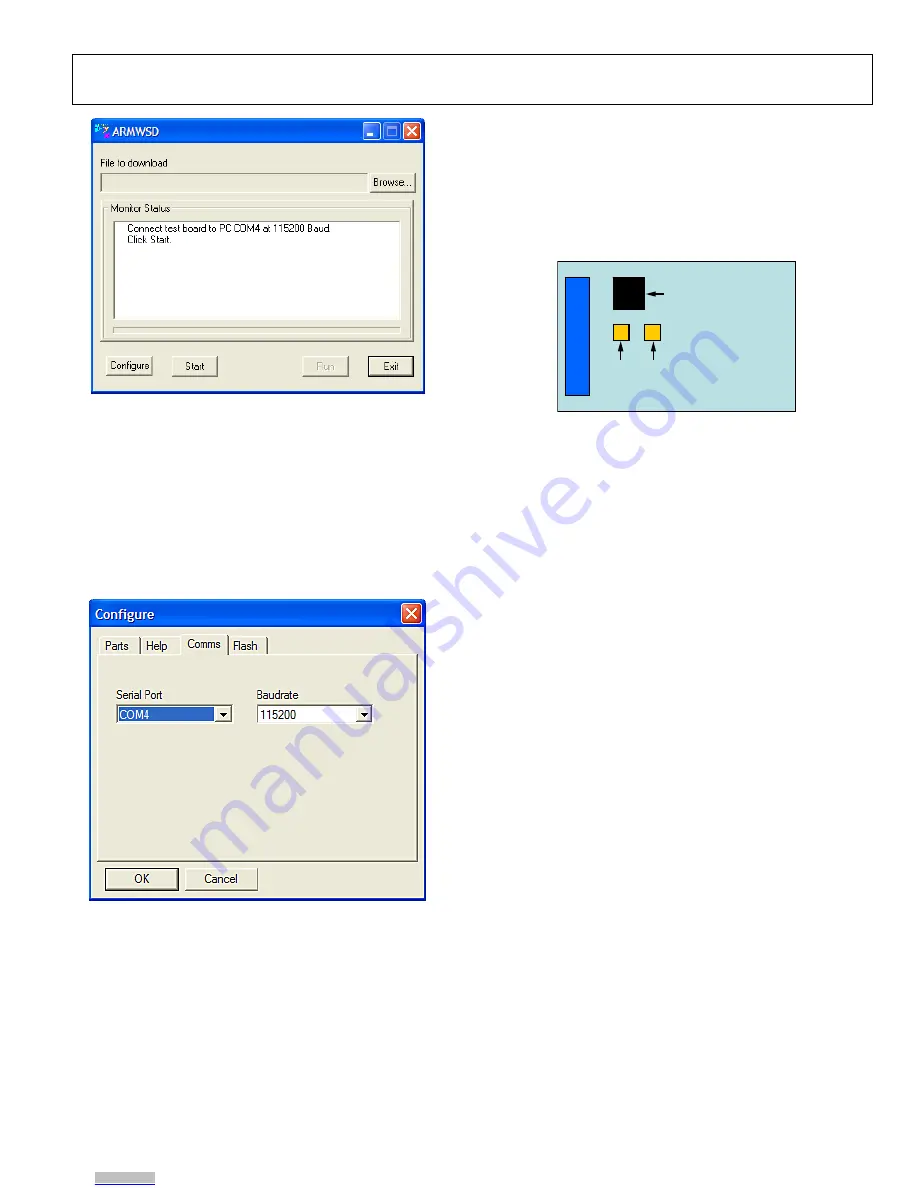
Figure 8. ISEB ARMWSD Firmware Downloader
3.
Click
Browse…
and select the
ADI_ISEB_FW_2_0.hex
file located in the
/ISEB_USB/FW/
folder or the most
recent firmware obtained from the Analog Devices website
(
www.analog.com
).
4.
Click
Configure
to display the box shown in Figure 9.
The downloader file should be configured for the
ADuC7026
microcontroller on the ISEB. The only option you may need to
change is the COM port. You can select the correct port from
the
Serial Port
menu on the
Comms
tab (see Figure 9).
09
11
3-
10
8
Figure 9. Selecting the Correct COM Port for the Downloader
When the COM port is selected, click
OK
to accept the changes
and go back to the ARMWSD box (shown in Figure 8).
When the ISEB is connected, the correct firmware is selected,
and the downloader is fully configured, follow these steps to
flash the firmware:
1.
Click
Start
in the ARMWSD box (see Figure 8) to initiate
the flashing process. After clicking
Start
, click the two
buttons (shown in Figure 10) on the ISEB in the following
order to flash the firmware:
ADuC7026
CO
NNE
CT
O
R
SW1
SW2
09
11
3-
10
9
Figure 10. ISEB Switch Locations for Flashing the Microcontroller
a.
Press and hold down
SW1
.
b.
With
SW1
held down, press and release
SW2
.
c.
Release
SW1
.
The download begins and is automatically verified by the
downloader.
2.
If the downloading process fails, which is indicated in the
Monitor Status
box (see Figure 8), attempt the download
again by clicking
Start
and then pressing the appropriate
switch combination. It may take a few attempts to reprog-
ram the board successfully.
3.
After the download has completed successfully, click
Run
(
as shown in Figure 8) to reset the ISEB and to begin
running the new firmware.
When this step is complete, the board is updated correctly.
Updating the firmware may require that a new evaluation GUI
be obtained. If the firmware on the CD is used to flash the ISEB,
the evaluation GUI on the corresponding CD is sufficient. If the
firmware used is obtained from the Analog Devices website
(www.analog.com), the most recent version of the evaluation
GUI, which is also located on the website, should be used.
Installing the ADXRS800 Software Evaluation GUI
The software GUI installation has been created to include any
required National Instruments drivers and run-time engines
that are necessary for proper operation. To run the software
GUI installation routine, double-click the
setup.exe
file located
in the /
ADXRS800 Evaluation Software
/ folder on the
included CD. The window shown in Figure 11 is displayed.
Downloaded from
Downloaded from
Downloaded from
Downloaded from
Downloaded from


