background image

16

CC3D FLIGHT CONTROLLER SETUP USING 

OPEN PILOT GCS SOFTWARE 

WARNING! 

Make sure you have removed your propellers before starting this section!

This instruction is for setting up the CC3D flight controller that comes with your Club Racer ARF with 

the Link9 Radio/Receiver and using the OpenPilot GCS software for the Microsoft Windows platform. 

If you are not using the Sky-Hero Link 9 radio with its receiver go to the section «USING ALTERNATIVE 

RADIOS & RECEIVERS»

Ensure that you downloaded and installed a copy of the OpenPilot GCS v15.05.02 software

Ensure your Lipo battery is NOT connected at this point and that the OpenPilot software is NOT running 

on your computer. 

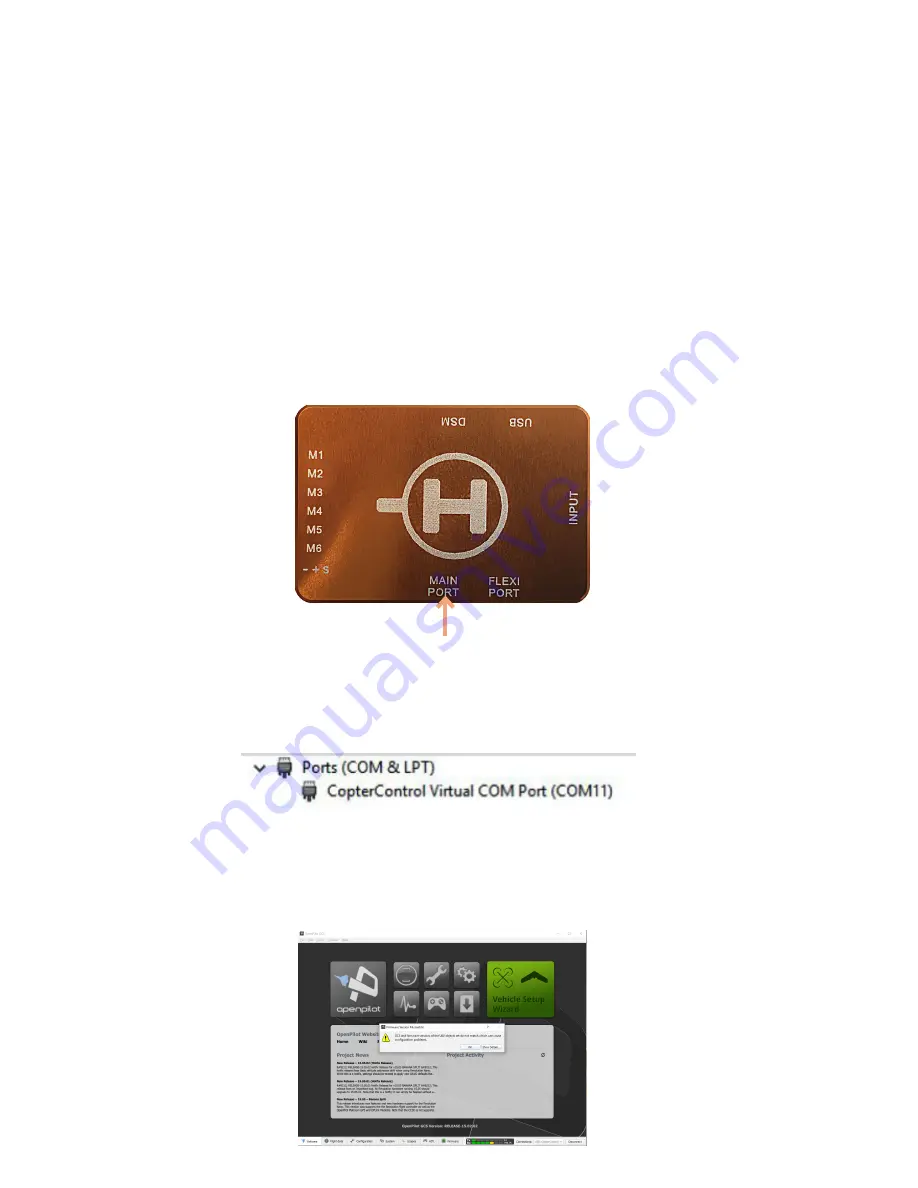
Connect your Micro USB Cable to the CC3D “USB” port and the other end to your computer.

Normally the light on the CC3D will flash very fast initially, then it will start flashing slower. 

Once it is flashing slower it is ok to start the software 

1. Open the OpenPilot software and if you see a pop up message warning the GCS does not match your 

firmware, click “Ok”

You may have to wait up to a couple of minutes for your computer to recognise the CC3D device (and in 

some cases install the necessary driver). If you want to check that the CC3D device has been recognised 

by  your  computer,  you  can  look  in  Windows  Control  Panel  under  Devices  and  you  should  see  a 

“CopterControl Virtual  COM  Port”  listed  under  the  “Ports”  category  (Note:  the  COMxx  number will 

generally change each time you connect the CC3D)

Содержание SKY-HERO

Страница 1: ...Anakin Club Racer ENGLISH...

Страница 2: ...th care and caution in order to avoid injury to yourself or others Ensure that you fully review all of the information in this instruction manual and familiarise yourself with the characteristics of t...

Страница 3: ...in confined or built up areas where you might lose visibility of the aircraft Never fly the aircraft in bad weather or strong winds doing so could cause you to lose control with unpredictable results...

Страница 4: ...UR SKY HERO LINK9 RADIO AND TRANSMITTER 15 CC3D FLIGHT CONTROLLER SETUP USING OPEN PILOT GCS SOFTWARE 16 TRANSMITTER SETUP WIZARD 22 TESTING YOUR ANAKIN CLUB RACER ARMING PROCESS WORKS 25 TROUBLE SHOO...

Страница 5: ...0 M3X14MM 2X ISO7380 M3X10MM 24X ISO7380 M3X6MM 8X SELF TAPPING SCREW M3X6MM 4X DIN 9021WASHER M3 8X SKH54 02 SCREW INSERT ANAKIN 6X FRONT MAIN SPACER 2X MIDDLE REAR MAIN SPACER 4X Screwset SKH07 112...

Страница 6: ...E P A S C H A N G E R L E C H E L L E SKH03 215 F 5 SKH03 260 F 6 SKH03 215 R 5 2X SKH03 260 R 6 2X SKH03 201 SKH05 026 SKH03 201 SKH03 015 SKH03 015 SKH01 107 4X SKH01 104 2X SKH05 024 01 SKH03 201 S...

Страница 7: ...ETRES ETAT DE SURFACE TOLERANCES LINEAIRES ANGULAIRES QUAL FAB APPR VERIF AUTEUR SKH04 013 RACER PDB MASSE A4 FEUILLE 1 SUR 1 ECHELLE 2 1 No DE PLAN TITRE REVISION NE PAS CHANGER L ECHELLE MATERIAU DA...

Страница 8: ...me that you are using Sky Hero components Camera VTX and Radio equipment however towards the end of the manual there is also some basic information over the use of alternative equipment If you are usi...

Страница 9: ...9 ASSEMBLY OF YOUR ANAKIN CLUB RACER...

Страница 10: ...BATTERY CONNECTION 2 4S NOTE the output labelled Camera provides the same voltage as your battery input The 5v output is filtered and can support up to 3 Amps Plug the camera cable into the rear of th...

Страница 11: ...and you do not want to do any soldering you can cover the connector from the camera in heat shrink tubing and insert it into the VTX connector connecting to the yellow wire pin Connect the Camera s Po...

Страница 12: ...ly unscrewing the two bolts holding the curved bracket above the camera Using double sided adhesive tape position the CC3D flight controller in the middle of the upper frame and 10mm back from the edg...

Страница 13: ...llow wires from the CC3D Main Port to the SBus port of the Receiver in the sequence shown above Yellow Signal Red Positive Black Negative Now you should fix the VTX in place as shown below using doubl...

Страница 14: ...uple of seconds it changes the VTX Band A E The choice of channel frequencies is shown in the table below NOTE if you use a 4S Lipo and the FX795T 2 or FX795T 6 200 600mW VTX we recommend to use a 12v...

Страница 15: ...the side of the Link9 Radio Receiver and hold it in for a couple of seconds until its LED starts to flash rapidly When it stops flashing it is bound with your Transmitter and on the radio Transmitter...

Страница 16: ...software is NOT running on your computer Connect your Micro USB Cable to the CC3D USB port and the other end to your computer Normally the light on the CC3D will flash very fast initially then it will...

Страница 17: ...the Firmware update screen remove the tick from Erase all settings option and Click the Upgrade button NOTE if the CC3D controller does not reconnect automatically after the upgrade close the OpenPil...

Страница 18: ...t 8 On the Vehicle type selection screen ensure that Multirotor is selected and Click Next 9 On the Multirotor configuration screen ensure that Quadcopter X is selected and click Next 10 On the Output...

Страница 19: ...your battery is not connected and no propellers are attached then tick the 3 boxes and Click Start In the next step we will apply power to spin the motors so ensure that your motors are clear of anyt...

Страница 20: ...ree other motors Click Next to continue Disconnect the battery 18 On the Initial Tuning screen Click Next 16 To find the neutral rate slowest smooth rotation speed of each motor Click Start and then m...

Страница 21: ...21 19 On the Configuration ready to save screen Click Save then Click Finish...

Страница 22: ...our radio transmitter on ensure that you do not have your propellers attached to the Anakin Club Racer and then connect the Lipo Battery If your computer is still connected via the usb lead to the CC3...

Страница 23: ...cessory0 1 and 2 switches just click Next 3 times no need to move any switches on your Transmitter unless you plan to configure a CC3D function on one of these switches 6 Now you need to move the 2 fl...

Страница 24: ...into the Roll setting Then Click the Save button 11 Click on the Input tab on the left and adjust the Min Neutral and Max values for Chan 5 to match the screen below Then Click the Save button 8 When...

Страница 25: ...your Anakin Club Racer will not respond to your Arming start sequence then you should re connect the usb cable restart the OpenPilot software and check that on the Configuration Input Arming Settings...

Страница 26: ...he left 4 For the 1st of the motors you have identified in OpenPilot move the Red slider for that channel to the rightmost position In the example screen below we assume that motors ESCs 1 is not work...

Страница 27: ...p Acknowledge the message about saving your Neutral settings and Click Save 10 Now return to Step 3 Above and repeat all steps in the process up to this point for any other motors which are not workin...

Страница 28: ...w paying special attention to the writing on the propellers the letter R after the size e g 5 x 4 5R indicates that the propeller is a ClockWise CW turning propeller If you do not have an R after the...

Страница 29: ...29 Your final setup should look like the image below and you just need to fix your canopy in place CC3D BATTERY STRAP VTX RX LIPO BATTERY 2 4S...

Страница 30: ...le of the aircraft is VERY LIMITED 2 STABILIZED SOFT ATTITUDE MODE Switch C in MIDDLE position Club Racer comes back to a at position when RIGHT STICK is back to neutral position The maximum angle of...

Страница 31: ...ion when released Roll it can return to the central position when released Throttle it cannot hold the central position when released Yaw it can return to the central position when released LEFT STICK...

Страница 32: ...me wire The advantage of such a PPM signal is that only one signal wire is needed instead of all the individual wires For PPM receiver the WHITE and GREY wire of the multi coloured signal wire needs t...

Страница 33: ...Whichever Receiver you decide to use on your Radio Transmitter you will need to asign a 3 position switch preferably or at least 2 position switch to channel 5 or higher in order to change between fl...

Страница 34: ...hase date Proof of the original purchase date is required for Warranty service SKY HERO reserves the right to modify the provisions of this Warranty without prior notice and then revokes the existing...

Страница 35: ...valid proof of purchase detailed reasons for the return as well as a list of all items included within your parcel We also need a full return mailing address together with phone number please provide...

Отзывы: