

For full warranty information, refer to www.amx.com.
10/07
©2007 AMX. All rights reserved. AMX and the AMX logo are registered trademarks of AMX.
AMX reserves the right to alter specifications without notice at any time.
3000 RESEARCH DRIVE, RICHARDSON, TX 75082 • 800.222.0193 • fax 469.624.7153 • technical support 800.932.6993 • www.amx.com
93-40-831
REV: B
Destination Monitor or Device
•
Adjustments made with the Wizard are seen on the destination monitor or
device.
RGB-DVI Wizard (with Help file)
•
Install on the Control PC (see Step 2 of “To adjust the video display”).
Optional
–
Adobe Acrobat
•
Use to view supplied test images
(<installation folder>\Test Patterns) for
checking resolution, color, and phase timing.
To determine Source PC’s
video card resolution/refresh settings on
Windows
®
operating systems:
1.
Minimize all applications on the Source PC.
2.
Right click on the desktop.
3.
Select Properties from the Shortcut menu.
4.
Select the Settings tab in the Display Properties dialog box.
5.
Check the Screen area setting (resolution).
6.
Click Advanced, and select the Monitor tab.
7.
Check the Refresh Frequency, expressed in Hz (try other tabs if not visible).
8.
Click Cancel on each dialog box to exit.
Video Display Adjustment
Tips for Working with Video Displays
• CRT monitors seem more sensitive to losing sync when changing vertical
position.
• “ReSync Monitor” (CTRL-R on the Control PC) can be useful when
closing in on final settings. Sometimes re-syncing clears up small
irregularities in display. As long as the adjustments are in the acceptable
range for the Destination Monitor, the sync light will shine constant a few
seconds before the image reappears. If the sync light does not shine
constant, return to the previous settings.
• Watch the sync / no sync light on the Destination Monitor. Dramatic
movements in a setting can cause the monitor to go blank temporarily
because it loses sync.
Test Image Files
Test image files (for checking resolution, color, and phase timing) are provided on the
AMX AutoPatch CD
. The test image files are copied to <installation folder>\Test
Patterns on the Control PC when the Wizard is installed (Step 1 below).
We recommend the following sequence for using the Wizard to adjust the video
display on Destination Monitor and save the settings as a User Configurable Preset.
Note:
The Destination Monitor controls may need adjusting during this procedure.
To adjust the video display:
1.
Using the Control PC – on the
AMX AutoPatch CD
, run the BoardConfig.exe
file located at CDRDrive:\Configuration\BoardConfig.
2.
On the Wizard, use the File / Open menu and select the supplied resolution
test image file that matches or closely matches the Source PC’s settings. The
default resolution is 60 Hertz if not indicated. (The settings display along the
bottom of the Wizard dialog box.)
When an image appears on the Destination Monitor:
Proceed to Step 3.
If an image does not appear:
See “Specialized Resolution Adjustments” to the right before continuing.
3.
Transfer the test image files from the Control PC to the Source PC, if you want
to use them.
4.
On the Source PC, open the file Colorbars.pdf to display the color bars test
image (for use in Steps 6 and 7).
5.
On the Source PC, in Acrobat Reader under the view menu, select Actual Size.
6.
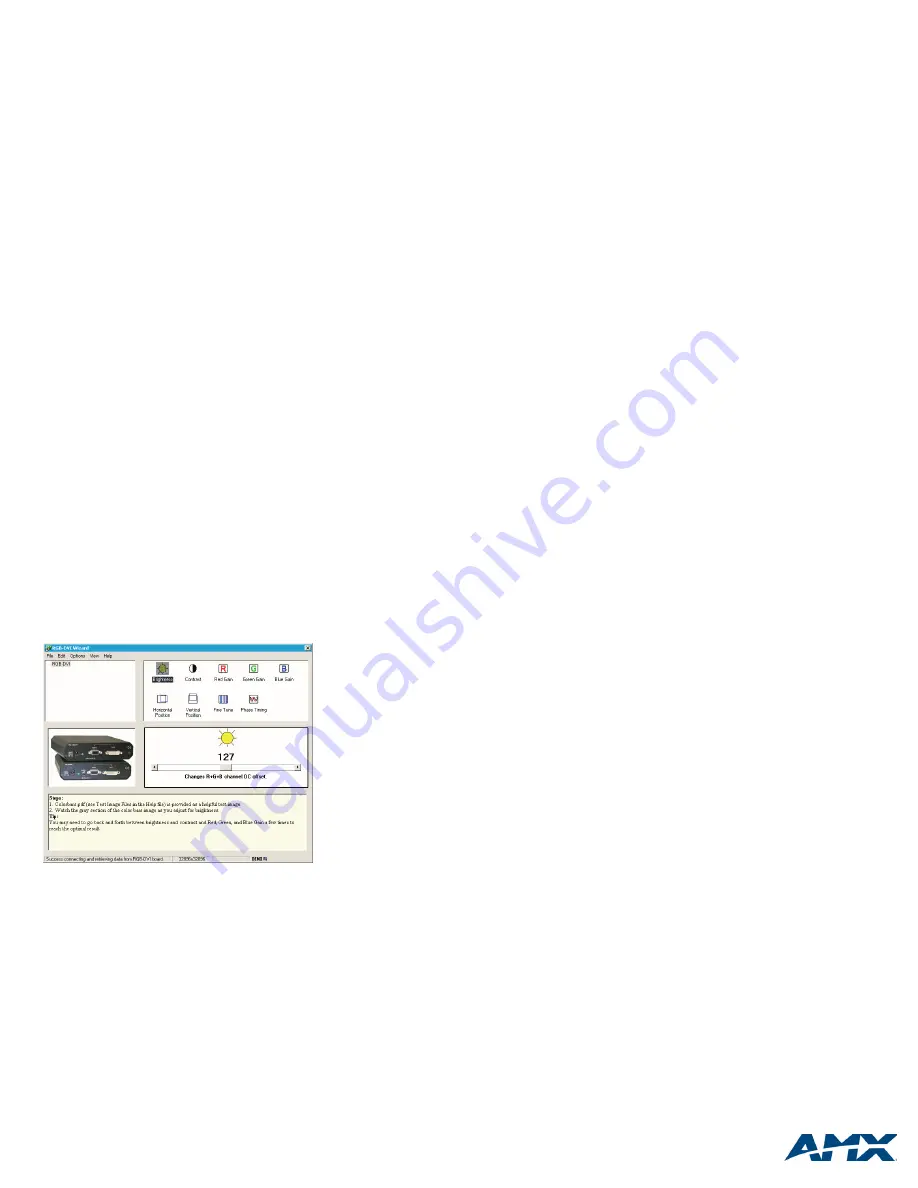
On the Wizard, select Brightness and then Contrast, adjusting each
respectively as you watch the Destination Monitor.
Tip:
You may need to go back and forth a few times between Steps 6 and 7 to reach
your desired result.
7.
On the Wizard, select Red Gain, Green Gain, and Blue Gain, adjusting each
respectively as you watch the Destination Monitor.
8.
On the Source PC, open the PDF of the test image that matches your
resolution setting.
9.
On the Wizard, select Horizontal Position and then Vertical Position, adjusting
each respectively as you watch the Destination Monitor. (Under the Options
menu, Horizontal Pulse Width may help with this adjustment.)
If the image is not satisfactory:
See “Fine Tune Adjustments” below.
If the image is satisfactory:
Go to Step 10.
10.
Select Save As from the File menu.
11.
Enter a file name and click Save.
12.
Repeat Step 2 through 11 for each converter that needs adjustment.
Time Saving Tip:
The file saved in Step 11 can be opened in Step 2 for other
converters if they are connected to the same type of equipment.
13.
When satisfied, disconnect the Control PC.
14.
On the converter, cycle power to verify that the file was saved correctly.
Options Menu Adjustment Items (also see Shortcut Keys in Help file)
• Horizontal Pulse Width – increases or decreases the pulse width to shift the
entire picture if the Horizontal Position element cannot move screen far enough.
• Fine Tune Shift – bumps the fine tune configuration element up or down a notch
resetting the Fine Tune, which allows continued adjustments in same direction.
• ReSync Monitor – resyncs the monitor to clear up distortion. Resyncing is useful
as you close in on your final settings.
Specialized Resolution Adjustments
Do not use this section unless the supplied resolution files do not provide an image.
To use specialized adjustments:
1.
With the closest resolution file open, increase and decrease Fine Tune Shift*
(under Options menu) several times in each direction until an image appears.
Repeat with all close resolution files if necessary.
If an image does not appear:
2.
Repeat the process in Step 1, selecting one of the resolution files from the
sample video card files found at <installation folder>\presets\samples.
If an image still does not appear:
3.
Change the Source PC’s video card settings to match one of the supplied
resolution files and adjust the image accordingly.
Or
On the Wizard (under Options menu), set the resolution and refresh rate to
match the video card settings on the Source PC.
When an image appears:
Resume adjusting the video display at Step 3 in the adjustment procedure in
the column to the left.
* Fine Tune Shift – bumps the fine tune configuration element up or down a notch
resetting the Fine Tune, allowing continued adjustments in the same direction.
CTRL-I (increase) and CTRL-D (decrease) also change the setting.
Fine Tune Adjustments
Use this section if the image requires further adjustment after normal adjustments
have been made.
To fine tune the image:
1.
On the Wizard, select and adjust Fine Tune one step at time (click the scroll
bar), watching the vertical noise lines on the Destination Monitor move farther
apart. Stop when the bands disappear. (The picture may still be slightly
distorted; however, the next step should clear any distortion).
2.
Under the Options menu, select ReSync Monitor.**
3.
Select Phase Timing. As you watch the Destination Monitor, try adjusting it.
If the image does not change, adjustment is not needed.
If the image changed and adjustment is needed, open the PhaseTest.pdf on
the Source PC. Watching the image, adjust until the transitions from dark to
light are even.
4.
Resume at Step 10 in the adjustment procedure at the top of this column.
** ReSync Monitor – resyncs the monitor to clear up distortion. Resyncing is useful
as you close in on your final settings. CTRL-R also resyncs the monitor.


