


Audio/Video Configuration
46
Enova DVX-3150HD/3155HD All-in-One Presentation Switcher Operation/Reference Guide
Video Settings
The following table lists the Video Output menu options available by pressing the VIDEO MENU button.
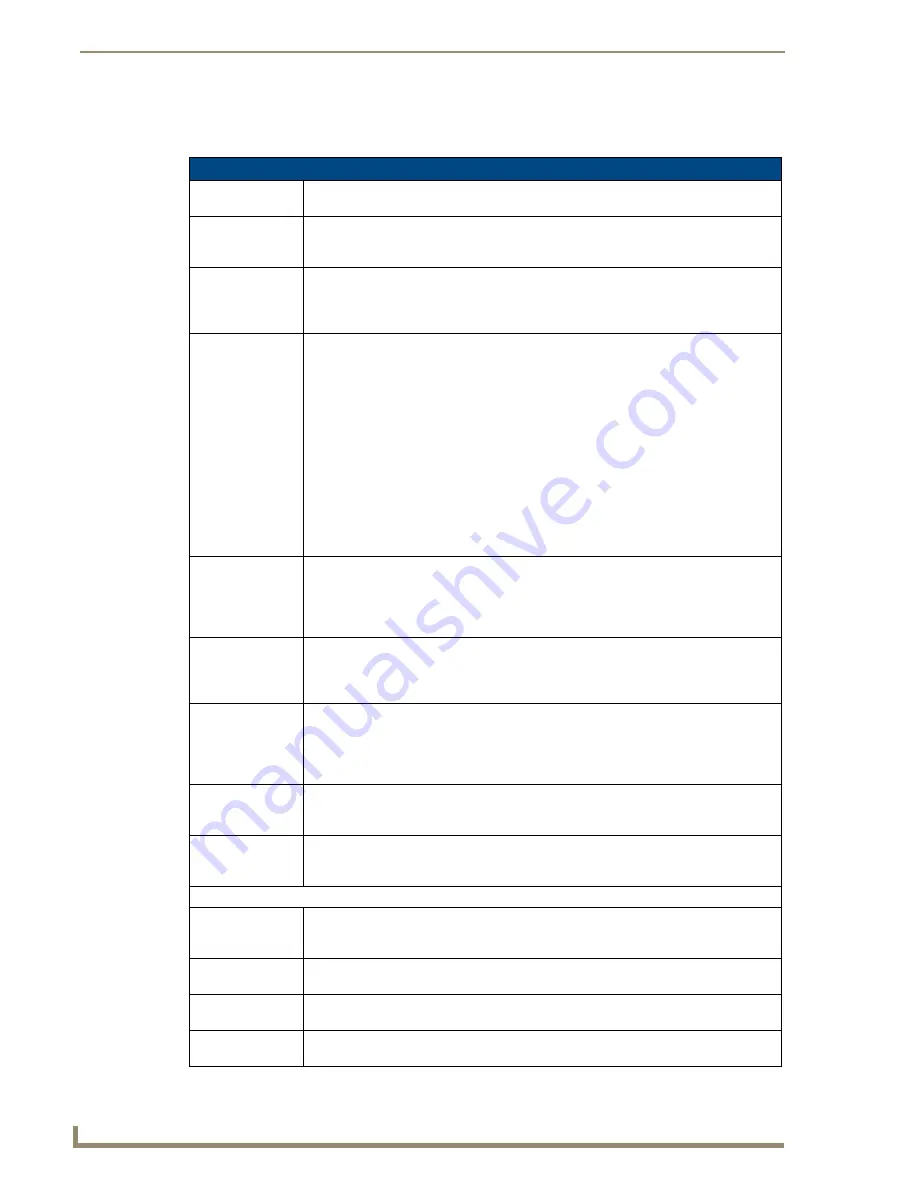
Video Output Menu Options
Output Select
Use the left and right navigational buttons to manually select which video output you want
to use. You can choose from 1, 2, 3, 4, or ALL.
Scaling
Use the left and right navigational buttons to toggle whether you want to scale the output
image. You can choose from AUTO, MANUAL, and BYPASS. The default setting is
AUTO.
Resolution
Use the left and right navigational buttons to manually select the desired resolution and
refresh rate of the selected output. For a complete list of output resolutions, see the
DVI
and HDMI Supported Output Resolutions
section on page 117. Changing the output
resolution automatically switches the scaling mode to MANUAL.
Aspect Ratio
Use the left and right navigation buttons to select how video inputs should be displayed
when the input and output aspect ratio do not match. You can choose from the following
options:
MAINTAIN: Maintains the input aspect ratio while filling the screen either vertically or
horizontally. Black bars may appear above and below or to the left and right of the image.
STRETCH: Ignores the input aspect ratio and stretches the image to fill the screen in all
directions.
ZOOM: Maintains the input aspect ratio while zooming the image to fill the screen in all
directions. Image data may be lost on the top and bottom or to the left and right of the
displayed image.
ANAMORPHIC: Use with anamorphic formatted video sources so that images appear
correctly on the display.
The default setting is STRETCH.
Logo/Test
Use the left and right navigational buttons to choose an output test pattern. Select Off to
disable the test pattern and view video from the selected source. You can choose from
Off, Color Bar, Gray Ramp, SMPTE Bar, HiLoTrak, Pluge, and Cross Hatch. If you have
uploaded a logo to display on the output, you can also select the logo from this option.
Logo images must be 24-bit color bitmap files at least 36x36 pixels in size.
Blank Screen
Use the left and right navigational buttons to select the color of the blank screen on the
output. You can choose from Black or Blue. The default setting is Black. If you have
uploaded a logo to display on the output, you can also select the logo from this option.
Logo images must be at least 36x36 pixels in size.
OSD Overlay
Use the left and right navigational buttons to toggle whether you want the OSD overlay to
be turned on or off. You can choose from Enabled or Disabled. When enabled, the input
name and resolution displays in a small box in the upper left-hand corner of the screen
whenever you select a new input source. The location of the input name and resolution
can be changed using the OSD Position option. The default setting is Disabled.
OSD Position
Use the left and right navigational buttons to select the on-screen display's relative
position so it is unobtrusive to video. You can choose from Top Left, Top Right, Bottom
Left, and Bottom Right. The default setting is Top Left.
OSD Color
Use the left and right navigational buttons to select the background color for the
on-screen display. You can choose from Black, White, Yellow, or Blue. The default setting
is Black.
Source (Output Video Adjust):
Brightness
Use the left and right navigational buttons to alter the brightness level adjustment applied
to the selected output. You can set the brightness level from 0-100. The default setting is
50.
Contrast
Use the left and right navigational buttons to alter the contrast level adjustment applied to
the selected output. You can set the contrast level from 0-100. The default setting is 50.
Horizontal Size
Use the left and right navigational buttons to set the horizontal size of the image for the
selected output. You can set the size from 25 to 800. The default setting is 100.
Horizontal Shift
Use the left and right navigational buttons to move the location of the video output from
left to right. You can set the shift from -127 to 127. The default setting is 0.
Содержание Enova DVX-3150HD
Страница 21: ...Overview 8 Enova DVX 3150HD 3155HD All in One Presentation Switcher Operation Reference Guide ...
Страница 129: ...Appendix A Input Resolutions 116 Enova DVX 3150HD 3155HD All in One Presentation Switcher Operation Reference Guide ...
Страница 131: ...Appendix B Output Resolutions 118 Enova DVX 3150HD 3155HD All in One Presentation Switcher Operation Reference Guide ...
Страница 132: ...Appendix B Output Resolutions 119 Enova DVX 3150HD 3155HD All in One Presentation Switcher Operation Reference Guide ...


