background image

Touch Panel Interface - Control Pages

18

Design XPress User Interface Guide

Touch Panel Interface - MAX Video Page

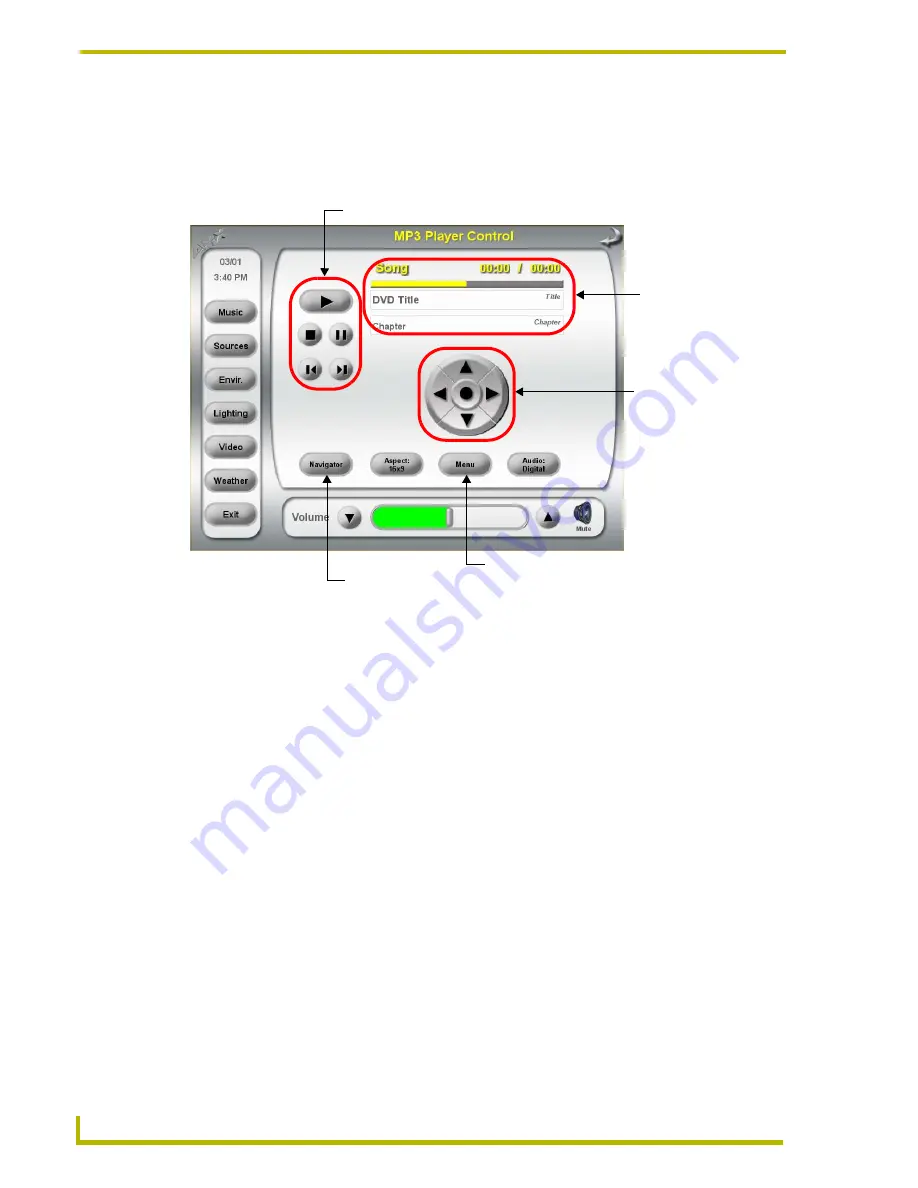
The MAX Video page (FIG. 20) is accessed by pressing the 

Player

 button on the MAX Navigator 

page (FIG. 18) after having pressed the 

Video

 Preset Categories button. From this page you can 

control video playback on the MAX server.

The elements on this page include:


Transport Controls: 

This set of buttons offers the standard video transport controls 

(

play

stop

pause

previous

 and 

next

) for the MAX server.


DVD Info: 

This table displays information for the currently loaded DVD (

Title and 

current Chapter

).


DVD Menu Navigation Controls: 

This set of buttons offers the standard navigation 

controls for DVD players (

up/down, left/right and select

) for the MAX server.


Navigator button

: Press to open the MAX Navigator page (FIG. 18) where you can 

navigate the MAX server’s database to locate audio/video files.


Aspect: 

Press to toggle between 16x9 (default) or 4x3 aspect ratios for video display.


Menu: 

Press to access the DVD’s menu screen. Use the DVD Menu Navigation Controls 

to navigate the DVD menu options and make selections.


Audio: 

Select to toggle between digital (default) or analog audio output.

FIG. 20  

Touch Panel Interface - MAX Video Page

Video File Information

Video Transport Controls

Opens the MAX Navigator page

DVD Menu navigation
controls (up/down,
left/right and select)

Accesses the DVD Menu

Содержание Design XPress

Страница 1: ...instruction manual User Interface Guide Design XPress for NetLinx Studio version 1 5 ...

Страница 2: ...eceipt AMX DISCLAIMS ALL OTHER WARRANTIES EITHER EXPRESS OR IMPLIED INCLUDING BUT NOT LIMITED TO IMPLIED WARRANTIES OF MERCHANTABILITY AND FITNESS FOR A PARTICULAR PURPOSE WITH REGARD TO THE AMX SOFTWARE THIS LIMITED WARRANTY GIVES YOU SPECIFIC LEGAL RIGHTS Any supplements or updates to the AMX SOFTWARE including without limitation any if any service packs or hot fixes provided to you after the ex...

Страница 3: ...l Interface Satellite Control Page 11 Touch Panel Interface Satellite Music Stations Page 12 Touch Panel Interface Satellite TV Favorites Page 12 Touch Panel Interface MP3 Navigator Page 13 Touch Panel Interface MP3 Player Control Page 14 Touch Panel Interface MAX Navigator Page 15 Touch Panel Interface MAX Audio Page 17 Touch Panel Interface MAX Video Page 18 Temperature Control Page 19 Touch Pan...

Страница 4: ...ad Interface MP3 Playlist 36 Keypad Interface MP3 Song 36 Keypad Interface MP3 SearchBy 37 Keypad Interface MP3 Search A Z 37 Keypad Interface MP3 SearchRes 1 2 38 Keypad Interface MAX Main 38 Keypad Interface MAX Transport 39 Keypad Interface MAX Playlist 39 Keypad Interface MAX Song 40 Keypad Interface MAX SearchBy 40 Keypad Interface MAX Search A Z 41 Keypad Interface MAX SearchRes 41 Keypad In...

Страница 5: ...he information on this screen is gathered by the GUI and is built into the touch panel file There also several buttons along the bottom of this screen SETUP Opens the Touch Panel Setup page FIG 3 Sleep Immediately puts the touch panel into sleep mode i Weather Configure Opens the Weather Config page FIG 4 where you can configure and activate your i Weather account This account must be activated be...

Страница 6: ...ssed by pressing the Setup button from the System Information page FIG 2 From this screen you can view connection status and modify several touch panel configuration items including Display timeout for sleep mode Panel Brightness Default Panel Sounds The buttons along the left side of the Setup page allow access to the other panel setup options Refer to the 12 and 15 Modero Touch Panels Firmware v...

Страница 7: ...ode the touch screen is powered down WeatherConfig Page Press the i Weather Configure button on the System Information Page FIG 2 to access the WeatherConfig page FIG 4 The WeatherConfig page displays the serial number for your NetLinx Master and reminds you to contact AMX to setup your i Weather account FIG 3 Touch Panel Interface Modero Touch Panel Setup Page FIG 4 Touch Panel Interface WeatherC...

Страница 8: ...the PictureFrame application Refer to the PictureFrame online help and Instruction Manual for details on setting up and using the PictureFrame application Clean Page Press the Clean button on the System Information page FIG 5 to access the Clean Page The purpose of this page is to disable the touch screen for one minute to allow you to clean the screen without the panel registering random button p...

Страница 9: ...or Modero G4 touch panels These pages will appear slightly different on G3 panels but will work basically the same FIG 6 Touch Panel Interface Main Page Music Press to access the Music page FIG 7 where you can select audio zones and control audio equipment Sources Press to access the Sources page FIG 9 where you can select an Audio Source for the zone the panel is assigned to Envir Press to access...

Страница 10: ...he Audio Zone Settings page FIG 8 for that zone The elements on the Music Page are described below Audio Zone Selection Buttons Use this set of buttons to select an audio zone Go To Source Press to access the main Control page for the source device associated with the active audio zone Weather Press to access the Weather page FIG 27 where you can view current weather information Exit Press to acce...

Страница 11: ...e to equipment To modify these default settings for a zone you must press and hold an audio zone button on the Music page FIG 7 for two seconds to gain access to the audio settings screen for that zone Touch Panel Interface Audio Zone Settings Page The Audio Zone Settings page FIG 8 allows you to modify the volume bass treble balance and loudness settings that will be used when the zone is turned ...

Страница 12: ...Presets Page FIG 10 is accessed by either pressing a tuner source button from the Source Select page or by pressing the Go To Source button on the Music page FIG 7 for a selected audio zone whose current audio source is a tuner source The elements on this page include Tuner Presets buttons Press a Tuner Preset button to select a preset for listening Press and held a Tuner Preset button for two sec...

Страница 13: ...d audio zone whose current audio source is a CD source From this page you can control functions of the CD player The elements on this page include Manual Disc Selection Controls Use these buttons to select a disc to play by its number assignment in the CD list FIG 10 Touch Panel Interface Tuner Presets Page FIG 11 Touch Panel Interface CD Control Page Tuner Preset buttons press and hold for 2 seco...

Страница 14: ...Control page FIG 11 This page displays up to 10 CD titles at a time The titles are arranged according to the sort selection button currently active Sorted By Disc or Sorted By Name The elements on this page include CD Title Preset buttons To select a CD for listening press the button of the CD title There is an up and down arrow to allow for easier scrolling In addition a page multiplier is availa...

Страница 15: ...te source button from the Sources page FIG 9 or by pressing the Go To Source button on the Music page FIG 7 for a selected audio zone whose current audio source is a satellite source From this page you have access to several features manual channel selection menu control and guide control In addition you may access direct music and TV selections from the Music Stations and TV Favorites buttons The...

Страница 16: ...The Satellite Music Stations page FIG 14 is accessed by pressing the Music Stations button from the Satellite Control page FIG 13 This page displays up to 22 pre configured music stations Press the preset buttons to select a music channel for listening Touch Panel Interface Satellite TV Favorites Page The Satellite TV Favorites page FIG 15 is accessed by pressing the TV Favorites button from the S...

Страница 17: ...box entries The information displayed is scrollable and additionally player modes can be selected FIG 15 Touch Panel Interface Satellite TV Favorites Page Unlike the CD Disc Selection and Tuner Presets pages these preset names cannot be edited FIG 16 Touch Panel Interface MP3 Navigator Page Preset Categories buttons Preset buttons Up Down scroll Player Mode options Selects the highlighted MP3 Titl...

Страница 18: ...e FIG 7 for a selected audio zone whose current audio source is an MP3 source then pressing the Player button from the Navigation page From this page you can control features of the MP3 player The elements on this page include MP3 Transport Controls This set of buttons offers the standard transport controls play stop pause previous and next for the MP3 player MP3 File Information table This table ...

Страница 19: ...nt on the MAX server Note that this page works much like the MP3 Navigator page described on page 13 but has additional features to accommodate audio and video media content on the MAX server FIG 17 Touch Panel Interface MP3 Control Page FIG 18 Touch Panel Interface MAX Navigator Page MP3 Player Transport Controls MP3 File Information Scroll Up Down Player Mode options Opens the MP3 Player Navigat...

Страница 20: ...Preset Search Press to open an on screen keyboard where you can perform a search for a Playlist Genre Artist Album All or Video The type of search that is performed depends on which Preset Category was selected to be displayed on the Preset buttons Playlists Press to populate the Preset buttons with Playlists Genre Press to populate the Preset buttons with Genres Artist Press to populate the Prese...

Страница 21: ...page include Transport Controls This set of buttons offers the standard audio transport controls play stop pause previous and next for the MAX server Song Info This table displays information for the currently loaded audio file Song Name Artist Name Album Name Playlist Name and Genre Navigator button Press to open the MAX Navigator page FIG 18 where you can navigate the MAX server s database to lo...

Страница 22: ...nt Chapter DVD Menu Navigation Controls This set of buttons offers the standard navigation controls for DVD players up down left right and select for the MAX server Navigator button Press to open the MAX Navigator page FIG 18 where you can navigate the MAX server s database to locate audio video files Aspect Press to toggle between 16x9 default or 4x3 aspect ratios for video display Menu Press to ...

Страница 23: ...ed by pressing the Edit button for a zone on the Temperature Control page FIG 21 The temperature displays the heat and cool set points the current mode and the fan On Off To adjust the set point values use the appropriate arrow buttons The display changes not when the arrow button is pressed but when the thermostat acknowledges the change The mode button is a momentary button and when pressed cycl...

Страница 24: ... the modes Heat Cool Auto etc available for the selected HVAC zone Fan Mode button Press to toggle the fan On Off FIG 22 Touch Panel Interface Temperature Control Edit Page Current temperature Heat Set Point setting Cool Set Point setting Browse the Modes Toggle the fan On Off supported in this HVAC zone display for this zone The display Heat and Cool Set Point displays do not change not when the ...

Страница 25: ...display that video input on the touch panel This is useful for cameras DVDs TV and any other video that one would have an interest in viewing from a touch panel The elements on this page include Setup Button The Setup button on this page takes you to the Touch Panel Video Setup page FIG 25 where video adjustments brightness contrast etc can be controlled Select Button Press the Select button to ac...

Страница 26: ...e Guide FIG 24 Touch Panel Interface Video Setup Page FIG 25 Modero Video Setup page Video Window Opens the Touch Panel Video Setup page Opens the Video Select page Sets the aspect ratio to 4 3 default 16 9 Displays the video in full screen mode Incoming Video signal ...

Страница 27: ...eather Location Weather Zip Code and Weather Configuration pages is displayed Refresh Button Press to refresh update the weather information Update Locations Button Press to open the Weather Download page FIG 28 where you can set up new weather location presets or edit existing ones FIG 26 Touch Panel Interface Video Select Page FIG 27 Touch Panel Interface Weather Page Video Source Selection butt...

Страница 28: ...ather Zip Code page FIG 30 to enter a location and set the interval for automatic weather updates The elements on this page include Presets Use these buttons to set and recall saved weather location presets Current Location This text box displays the name of the city specified in the currently selected weather location preset Enter Zip Code Press to access the Weather Zip Code Page FIG 30 with an ...

Страница 29: ...n that you want to add as a new preset 2 Press the Save button under the four Presets buttons This causes the Save button to blink 3 While the Save button is blinking select any one of the four Presets buttons 4 Once saved the location name will be displayed on the preset button and that location can then be recalled FIG 29 Touch Panel Interface Weather Location Page ...

Страница 30: ...Zip Code button on the Weather Location page FIG 29 Using the on screen keypad enter a 5 digit zip code and press Done This will then become the currently selected location The Bksp backspace and Clear buttons allow for editing while entering a zip code Press the Abort button to cancel the entry and return to the Weather Location page FIG 30 Touch Panel Interface Weather Zip Code Page ...

Страница 31: ...om call it transitions to the Intercom Call In Progress page FIG 60 This button is also used to terminate an intercom call In this case you are transitioned back to the Main page The Menu Bar button contains an LED This LED is green whenever the microphone is active in an intercom call or paging call The only way to turn the microphone off and terminate the call is for the Menu Bar button to be pr...

Страница 32: ...eypad displays its temperature first When the HVAC zone reports the temperature it will then be displayed This selection switches you to the Environment page FIG 35 Music This selection switches you to the Music page for selecting sources FIG 37 If the keypad is not configured as an audio zone this line is blank and the selection does nothing Intercom This selection switches you to the Intercom pa...

Страница 33: ...scenes FIG 34 Each scene corresponds to a button press release on a lighting keypad The first scene on the page is considered the default room on scene and the last scene on the page is the room Off scene When Lights is selected from the Main page FIG 32 if no scenes are presently in the on state this default scene is automatically turned on This was done so the lights on button is always the firs...

Страница 34: ...rrow buttons are used to adjust the temperature set point value The top line of the display shows which set point is being adjusted This screen may seem confusing at first because the set point value displayed is the value reported by the HVAC zone The inside temperature displayed is the value sensed by the keypad not the value from the HVAC zone If an outside temperature sensor is installed in an...

Страница 35: ...s configured in the system The UP and DOWN arrow buttons are used to scroll through the list to allow you to select an audio source Selecting an item on the list selects that source for the current zone and transitions you to its Control page FIG 36 Keypad Interface Cool and Heat Set Point Pages FIG 37 Keypad Interface Music Audio Source Select Page ...

Страница 36: ... arrow buttons are used to scroll through the list Selecting a preset switches the tuner to that preset Keypad Interface Satellite Control The Satellite Control page FIG 39 displays all of the configured satellite music presets The UP and DOWN arrow buttons are used to scroll through the list FIG 38 Keypad Interface Tuner Control FIG 39 Keypad Interface Satellite Control Page ...

Страница 37: ...is not without its limitations For instance the DMS can only display 6 titles at a time Because the system can support several hundred or more titles it would be painful to scroll from title 1 to title 300 in groups of 6 To reduce the amount of scrolling required an intermediate screen is displayed The CD Sort page screen allows you to skip over titles and narrow the search Since titles are always...

Страница 38: ...oo many titles and you will wait for long periods of time Too few titles and you will constantly scroll wait scroll wait etc The approach taken here is that 17 titles are downloaded to the keypad This provides very quick feedback to you Since the DMS has all 17 titles in memory scrolling is very fast With 6 titles per keypad page this provides enough titles to fill 3 keypad screens with the last l...

Страница 39: ...st and navigation pages Pressing any button will take you to the corresponding MP3 page Keypad Interface MP3 Transport This page displays some basic transport functions for the MP3 player Selecting the transport causes that transport function to be executed FIG 43 Keypad Interface MP3 Main Page FIG 44 Keypad Interface MP3 Transport Page ...

Страница 40: ... displays a listing of available playlists Once selected that Playlist will begin to play Keypad Interface MP3 Song This page displays information about the currently playing track title artist album Playlist length FIG 45 Keypad Interface MP3 Playlist Page FIG 46 Keypad Interface MP3 Song Page ...

Страница 41: ...which allows you to narrow the search based on the first letter of the search criteria Keypad Interface MP3 Search A Z The MP3 Search A Z page allows you to further refine the search criteria selected on the MP3 SearchBy page FIG 47 Making a selection will perform the search based on the corresponding letter and takes you to the Search Results 1 page FIG 49 FIG 47 Keypad Interface MP3 SearchBy Pag...

Страница 42: ...he arrow keys allow you to scroll through the results Additionally if there are more than eight results the NEXT button can be selected to scroll through the remaining listings Keypad Interface MAX Main This page FIG 50 allows access to all of the MAX control Playlist and navigation pages Pressing any button will take you to the corresponding MAX page FIG 49 Keypad Interface MP3 SearchRes 1 2 Page...

Страница 43: ...tions for the MAX server Selecting the transport causes that transport function to be executed Keypad Interface MAX Playlist This page FIG 52 displays a listing of playlists available on the MAX server Once selected that Playlist will begin to play FIG 51 Keypad Interface MAX Transport Page FIG 52 Keypad Interface MAX Playlist Page ...

Страница 44: ...If the current selection is a video file then it displays Chapter Title and Length information Keypad Interface MAX SearchBy The MAX SearchBy page FIG 54 allows you to search for tracks based on Genre Artist Album All or Videos Pressing any of these buttons will open the MAX Search A Z page FIG 55 which allows you to narrow the search based on the first letter of the search criteria FIG 53 Keypad ...

Страница 45: ...AX SearchRes This page FIG 56 displays the results of the search performed after making a selection on the MP3 SEARCH A Z page If more than five results are returned the arrow keys allow you to scroll through the results Additionally if there are more than eight results the NEXT button can be selected to scroll through the remaining listings MAX returns the first song per album that matches the le...

Страница 46: ... this point there is a one way voice conversation only That is the called zone can hear the caller but the caller cannot hear the called zone The caller s keypad will switch to the Intercom Call In Progress page FIG 60 and the called zone switches to the Intercom Call Notification page FIG 59 Intercom zones can also be configured as monitored zones The easiest way to describe this is to think of a...

Страница 47: ... All Zones page press the Menu Bar button Alternatively you can page and wait for a person in another intercom zone to answer the call If this occurs the two intercom zones are connected and transition to the Intercom Call In Progress page FIG 60 All other intercom zones are immediately disconnected returned back to any previous audio at previous volume levels and switched back to the Main page Al...

Страница 48: ...button When this is done the microphone goes active each user can hear the other and the keypad switches to the Intercom Call In Progress page FIG 60 Keypad Interface Call In Progress This page is displayed on the caller s keypad when calling another zone and on the called keypad when the call has been accepted The first line of the page shows the zone which is connected to the call i e the interc...

Страница 49: ...tion of disabling the timeout by pressing its adjoining button When this is done the line changes to Timeout Off At this point you accept full responsibility for terminating the call The microphone remains active indefinitely until the Menu Bar button is pressed Keypad Interface Intercom Error When you select an intercom zone to call from the Intercom pages if the called zone is in use connected t...

Страница 50: ...ese values are stored in memory and used whenever an intercom call is active The current volume and gain settings are displayed in percentage values For example on the display shown below the volume is V50 or 50 The gain is G80 or 80 Pressing the save button stores the new settings and switches the keypad back to the Intercom Call In Progress page FIG 60 FIG 62 Keypad Interface Intercom Call Setti...

Страница 51: ...Keypad Interface 47 Design XPress User Interface Guide ...

Страница 52: ...NA AUSTRALIA BELGIUM BRAZIL CANADA CHINA ENGLAND FRANCE GERMANY GREECE HONG KONG INDIA INDONESIA ITALY JAPAN LEBANON MALAYSIA MEXICO NETHERLANDS NEW ZEALAND PHILIPPINES PORTUGAL RUSSIA SINGAPORE SPAIN SWITZERLAND THAILAND TURKEY USA ATLANTA BOSTON CHICAGO CLEVELAND DALLAS DENVER INDIANAPOLIS LOS ANGELES MINNEAPOLIS PHILADELPHIA PHOENIX PORTLAND SPOKANE TAMPA 3000 RESEARCH DRIVE RICHARDSON TX 75082...

Отзывы: