background image


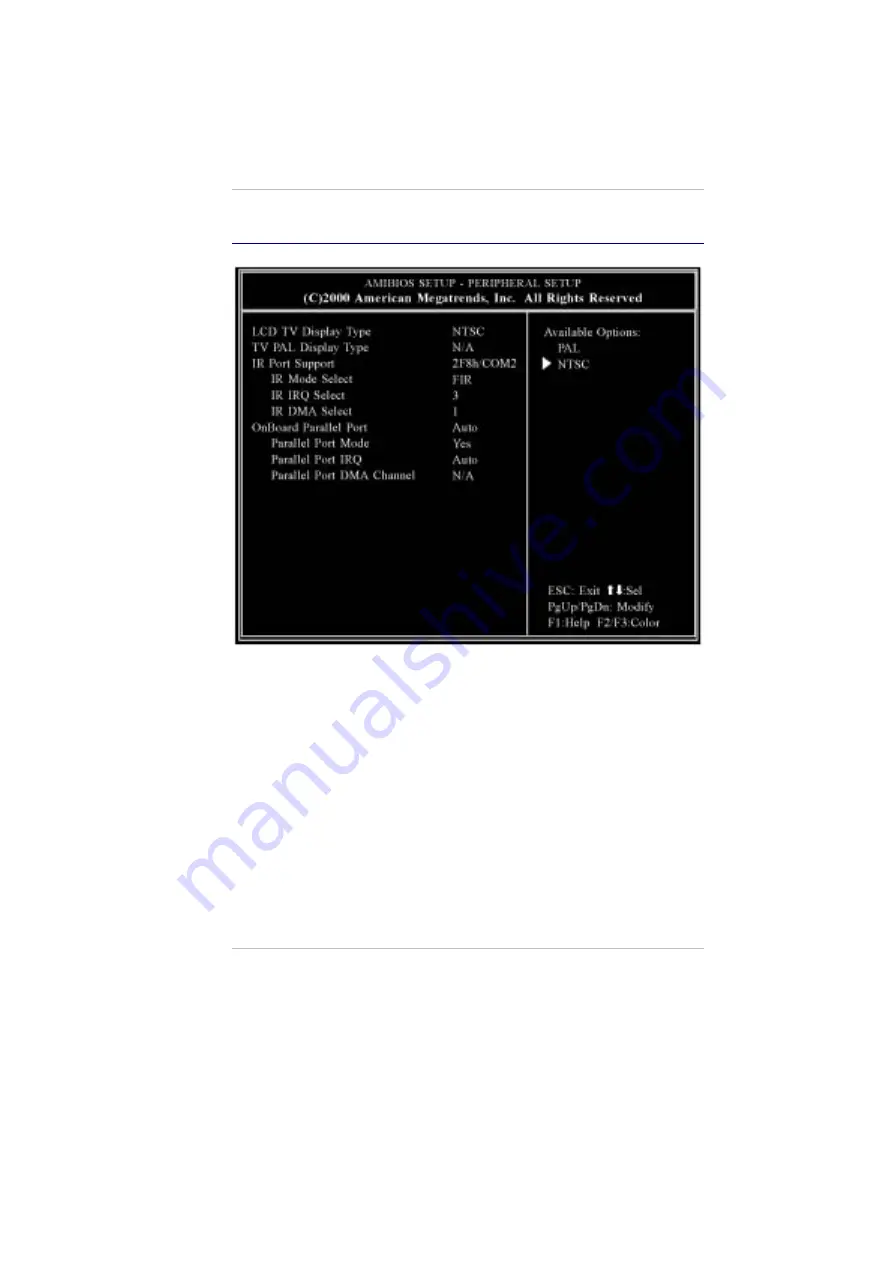
The Peripheral Setup 


LCD TV Display Type 

This field allows you to choose the television display option when using the TV 
out port. 


The settings are PAL, NTSC (default value). 

TV PAL Display Type 

This field allows you to choose the television PAL system type. 


The settings are PAL (default value), PAL-M, PAL-N. 

IR Port Support 

This option specifies the IR port address for the IR Port.   

34 

Содержание DeskNote A928

Страница 1: ...900001 i...

Страница 2: ...cal electronic or other means in any form without prior written permission of the manufacturer Trademarks AutoCAD and Autoshade are trademarks of Autodesk Inc IBM OS 2 and VGA are trademarks of Intern...

Страница 3: ...This page is intentionally blank iii...

Страница 4: ...Table of Contents iv...

Страница 5: ...television reception which can be determined by turning the equipment off and on the user is encouraged to try to correct the interference by one or more of the following measures Reorient or relocat...

Страница 6: ...ase disconnect this equipment from AC outlet before cleaning Don t use liquid or sprayed detergent for cleaning Use moisture sheet or cloth for cleaning For pluggable equipment that the socket outlet...

Страница 7: ...ure above 60 C 140 F it may damage the equipment The unit can be operated at an ambient temperature of max 35 C The sound pressure level at the operators position according to IEC 704 1 1982 is equal...

Страница 8: ...recautions includes the following 18 1 Do not use this product near water for example near a bathtub wash bowl kitchen sink or laundry tub in a wet basement or near a swimming pool 2 Avoid using a tel...

Страница 9: ...Elektrischen Schlag ausl sen ffnen Sie niemals das Ger t Das Ger t darf aus Gr nden der elektrischen Sicherheit nur von authorisiertem Servicepersonal ge ffnet werden Wenn folgende Situationen auftre...

Страница 10: ...se passen A F r die USA und Kanada Das Kabel Set muss UL gelistet und CSA zertifiziert sein Die Minimalanforderungen f r das Kabel entsprechen No 18 AWG B F r Japan Alle Teile des Kabel Sets m ssen en...

Страница 11: ...e and pleasurable computing Use this section to keep notes about details of your purchase Update this section when you add new options Date of Purchase Dealer s Name Phone Address E Mail Address WWW S...

Страница 12: ......

Страница 13: ...lly sound work environments A few tips to help you work effectively without a lot of physical discomfort Purchase a chair with armrests and good back support Don t slouch when sitting keep your back s...

Страница 14: ...xpansion module a 5 CD ROM or DVD ROM drive To keep pace with the accelerated advances in technology your DeskNote provides extensive upgrade options an upgradeable hard disk drive and an upgradeable...

Страница 15: ...latch and then raise the LCD screen At any time you can tilt the display toward or away from you to a comfortable viewing position To avoid damage to the display panel 1 Try not to slam the display u...

Страница 16: ...eal the LCD screen and the keyboard 1 1 2 2 3 3 LCD Screen Your DeskNote computer is equipped with a replaceable color Liquid Crystal Display LCD screen that supports up to 1024 x 768 LCD resolution S...

Страница 17: ...also turn off the system TouchPad The TouchPad is hardware compatible with the IBM PS 2 mouse and software compatible with the Microsoft mouse TouchPad Buttons The buttons below the TouchPad correspo...

Страница 18: ...educe the risk of fire use only No 26 AWG or larger telecommunication line cord 3 3 4 4 USB Ports Your computer includes four Universal Serial Bus USB ports USB is the latest development in Plug and P...

Страница 19: ...Vent This fan prevents the DeskNote CPU and other internal components from becoming overheated Keep this fan unobstructed to allow proper ventilation to the DeskNote s internal components DC IN Connec...

Страница 20: ...t The Infrared Data Port allows your DeskNote to become truly wireless You can use this port to transfer large amounts of data very quickly to any other machine DeskNote computers printers etc which i...

Страница 21: ...ll serve as an expansion to upgrade your DDR module 1 1 2 2 3 3 Cooling Fan Vent This fan prevents the DeskNote CPU and other internal components from becoming overheated Keep this fan unobstructed to...

Страница 22: ...isconnect all peripherals Make sure the computer is turned off before you do this After disconnecting all peripherals close the rear port covers to protect the connectors The DeskNote hard disk head i...

Страница 23: ...provided to supply your computer with power The adapter s AC input voltage can range anywhere from 100 to 240 volts covering the standard voltages available in almost every country Using the AC adapt...

Страница 24: ...rd disk is in use and the HDD status icon is lit doing so can result in loss or destruction of your data Always wait at least 5 seconds after turning off your DeskNote before turning it back on turnin...

Страница 25: ...event the computer from operating at all or could cause incorrect results An example of a critical error is a microprocessor malfunction Messages that furnish important information such as memory stat...

Страница 26: ...en you encounter hardware or software problems which lock up the DeskNote If this key combination does not reset the DeskNote you can shut down the DeskNote by using the computer s power button Should...

Страница 27: ...1 XGA TFT 1024 x 768 32 bit All displays support up to 1024 x 768 x 64K color mode on an external CRT The LCD screen display results can be adjusted by changing the LCD panel angle and the display bri...

Страница 28: ...ny objects on the cover when it is closed Doing so may cause the LCD to break External CRT Display You can hook up an external monitor through the 15 pin CRT connector Four configurations are availabl...

Страница 29: ...various locations on the screen or within the document The embedded numeric keypad consists of 15 keys that make number intensive input more convenient Like the Num Lock key these keys are labeled in...

Страница 30: ...short cut key Install the Hotkey driver Email button Press this button to open the Email reader short cut key Install the Hotkey driver Fn F2 Press this function to mute and unmute the system audio f...

Страница 31: ...g either your left or right thumb off the space bar and on to the TouchPad 1 2 3 Gently move your thumb across the pressure sensitive TouchPad in the direction you want the cursor to move The TouchPad...

Страница 32: ...ieval are two of the most fundamental tasks you will perform when working with your computer The DeskNote is equipped with hard disk drive HDD The HDD is removable allowing for easy upgrades The Upgra...

Страница 33: ...e place Slide the grip into the direction away from you as shown in the illustration 1 2 Use a screwdriver to lift up the HDD cover from the compartment Remove the two screws attached to the HDD drive...

Страница 34: ...tly ease the drive into the bay Slide the drive until it iengages with the system Slide the compartment cover into place Be sure that the screw holes on the cover align completely with the screw holes...

Страница 35: ...cs Loading a Disc To play a CD disk follow the instructions listed below Push the CD ROM eject button on the CD drive door Gently pull the tray all the way out 1 2 3 1 2 3 Carefully lift the CD disk b...

Страница 36: ...DeskNote is equipped with two internal stereo speakers a microphone and input audio ports for external audio units An external microphone can be connected to the microphone jack External speakers or h...

Страница 37: ...or example want to add a mouse modem or a printer The computer is equipped with several interface ports including an enhanced parallel printer port a serial port and 4 USB ports These are provided as...

Страница 38: ...the DeskNote If the AC Adapter is not functioning properly please consult your dealer immediately for support Small Battery for the Real Time Clock There is a small built in battery that supplies pow...

Страница 39: ...n the DeskNote is turned back on the system is configured with the values stored in CMOS Navigating through BIOS Setup The Setup program has been designed to make it as easy to use as possible If you...

Страница 40: ...re I O support for the DeskNote To access the menu bar items press the up or down arrow key on the keyboard until the desired item is highlighted The Legend Bar At the bottom of the Setup screen you w...

Страница 41: ...the Esc key to return to the Main menu General Help In addition to the Item Specific Help window the BIOS Setup program also provides a General Help screen can be called up from any menu by simply pr...

Страница 42: ...essed the following screen appears Date Time The current values for each category are displayed Enter new values through the keyboard Pri Master Sec Master Select one of these hard disk drive icons to...

Страница 43: ...the following screen appears CPU DRAM Base Frequency Set this option to select the CPU DRAM base frequency for your system The settings are 100 100MHz or 100 133 MHz DRAM CAS Latency Set the amount o...

Страница 44: ...boot from after AMIBIOS POST completes The settings are Disabled HDD CD ROM and USB FDD default value 3rd Boot Device This option sets the type of device for the third boot drives that the AMIBOOS at...

Страница 45: ...tings are Disabled default value or Enabled Share Memory Size This field shows the share memory size available Graphic Win Size This field shows the graphic win size available The settings are 4M 8M 1...

Страница 46: ...display option when using the TV out port The settings are PAL NTSC default value TV PAL Display Type This field allows you to choose the television PAL system type The settings are PAL default value...

Страница 47: ...ttings are Disabled 0 1 default value and 3 OnBoard Parallel Port This option specifies the base I O port address of the parallel port on the motherboard The settings are Auto Disabled 378h 278h or 3B...

Страница 48: ...settings are best case values that should optimize system performance To set the configuration highlight this field and press the Enter key The following dialog box appears Load high performance setti...

Страница 49: ...o re run the AutoRun installation please refer to the procedures on the Manual Installation for a more detailed explanation Installing VGA Display Drivers for Win98SE 2K ME XP Insert the CD ROM Driver...

Страница 50: ...ng the Audio Driver for Win98SE 2K Me XP Insert the CD ROM Driver into your CD ROM drive Click Start and Select Run Type the following D Driver Audio Win9X Setup exe for Win98SE ME or D Driver Audio W...

Страница 51: ...manually follow the step by step procedures described on each individual section for a more clear installation Installing the IR Driver for Win98SE Please follow these instructions to install the FIR...

Страница 52: ...installation will create a certain icon for the IR to operate for wireless link between two DeskNote computers For WinXP Double click on the Wireless Link icon from the Control Panel window Click on...

Страница 53: ...owse button and specify for the designate location of your CD driver The procedures mentioned above described if you are installing the driver automatically to search for a suitable driver Another is...

Страница 54: ...tions to install the LAN driver From your screen click on the My Computer icon and use your mouse or touchpad right button to select the Properties item Click on the Hardware tab from the System Prope...

Страница 55: ...rdware tab from the System Properties window Click on the Device Manager tab from the Hardware window Click on the Network Adapter denoted by a yellow mark symbol select the SiS 900 PCI Fast Ethernet...

Страница 56: ...d select the PCI Card item Use your mouse cursor to double click the Reinstall Driver item Select the Specify the location of the driver Advanced and click on the Specify a location item Select the Br...

Страница 57: ...el or external monitor When the Mirror is selected you can toggle between the LCD and CRT display Both the LCD and CRT screen display the same image Display Combination This applies to the display tha...

Страница 58: ...upports two asynchronous simultaneous display paths with the features of LCD LCD CRT or CRT Click on the Control Panel and double click on the Display icon Click on the Settings tab to enter the Displ...

Страница 59: ...he cursor to click on the Monitor 2 screen on the sub screen of the Display Properties window A message is shown on your screen to ask you whether to enable the monitor that you have chosen Click Yes...

Страница 60: ...3D Settings This setting lets you modify the 3D display performance 48...

Страница 61: ...d and quality of your 3D display Gamma Correction You can adjust the right color for your window screen by moving the Brightness adjustment window to increase or decrease the right resolution for your...

Страница 62: ...e Display icon From the Display Properties window select the Settings tab and click on the Advanced tab to enter the SiS 650 740 Properties window You will notice four new entries have been made in th...

Страница 63: ...amma Correction You can adjust the right color for your window screen by moving the Tint adjustment window Adjust the Brightness to increase or decrease the right resolution for your screen display 51...

Страница 64: ...Video Setting 52...

Страница 65: ...video display Contrast Use this scroll bar to adjust the contrast level between the bright and dark areas of the video image The highter the contrast the brighter the bright areas and the darker the...

Страница 66: ...Auto tab will serve as additional function of the Mirror and VGA1 respectively by removing the check mark under the Display Combination selection field Select the VGA1 if you want the picture to only...

Страница 67: ...play to the external CRT screen Click on the Apply tab and you will be ask to keep the new setting The DeskNote and external monitor TV screen will now simultaneously display the same image Multi Moni...

Страница 68: ......

Страница 69: ...nized approach to solving the problem The problems that you will encounter can be divided into two basic categories hardware problems and software problems Hardware problems can be further divided int...

Страница 70: ...u may also need to check the fuses and breakers in your electric box If the outlet is controlled by a wall switch make sure that the switch is on If the outlet is controlled by a dimmer switch use a d...

Страница 71: ...ction Messages that furnish important information on the power on and boot processes such as memory status These non critical malfunctions are those that cause incorrect results that may not be readil...

Страница 72: ...eck and make sure that you do not have a non bootable floppy diskette inserted in your floppy drive If your FDD is empty you may not have an operating system installed on your drive Contact technical...

Страница 73: ...the mouse with another computer to see if it works If it doesn t operate on a different system the mouse might be broken Contacting Your Dealer If you still have a problem after reading the preceding...

Страница 74: ...62...

Страница 75: ...l FC PGA2 P4 series 2 0GHz 2 2GHz 2 26GHz 2 4GHz 2 5GHz CPU 512KB L2 cache on die CPU front side bus 400MHz 0 13u core 478 pin mPGA478 socket Memory 0MB on board expandable up to 1GB with 512Mb techno...

Страница 76: ...Chipset Codec Winbond W83972D Features Dual full duplex Direct Sound Channels Hardware SoundBlaster Pro for real mode DOS legacy compatibility 16 bit ADC DAC resolution Support SPDIF out Supports 6 c...

Страница 77: ...10 Base T 100 Base T Ethernet IEEE 1394 Controller VIA VT6306 1394 OHCI v1 0 and v1 1 compliant Integrated IEEE 1394 OHCI link and three ports of IEEE 1394 PHY Data transfer rate 100 200 00 Mbit s USB...

Страница 78: ...ra AGPII 2GB s bandwidth AGP 2 0 interface 4X Supports up to 2048x1536x32bit true color colors mode on external CRT 75MHz NI Supports 1600x1200x256K colors UXGA TFT LCD through external 2 channel LVDS...

Страница 79: ...attery charger Charge modes System on 1 5 hours charge time System off or in Suspend mode 3 5 hours charge time Mechanical Dimension 332 0 mm W x 281 0 mm D x 39 7 mm 44 7mm H 13 07 W x 10 81 D x 1 56...

Страница 80: ...tware Specifications System Software System BIOS AMI BIOS Video BIOS SiS 315 VGA BIOS Supported Operating Systems Optional Windows XP RTM or above version Optional Windows ME or above version Optional...

Отзывы: