background image

Exploded View 

Ampco Pumps Company 

Page 15 

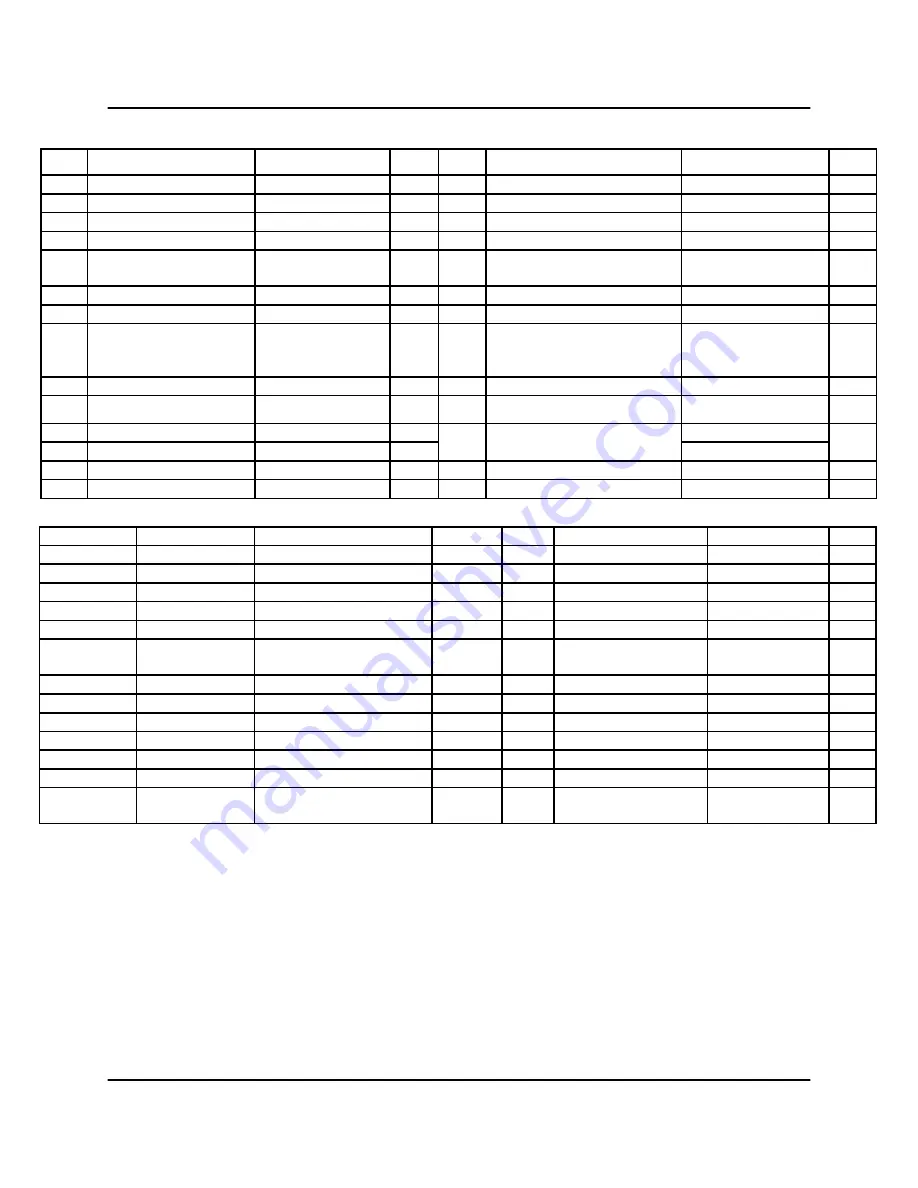
Parts List: 

AC+2116


Key


Description


Part Number


Qty


Key


Description


Part Number


Qty


1


Hopper


DBH2116-2-TC


1


15


Casing Gasket


S216-90A-U


1


2


(2”) Clamp


13MHHM200


2


18


Casing Clamp


S216-75AR-S


1


3


(2”) Gasket


40MP-U200


2


19


Deflector/Slinger


DBX8207351


1


4


(2”) Butterfly Valve


B5101E200CC-C


1


20


Impeller Key


S216-95C-316L


1


5


Diffuser/Dry Feed 

Tube


DBX2116-200D


1


21


Stub shaft


C216E-18TP-06


1


6


(2.5”) Clamp


13MHHM250


2


22


Shaft Collar Screw


GX5494026SS


1


7


(2.5”) Gasket


40MP-U250


2


23


Shaft Collar


SX18000014


1


8


Inlet Adapter


DBX2116-250W


1


24


Adapter Cap Screw


(D) GX5079700


(DG) SC1710H-SS


(E) SC1106E-SS

4


9


Pump Casing


S316DB-01C-E 

1


25


Seal Guard


C216-18T-131-S


1


10


Casing Screen


DBX8307982


1


27


Adapter


216D18T-71DB-SS


1


11


Impeller Nut


S216-91C-316L


1


28 

Platform/Base 

DBB2116-180


12


Impeller Nut Gasket


S216-25A-U


1


DBB2116-210


13


Impeller


S216-02DB-316L


1


29


Motor


Optional


1


14


Impeller Back Gasket


S216-25B-U


1


30


O-Ring, Rotor Hub

N70224


1


D1


Carbon Seal


216E-80-1A


1 (D)


E1


Carbon Seal


216E-80-1A


2


D2


Seal O-Ring


01-1165-19-U

1


E2


Seal O-Ring


01-1165-19-E

2


D3


Cup D


216D-80-3P


1


E3


Cup E


216E-80-3P


2


D4


Spring D


216D-80-4


1


E4


Drive Collar E


216E-23-316L


1


D5


Drive Collar D


SP216D-23P-S


1


E5


Spring E


216E-80-4A


1


D6


Set Screws


SC1105A-SS


3


E6


Set Screws


SC1103A-SS


3


D7


Back plate D


(D) 216D-11-316


(DG) SP216G-11-316L


1


E7


Stuffing Box


216E-83B-316


D8


Gasket -Thick


SP216G-80-12AG


1


E8


Back plate E


216E-11B-316


1


D9


Seal Seat


SP216G-80-11SC


1


E9


Follower


216E-17-316


1


D10


Gasket -Thin


SP216G-80-12G


1


E10


Lock washer


LWA-1300-SS


4


D11


Gland Ring


SP216G-17-316L


1


E11


Machine Screw


SC1308H-SS


4


D12


Mounting Bolt


GX5076004


4


E12


O-RING

17-122-U

1


D13


Lock Washer


LWA-1300-SS


4


E13


O-Ring

17-275-U

1


D14


Set screw cup 

point


GX5494026SS


3


Ampco Pumps Company AC+ Dry Blender Manual M-028 Rev C 12.20 

Содержание AC+ 2116

Страница 1: ...AC Dry Blender Operation and Maintenance Manual Models 2116 2116 System 3218 4329 Ampco Pumps Company AC Dry Blender Manual M 028 Rev C 12 20 ...

Страница 2: ...dels AC 2116 and AC 2116 System 8 Models AC 3218 and AC 4329 9 Reassembly 10 Models AC 2116 and AC 2116 System 10 Models AC 3218 and AC 4329 11 Maintenance 12 Maintenance 12 Setting the Drive Collar 13 Seal Replacement 13 Exploded View 15 AC 2116 15 AC 3218 17 AC 4329 19 Troubleshooting 21 Ampco PumpsTerms and Conditions 23 Return Policy 26 Ampco Pumps Company AC Dry Blender Manual M 028 Rev C 12 ...

Страница 3: ...nt is introduced by opening the butterfly valve AC Dry Blenders are also suitable for liquid to liquid applications Shipping Damage or Loss Upon receiving equipment that is damaged or if your shipment is lost in transit immediately file a claim with the carrier At time of pick up the carrier signed the bill of lading acknowledging that they have received the product from Ampco in good condition Pu...

Страница 4: ...ower source and stored energy if present be released Refer to National Fire Protection Association Standards and OSHA rules for the Control of Hazardous Energy Sources and the Electrical Safety Related Work Practices Check for procedural requirements for lockout tagout and personnel qualifications and training Interconnected devices should be checked to insure they are capable of performing their ...

Страница 5: ...nt that will result in death or serious injury if not avoided Marked with a warning triangle to indicate that hazards or unsafe practices if not avoided could result in severe injury or death Also used to warn against unsafe func tioning or maintenance practices Marked with a warning triangle to indicate that hazards or unsafe practices if not avoided could result in death or injury or product or ...

Страница 6: ...inch 38 1mm liquid inlet 3 inch 76 2mm powder inlet and 2 inch 50 8mm liquid outlet The AC 4329 model has a 2 inch 50 8mm liquid inlet 4 inch 101 6 mm powder inlet and 3 inch 76 2 mm liquid outlet The purchaser is responsible for supplying and installing all piping Liquid inlet piping should be short and provide a direct route into the blender There should be a minimum number of elbows and fitting...

Страница 7: ...he control valve 5 Hold the valve while removing the clamp to prevent it from falling To repair the valve see manufacturer s instructions 6 Loosen and remove the clamp at the top of the inlet adapter 7 Remove the clamp the diffuser and the suction tube 8 Loosen and remove the clamp securing the inlet tube adapter to the casing 9 Remove the adapter and the gasket 10 Remove the large clamp that secu...

Страница 8: ...r replacement as incorrect setting on the DG seal may allow for excessive wear on the seal Models AC 2116 and AC 2116 System 1 To remove the drive motor from the AC 2116 or AC 2116 System place a block suitable in size under the motor Turn the adjustable legs until the motor rests on the block 2 Remove the seal guard 3 Remove the carbon seal cup spring and o ring from the stub shaft 4 Loosen the s...

Страница 9: ...ve the bolt and the pulley 6 Remove the tapered bushing from the shaft of the blender 7 To remove the adapter ring and spacers hold the adapter ring to prevent it from falling while you remove the six cap screws 8 Set the blender back down on all four legs 9 Loosen the bearing housing from the base by removing the cap screws 10 Grasp the bearing housing with both hands and firmly lift it off the b...

Страница 10: ...urizes the o ring groove and augments the spring tension in keeping a tight joint at the sealing faces The width of the seal face controls the balancing of the seal This type of seal should be replaced when the clearance between the carbon seal face and the back plate is less then 1 32 0 79mm or when leakage is noted See instructions for setting the drive collar and seal replacement on page 13 9 A...

Страница 11: ...ulley and the bushing Tighten the bolts Both pulleys should be aligned horizontally 15 Use the mounting bolts to draw the motor pulley tight Tighten the bolts a small amount at a time alternating between the three until all are tight 16 Now you need to install the drive belts onto both the motor and the blender pulley You may need to move the motor to do this The plate that holds the motor to the ...

Страница 12: ...ates the casing and back plate Do not use a tool to try and pry them apart This could damage the surfaces of the adapter ring and the gasket Firmly tugging the casing should separate the casing from the back plate 7 Remove the screen inside the casing 8 Remove the impeller and back plate Protect the sealing surface of the back plate against all nicks and scratches when removing for cleaning and di...

Страница 13: ...ng 4 Clamp the casing to the back plate and tighten the clamp 5 To locate the drive collar position slide the collar and seal assembly towards the back plate until the o ring and carbon seal are pushed tight against the back plate 6 Slide the drive collar back from the back plate by 1 32 0 79mm Tighten the set screws to secure the drive in this location 7 Install the seal spring cup seal o ring an...

Страница 14: ...ng seal components including the seal spring cup seal o ring and carbon onto the shaft Take care that the slot in the seal cup is aligned with the pin on the drive collar Gentle finger pressure will overcome o ring resistance on the shaft 8 Place the stuffing box and back plate assembly over the stub shaft and the seal components 9 Next set the follower onto the stuffing box and secure it by tight...

Страница 15: ...Impeller Nut Gasket S216 25A U 1 DBB2116 210 13 Impeller S216 02DB 316L 1 29 Motor Optional 1 14 Impeller Back Gasket S216 25B U 1 30 O Ring Rotor Hub N70224 1 1 D1 Carbon Seal 216E 80 1A 1 D E1 Carbon Seal 216E 80 1A 2 D2 Seal O Ring 01 1165 19 U 1 E2 Seal O Ring 01 1165 19 E 2 D3 Cup D 216D 80 3P 1 E3 Cup E 216E 80 3P 2 D4 Spring D 216D 80 4 1 E4 Drive Collar E 216E 23 316L 1 D5 Drive Collar D S...

Страница 16: ...Exploded View Ampco Pumps Company Page 16 Figure 4 AC 2116 Ampco Pumps Company AC Dry Blender Manual M 028 Rev C 12 20 ...

Страница 17: ...t Washer GX10610500 4 17 Hex Cap Screw GX5077200 6 40 Adapter Cap screw GX5079700 4 18 Pump Adapter DBX8307742 1 41 Belt 7888K222 1750 7888K252 1450 1 19 Adapter Casing Clamp S328 75AR S 1 42 SD Sheave Bush ing 120382 1 20 Impeller Key S328 95C 316L 1 43 SK Sheave Bush ing 120431 1 21 Stub shaft C328E 25DB 06 1 44 Flat Washer GX5505015 6 22 Guard DBX8307732 2 45 Lock washer GX5503010 6 1 D1 Carbon...

Страница 18: ...Exploded View Ampco Pumps Company Page 18 Figure 5 AC 3218 Ampco Pumps Company AC Dry Blender Manual M 028 Rev C 12 20 ...

Страница 19: ...610500 4 16 Deflector Slinger D DBX8207082 DG DBX8207331 E DBX8207702 1 40 Adapter Cap Screw GX5079700 4 17 Cap Screw GX5077200 6 41 Belt 7888K252 1 18 Pump Adapter DBX8308231 1 42 SD Sheave Bushing 120382 1 19 Adapter Casing Clamp SP4410 75D S 1 43 SK Sheave Bushing 120435 1 20 Impeller Key S4410 95C 316L 1 44 Flat Washer GX5503015 6 21 Stub Shaft 4410E 25DB 06 1 45 Lock Washer GX5503010 6 1 D1 C...

Страница 20: ...Exploded View Ampco Pumps Company Page 20 Figure 6 AC 4329 Ampco Pumps Company AC Dry Blender Manual M 028 Rev C 12 20 ...

Страница 21: ...ction of rotation Reverse a three phase motor by switching any two of the three power leads at the motor or controller Liquid inlet port on the wrong side Remove inlet adapter housing and relocate so it is correctly positioned as shown on the exploded view pag es Splashing in the suction throat of the Tri Blender High Flow oversized supply pump Verify that pumps are sized correctly to suit applica...

Страница 22: ...e Inspect for damage Excessive vibration Blender is not leveled properly Level blender Impeller is damaged Replace impeller Foreign matter in casing Remove casing and foreign matter inspect f or damage O ring seal is worn Replace o ring seal Carbon seal is worn Replace carbon seal Insufficient compression on seal Replace spring Back plate gasket is worn Replace gasket Back plate is worn Replace ba...

Страница 23: ...t be liable for loss damage or delay resulting from causes beyond its reasonable control including without limitation strikes or labor difficulties lockouts acts or omissions of any governmental authority or Seller insurrection or riot war fires floods Acts of God breakdown of essential machinery accidents embargoes cargo or material shortages delays in transportation lack of production capacity o...

Страница 24: ...SELLER c FROM ANY BREACH OF ITS WARRANTY OR ANY OTHER OBLIGATIONS TO BUYER OR d FOR ANY OTHER CAUSE WHATSOEVER WHETHER BASED ON WARRANTY EXPRESSED OR IMPLIED OR OTHERWISE BASED ON CONTRACT OR ON TORT OR OTHER THEORY OF LIABILITY AND REGARDLESS OF ANY ADVICE OR REPRESENTATIONS WHETHER OR NOT IN WRITING THAT MAY HAVE BEEN RENDERED BY SELLER CONCERNING THE DESIGN MANUFACTURE SALE USE OR INSTALLATION ...

Страница 25: ...n whether shipment is made by air land or sea Except as otherwise provided expressly stated in the agreement Purchaser will bear any additional expenses required to satisfy Purchaser s packaging requirements Packages will be marked in accordance with Purchaser s instructions if any Seller shall furnish packing lists and such other information as may be necessary to enable Purchaser s agent to prep...

Страница 26: ... parts without a replacement order Restocking Charge 10 20 5 10 Additional restocking charges may be assessed for any of the following circumstances 1 Special order motors and seals are not returnable unless we have a use for them Credit will be determined on a case by case basis 2 Impellers that are trimmed to a diameter that we don t regularly use are not returnable Credit will be determined on ...

Страница 27: ...Notes Ampco Pumps Company Page 27 Notes Ampco Pumps Company AC Dry Blender Manual M 028 Rev C 12 20 ...

Страница 28: ...e 800 737 8671 or 414 643 1852 Fax 414 643 4452 Email ampcocs ampcopumps com For additional information on the ROLEC DH series and other Ampco Pumps products please visit our website www ampcopumps com Ampco Pumps Company AC Dry Blender Manual M 028 Rev C 08 16 ...

Отзывы: