background image

21

© American Time

PoE Installation Manual

Appendix

Tr

oubleshooting

Configuration

Network Clock 

Connect

Installation

Intr
oduction

Specifications

Configuration

Schedule Editor

Note: This feature is only available for analog clocks with the buzzer option, digital clocks or relay. If the option is not enabled 
the button will display N/A.

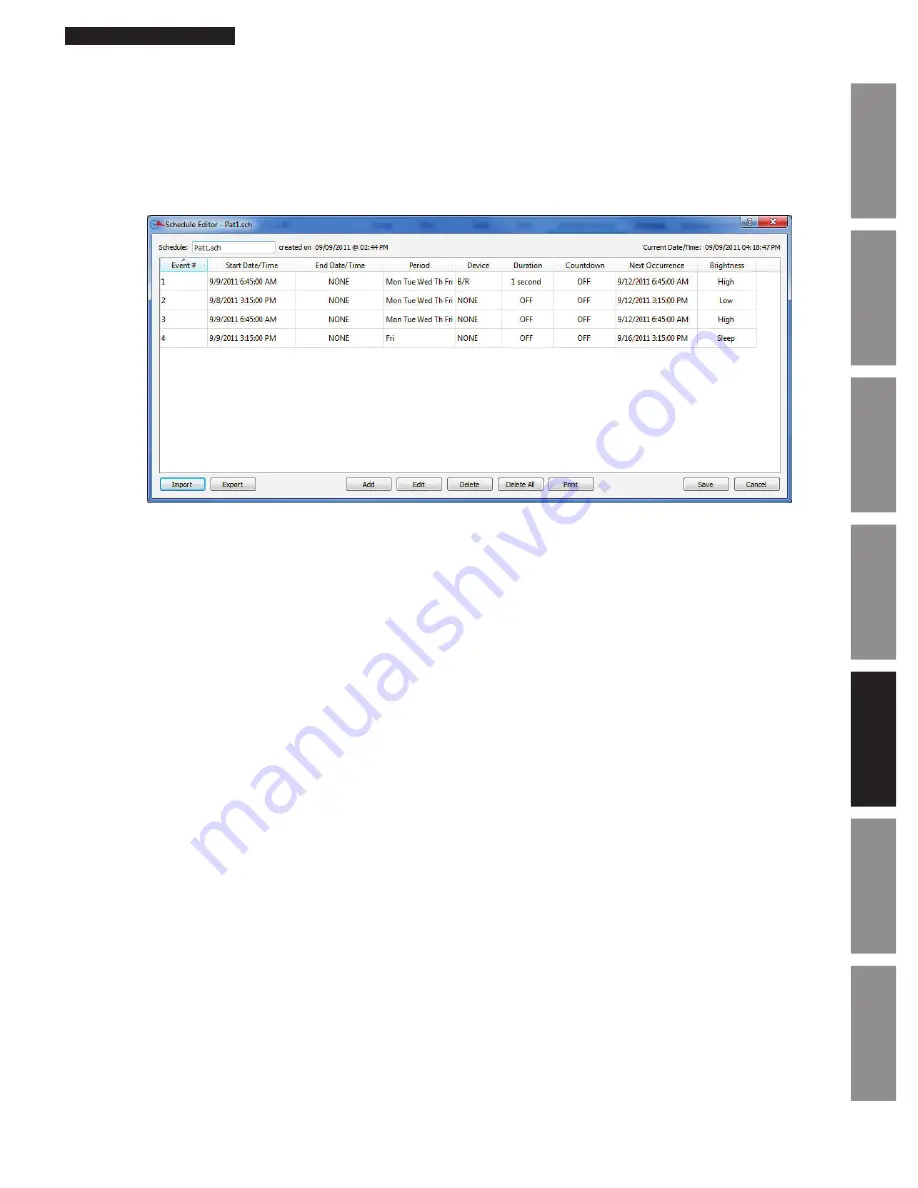
The Schedule Editor may be entered by pressing the schedule button from the main Network Clock Connect screen. This is 

used to add and edit events in a schedule. Multiple devices may be scheduled at once by selecting them in the Select Column 

in the Network Clock Connect screen. The maximum number of scheduled events is 100. 

Reference Appendix C for scheduling 

examples.


1. Schedule

 – This is the file name of the schedule and the date and time it was last modified. This field is editable so  


that the schedule may be named appropriately (i.e. 2HourLateStart.ats, PepFest.ats, etc.).


2.  Current Date/Time

 – This displays the current date and time of the selected network clock.


3.  Event # Column

 – This displays the event number.


4.  Start Date/Time Column

 – This displays the start date and time of the event. 


5.  End Date/Time Column

 – This displays the end date and time of the event. There may not be an end date if the event  


is a reoccurring event.


6.  Period Column

 – This displays the period of the event. The period is how often the event occurs. Therefore a period of  


one week correlates to an event that happens weekly.


7.  Device Column

 – This displays the device(s) that will be triggered during the event. If all outputs are to be triggered  


for a specified event this field will display: 1 2 3 B/R. This correlates to LED1, LED2, LED3, Buzzer/Relay, respectively.  


(LED1, LED2, LED3 available on analog clocks only)


8.  Duration Column

 – This displays the event duration. The duration may be selected from this field (ON, OFF, 0–59    


seconds). The event duration must be less than the period.


9.  Countdown Column – 

This displays the duration of the countdown timer. 

Note:

 Countdown column only available for  


digital clocks.


10.  Next Occurrence Column

 – This displays the date and time of the next occurrence of the event.


11.  Brightness Column – 

This displays the brightness of the time display on the clock triggered by the event.


12.  Import Button

 – This button is used to import an existing schedule. 


13.  Export Button

 – This button is used to export the current schedule on the network clock.


14.  Add Button

 – This button is used to add an event to the schedule. The Event Editor will appear when this  button is  


pressed. Reference the Event Editor section for more details.


15.  Edit Button

 – This button is used to edit a selected event with the Event Editor. An event is selected by highlighting  


the event row by clicking on the event. Double-clicking on the event row will also prompt the Event Editor.


16.  Delete Button

 – This button is used to delete a selected event from the schedule. A confirmation dialog will appear  


prior to deleting the event.


17.  Delete All Button

 – This button is used to delete all events from the schedule. A confirmation dialog will appear prior  


to deleting the events.

Содержание H004595

Страница 1: ...Installation and Operation Manual Part H004595 Rev 8 April 2015 Power over Ethernet PoE Clocks...

Страница 2: ...national and local electrical codes Improper installation of this equipment can result in electrical shock and fire The PoE clock should be installed in a secure location protected from Physical dama...

Страница 3: ...18 Network Tab 19 Buzzer Tab 20 Manuf Tab 20 Schedule Editor 21 Event Editor 22 Web Browser Interface 23 Network 23 Time Synchronization 24 Daylight Saving Time 24 Other Configurations 25 Troubleshoo...

Страница 4: ...y be injected into the Ethernet cable using a midspan injector There are several advantages for using PoE PoE eliminates the need to run AC power cables for certain devices Instead the more cost effec...

Страница 5: ...004167B POE Security Bracket part number varies by size Features Time Zone Management Supports up to 10 SNTP servers for redundancy Supports Daylight Saving Time Power over Ethernet IEEE802 3af DHCP o...

Страница 6: ...zzer Relay maximum of 100 scheduled events Calendar Clock Display Modes MM DD YY DD MM YY YY MM DD M D YY D M YY YY M D Configurable date time toggle durations Specifications Dimensions 2 5 display 4...

Страница 7: ...ving Time Power over Ethernet IEEE802 3af DHCP or Static IP addressing Network Clock Connect configuration Status LED indicator Scheduling maximum of 100 scheduled events Specifications Dimensions 2 2...

Страница 8: ...using DHCP Flashing Red Attempting SNTP sync Continuous Red Failed SNTP sync Flashing Green Received SNTP sync Continuous Green Successful SNTP sync Note When a DHCP network is not present at initial...

Страница 9: ...digits on the far right hand side of the clock will flash For 4 digit clocks the AM PM indicators on the left side of the clock will flash 2 Upon startup the clock Firmware version and IP address will...

Страница 10: ...UTION RISK OF ELECTRICAL SHOCK Disconnect and lock out power to the electrical box before installing or servicing the clock u Remove the four sheet metal screws that hold the cover assembly and enclos...

Страница 11: ...on the orientation of the 4 square backbox use two 8 32 x 3 4 screws and two 8 32 nuts for the two dummy holes in the mounting plate w Run patch cable through the conduit x Using two 8 32 x 3 4 screws...

Страница 12: ...that may be purchased from American Time 2 The Status LED B will indicate the relays status as follows Flashing Orange Acquiring an IP address using DHCP Flashing Red Attempting SNTP sync Continuous...

Страница 13: ...13 American Time PoE Installation Manual Appendix Troubleshooting Configuration Network Clock Connect Installation Introduction Specifications User Notes...

Страница 14: ...indows Server 2008 R2 64 bit PC with 500Mhz or higher processor clock speed recommended 50MB free storage 256MB or RAM or higher recommended VGA 800x600 or higher resolution video adapter and monitor...

Страница 15: ...clock The network clocks may be grouped for sorting purposes The groups may be named under Tools Rename Groups 8 MAC Column This displays the MAC address of each clock 9 Date Column This displays the...

Страница 16: ...red when this button is pressed Once the clocks obtain the SNTP sync the Last Sync Success field will update to green with the correct date and time 20 Configure Button This is used to enter the Confi...

Страница 17: ...up of multiple selected clocks h Time Zone This displays the time zone of the selected clock The time zone will not be displayed if multiple clocks are selected i Daylight Saving Time This displays th...

Страница 18: ...to select a custom time zone with a bias of hours and minutes from UTC time The CUSTOM selection must be made in the Time Zone field for this to be enabled The bias may be configured in the range of 0...

Страница 19: ...be set to CUSTOM for these fields to be editable 4 Network Tab a DHCP This checkbox enables Dynamic Host Configuration Protocol DHCP on the selected network clocks b IP Address The IP address may be s...

Страница 20: ...ck Connect Installation Introduction Specifications Configuration 5 Buzzer Tab a Activate Buzzer Relay Button This button will activate the relay or buzzer on all selected network relays or clocks tha...

Страница 21: ...ly 7 Device Column This displays the device s that will be triggered during the event If all outputs are to be triggered for a specified event this field will display 1 2 3 B R This correlates to LED1...

Страница 22: ...d date and time is also displayed 3 Start Date Calendar This is used to select the start date of the event A date selection prior to the current date is not possible 4 Start Time HH MM SS This is used...

Страница 23: ...take effect the Restart button must be clicked By default the network parameters are set up using DHCP In order to set static values uncheck the DHCP check box and enter new values in the address fie...

Страница 24: ...Period HH MM The SNTP Resync Period is used to determine how often the clock requests the time from the SNTP server The default and recommended interval for the clock to resync is every 15 minutes Use...

Страница 25: ...only the time will be displayed If date is set to 0 and time is set to anything other than 0 only the date will be displayed If neither time nor date are 0 the time and date will toggle for the durati...

Страница 26: ...rator to ensure that DHCP is enabled on the network you are connecting the PoE clocks 4 Verify that DHCP is enabled on the PoE receiver a Configure a PC that is on the same local network as the PoE re...

Страница 27: ...e following network configurations Tip Note existing PC settings first Contact your Network Administrator for assistance or reference the following link http windows microsoft com en US windows vista...

Страница 28: ...Port 123 is open for SNTP time synchronization 5 If the SNTP servers do not respond update the NTP Servers List with new SNTP Servers When the time displayed on the clock s differs from the Network Cl...

Страница 29: ...005 Southfield Michigan nisttime carsoncity k12 mi us 066 219 116 140 Carson City Michigan wwv nist gov 024 056 178 140 WWV Fort Collins Colorado utcnist colorado edu 128 138 140 044 University of Co...

Страница 30: ...astern EST EDT 5 4 YES 08 USA Hawaii HST 10 10 NO 10 USA Mountain MST MDT 7 6 YES 11 USA Pacific PST PDT 8 7 YES 12 USA Midway Island Samoa SST 11 11 NO 13 USA Wake Islands WAKT 11 11 NO 14 UTC 0 0 0...

Страница 31: ...prompt the Event Editor Step 2 Enter the parameters as shown below The Start Date is set to the current date The Start Time is 08 55 00 Hours dropdown is in military format which is 8 55 AM The Perio...

Страница 32: ...vent Editor Step 2 Enter the parameters as shown below The Start Date is set to October 31 2011 The Start Time is 15 45 00 Hours dropdown is in military format which is 3 45 PM The Period is set to 1...

Страница 33: ...High Brightness state every Monday at 12 00 AM starting on September 12th Step 1 Click on Add to prompt the Event Editor Step 2 Enter the parameters as shown below The Start Date is set to September...

Страница 34: ...pdown is in military format which is 12 00 AM The Period is set to 1 Day The Buzzer Relay checkbox is not selected The Duration is set to 2 seconds Duration is irrelevant as long as it is not set to O...

Отзывы: