American Dynamics Hybrid Digital Video Recorder Скачать руководство пользователя страница 140

140 


Hybrid Digital Video Recorder


NOTE

You can make the same customizations using the Cameras tab, depending on your preference. 
From the Cameras tab, you will see the days of the week on the left and the cameras will be listed 
in the drop down box at the top. Instead of an Apply to All Days button, you will see an Apply to All 
Cameras button. This will enable you to schedule one camera for the week and then apply that 
same schedule to all of the cameras. You do not need to customize your schedule in both views. 
Select the view that best meets your needs.   

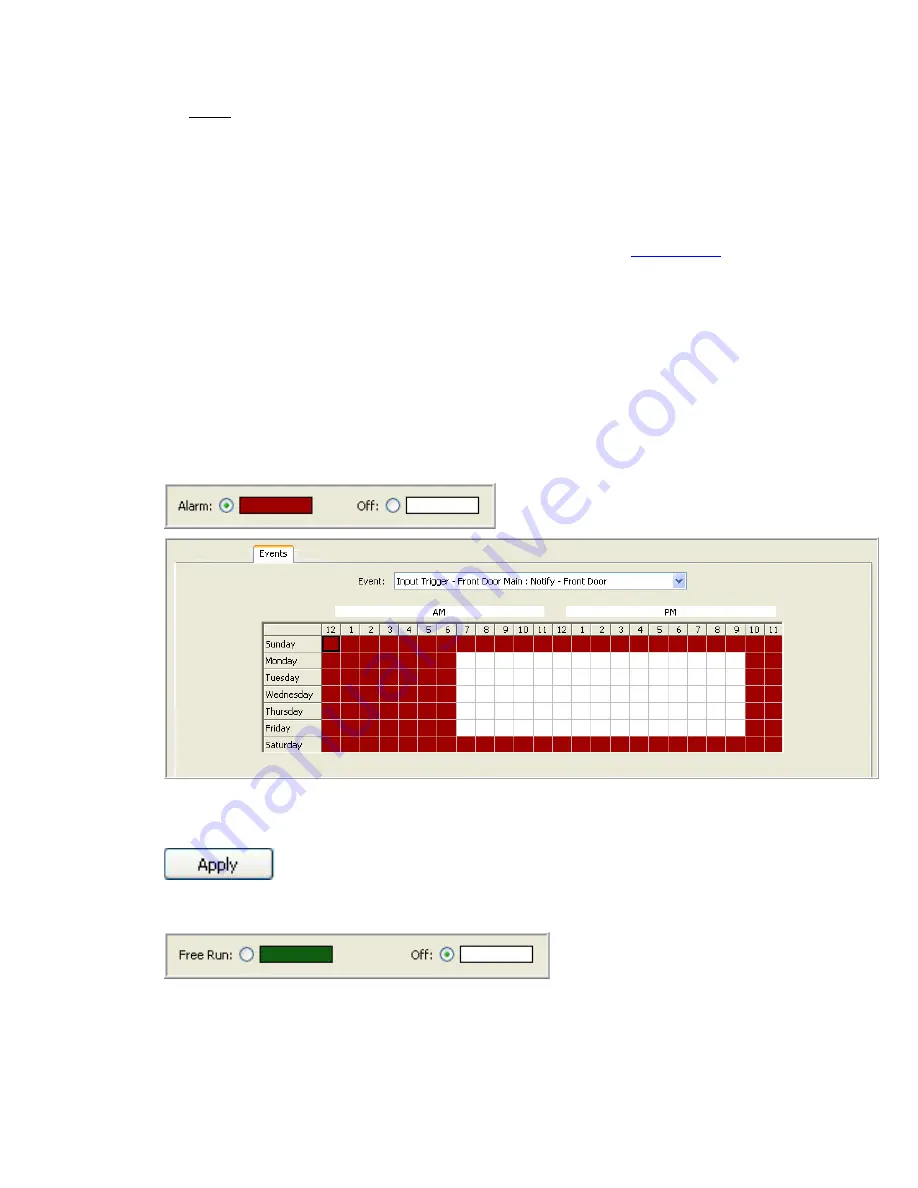
The Events schedule is where you enable or disable events created in 

Event Linking

. By default, when 

an event is created in the Event Linking screen, it is automatically enabled in the Event Scheduling 
screen, meaning the action you have attached to the event will occur every time the event occurs. For 
example, if you have created a link with an input trigger of a door opening and an action target of a 
camera recording, the camera will record every time the door opens. However, if you only want the 
camera to record when the door opens on a specific day of the week or during set hours, you can use 
the Events schedule to customize when the actions will operate. To customize an event schedule: 

Click on the Disable button. 

Click on the Event drop down box and select an event. 

Left click on the desired day and hour grid holding the mouse button down while dragging it to another 
grid location and release the mouse button. The area will change to white indicating the date and time 
has been disabled. The Event will remain Enabled in the red area.  


Once you have made the change you must click the Apply button to make the change. If you want the 
same schedule for every event you have enabled, you can click the Apply to All Events button. 


The Audio tab enables you to schedule when the system records audio input. There are two modes for 
recording audio, Free Run, represented by the color green, or Off, represented by the color white.  


The system defaults to the Off mode, meaning no audio is being recorded. To set the system up to 
record audio, select the Audio tab. Select the appropriate Audio Input using the dropdown menu. (Any 
audio terminals that have not been enabled on the Audio Input Setup screen will be listed as disabled.)  

Содержание Hybrid Digital Video Recorder

Страница 1: ...Hybrid Digital Video Recorder User Manual Version 1 1 Part Number 8200 2713 01 B0...

Страница 2: ...not owned by Tyco International Ltd are the property of their respective owners and are used with permission or allowed under applicable laws Product offerings and specifications are subject to change...

Страница 3: ...with Canadian ICES 003 Cet appareil num rique de la classe A est conforme la norme NMB 003 du Canada Rack Mounting Consult with the supplier of your equipment rack for adequate rack mounting means wit...

Страница 4: ...constitutes the new user s acceptance of its terms and conditions The Software is not fault tolerant and may contain errors You agree that the Software will not be used in an environment or applicatio...

Страница 5: ...y other warranty and you may not rely on such information or advice NO LIABILITY FOR CONSEQUENTIAL DAMAGES In no event will Sensormatic be liable to you for damages including any loss of profits loss...

Страница 6: ...Example for Analog Camera HDVR System 16 Network Connections for IP Camera HDVR System 17 Network Bandwidth Example for IP Camera HDVR System 18 3 Chassis Layout 19 Back Panel Layout 19 Front Panel La...

Страница 7: ...iew 55 Video Timeline 58 Video Playback 58 Smart Search 62 Searching Maps 63 Searching Views 64 Searching Events 64 Exporting Files 65 Setup Mode Overview 72 Add System 73 My Systems 75 Client Setup 7...

Страница 8: ...ons 125 Event Linking 134 Schedule 137 Users Setup 142 RAID Setup 145 Remote Client Software Setup 146 Recommended Remote Client PC Requirements 146 Installing the Remote Client Application 146 Starti...

Страница 9: ...search and find the video that will help to solve your security problem There are many additional features and configuration settings that provide you with tools to customize your system to your speci...

Страница 10: ...c IP address designation with DHCP Will not stop recording in the event of network failure watchdog timer Bandwidth limitation for Ethernet Dial up networks Simultaneous record playback background ima...

Страница 11: ...product line is its ability to address a wide variety of installations whilst also providing live monitoring searching and configuration through the same easy to use interface Below are some typical t...

Страница 12: ...12 Hybrid Digital Video Recorder Remote HDVR System...

Страница 13: ...13 Multi Branch Office HDVR System...

Страница 14: ...14 Hybrid Digital Video Recorder Enterprise HDVR System...

Страница 15: ...R client can be installed on as many of these client computers as desired The second Ethernet switch is only required if there are more network client computers than ports on the first Ethernet switch...

Страница 16: ...16 Hybrid Digital Video Recorder Network Bandwidth Example for Analog Camera HDVR System...

Страница 17: ...installation with IP cameras is quite similar HDVR recommends that the IP cameras are wired in home run style back to an Ethernet switch near the HDVR Server Network Connections for IP Camera HDVR Sy...

Страница 18: ...diagram below gigabit Ethernet connections are recommended between the HDVR servers and the Ethernet switches but 100 Mbps connections from the switches to each IP camera and HDVR Client are sufficie...

Страница 19: ...it 5 Audio Line Input 6 Audio Line Output 7 Microphone Input 8 1 RS 485 RS 422 Serial Port COM4 9 1 Relay Output 10 8 TTL Output Triggers 11 16 TTL Input Triggers 12 1 Switched Multi Picture Composite...

Страница 20: ...Digital Video Recorder Front Panel Layout 1 2 USB 2 0 ports 4 additional USB 2 0 ports on the back of the unit 2 Power switch turns power on off the system 3 Reset Switch 4 Power LED 5 Hard Drive LED...

Страница 21: ...the power cord to the back of the unit and a power source 5 Connect the cameras to the BNC connectors 6 Connect the audio to the RCA connectors 7 Connect the Ethernet switch to the 10 100 1000 Mbits s...

Страница 22: ...ble or DSL modem to your cable outlet or DSL connection port In the first three steps please refer to your manufacturers Ethernet Switch Router and Cable DSL modem installation guide for specific inst...

Страница 23: ...back of the HDVR unit can be removed to easily connect the cable that controls the PTZ camera There are four small screws on the top of the connector that need to be partially unscrewed in order to i...

Страница 24: ...ion and then re insert the connector in the back of the unit 1 Connect the one source output sensor wire to any of the 16 32 trigger inputs 2 Connect the second source output sensor wire to one of the...

Страница 25: ...l system through a 24 VDC latching relay Through the Event Linking screen HDVR can be configured to turn on the light upon predefined events motion input trigger etc 1 Connect the Alarm Output Relay t...

Страница 26: ...r High 5 VDC or Low 0 VDC on the Alarm Output setup screen Audio Input HDVR systems have multi channel Audio Inputs that can be configured to record audio from line level security microphones and othe...

Страница 27: ...same system that is local to the server The second installation is referred to as a Remote Client meaning it is installed on a different computer that is remote from the server All interaction viewing...

Страница 28: ...ount To shut down the system or perform maintenance an operator must switch from user to the admin account via the operating system start menu and enter the admin account password Default passwords sh...

Страница 29: ...ount to connect to the local HDVR Server via this user The new recommended configuration is shown below See the Users Setup section of this manual or the context sensitive online help file for instruc...

Страница 30: ...end of the toolbar you will find the Help button Click it to access online help for your HDVR System You can also toggle to and from the online help system by using the F1 key The system will default...

Страница 31: ...click the topic you want to review To use the Search tab type in a word to search for and then click the List Topics button to generate a list of items that include the word you typed You can then dou...

Страница 32: ...d The factory default settings can be changed with the Setup Mode icon to meet your specific requirements Operating Modes HDVR systems have three main modes of operation depicted by the three icons be...

Страница 33: ...nitor audio inputs Also displays setup icons used to configure HDVR systems 5 Navigation Panel displays cameras and video in organized groups and views 6 Video View Panel displays video of cameras 7 M...

Страница 34: ...he status of any soft triggers on connected HDVR servers Layout Panel The system will default to the 2x2 layout as shown in the example below You change the layout of the Video Panel by clicking on on...

Страница 35: ...one of the cameras listed in the Live Site Tree The system will display that camera in the upper left square of the Video View Panel and fill the additional squares by going down the list Drag and dro...

Страница 36: ...cking anywhere in the square and selecting Disconnect Streaming Video You can also access the Camera Setup screen directly from Live Mode by selecting Camera Properties and then clicking the OK button...

Страница 37: ...increments of 5 or 30 seconds or 1 5 or 15 minute increments Once you select the desired video replay increment the HDVR Replay window will open and begin downloading the recorded video A blue or gree...

Страница 38: ...Play video forward in normal speed Play video forward in fast double speed Play video forward one frame at a time Play video backward one frame at a time You can only scan the portion of the video th...

Страница 39: ...e you would like to view At this point an orange border will appear around the video panel and you will probably not have any video in the panel until an event triggers As motion is triggered on the c...

Страница 40: ...the video to that camera Clicking on the small blue rewind button will replay the event as it was tripped Clicking the small red X acknowledges the event and removes it from the list If you configured...

Страница 41: ...tup Mode See Event Linking for detailed instructions Once you have set up a Soft Trigger you will see the Soft Trigger icon in the toolbar at the top of the Live Panel screen Simply click the icon to...

Страница 42: ...ack Door Front Desk West Hall and Reception Desk cameras you would have to individually drag and drop these cameras in the Video View Panel because they are not listed in order in the Site Tree Using...

Страница 43: ...is will take you to the HDVR Views window Type a unique name for your view in the View Name field The system and camera names will be displayed when you hover over the view name in the Live View Site...

Страница 44: ...a unique name and a description if desired click the Apply button Once you have saved your view you can access it by clicking the View button from the Navigation Pane Select your view from the Live Vi...

Страница 45: ...ews To create a folder simply click the New Folder button Type a unique name for the folder and a description if desired The folder will appear in the My Views Site Tree in the lower left quadrant of...

Страница 46: ...n your views by dragging it to the desired location in the My Views Site Tree If you would like your video view panel to automatically cycle through two or more views you can create a View Tour Begin...

Страница 47: ...Description field This description will appear whenever you hover your cursor over the tour It is optional but it can serve as a helpful reminder when you go to select the tour Below the Description f...

Страница 48: ...Live Maps allows you to select from a list of maps that you have imported into the HDVR When you select Maps from the navigation pane all the maps that you have entered are listed organized based on...

Страница 49: ...ng Maps Maps can be created on a client computer but they are associated directly with all HDVR servers that have cameras and devices associated with the map Thus any map that you create can be seen b...

Страница 50: ...expand the display Click it again to return to the normal view The F11 key will perform the same function Click it once to expand the display Click it again to return to the normal view The F8 key wi...

Страница 51: ...the Video Panel in use The name of the camera being controlled will also be displayed in the PTZ Control title bar To switch the controls click anywhere in the desired video panel You can also click a...

Страница 52: ...set buttons you have setup by clicking on the green numerical buttons at the bottom of the PTZ control For directions on how to setup a Preset button see Camera Setup By rolling your cursor over the P...

Страница 53: ...our mouse to maneuver the PTZ controls within the PTZ Video Panel Move your cursor to the top and center of the PTZ camera view and you should see an up arrow Click your mouse and the camera will move...

Страница 54: ...54 Hybrid Digital Video Recorder Finally if you have access to a USB joystick you can use it to maneuver your PTZ controls See Joystick Setup for detailed instructions on how to set up your joystick...

Страница 55: ...ing and dragging either up or down allows expanding or shrinking the camera selection list and associated video bars along with the video playback display 6 Camera Selection List list of cameras that...

Страница 56: ...eo window that video is played in 15 Export Buttons Save Picture Save Video Print Picture and Burn to CD or DVD 16 Scrub Bar Scrub Handle used to quickly scrub back and forth through video 17 Stop Dow...

Страница 57: ...date and time click the Search button When your search is complete the camera names you selected will appear in the Camera Selection List with the corresponding Recorded Video Bar to the right A Legen...

Страница 58: ...r increments The yellow Video Cursor is used to select a segment of recorded video Video Playback To select a camera for video playback click on a camera name in the search results area To select mult...

Страница 59: ...opening The blue border indicates that the recording occurred using the motion mode A red border around the playback window indicates an alarm triggered the recording To zoom in on a single camera dou...

Страница 60: ...that triggered the recording to identify the cause by right clicking anywhere in the playback window and select View Motion This feature is not available on IP cameras NOTE Blue motion boxes will mar...

Страница 61: ...and forth through the video using the Scrub Bar Scrub Handle or the Video Playback Controls You can only scan the portion of the video that has downloaded You will not have access to the entire video...

Страница 62: ...Enter and Backspace play every frame of video as quickly as the system hardware allows unlike the normal Play and Reverse buttons which play video at actual speed even if frames must be skipped to do...

Страница 63: ...arch using the Groups Maps Views or Events Navigation Pane Conducting a Groups search allows you to organize your cameras in groups that suit your needs See Group Setup for Groups set up instructions...

Страница 64: ...vents There may be times when you want to narrow your search to a specific event rather than all video that recorded on a particular camera during a given time period For example you may have a camera...

Страница 65: ...ith this particular event you ll need to click the Cameras button in the Navigation Pane and then conduct a search on the camera associated with that event Exporting Files Once you have downloaded a v...

Страница 66: ...right click anywhere in the Video Playback window and select Copy Image to Clipboard The image will be stored and you can paste it into your document If you need to save a series of frames you can sa...

Страница 67: ...ts to a standalone exe file which plays on its own and can be run by a Windows user who does not have access to an HDVR Client Alternatively you can save the clip as a ps avi or mov file if you are em...

Страница 68: ...ith DivX decoder AVI H 264 with DivX with DivX decoder with DivX decoder Quicktime MJPEG Quicktime MPEG4 Quicktime MPEG4 with ASP with 3ivx MPEG4 decoder with 3ivx MPEG4 decoder Quicktime H 264 WMP Wi...

Страница 69: ...email or export them to a CD or DVD If you wish to burn them to a CD or DVD insert a writable CD or DVD and click the Save to a CD or DVD button at the top of the toolbar If you do not have a CD burn...

Страница 70: ...format The first number listed MB is the amount of space required to burn all of the video clips you have selected The next number represents the capacity of the disc you have inserted If you forget...

Страница 71: ...checkbox if the CD drive is behind closed doors as in the HDVR Server It will also automatically delete the files from the hard drive after a successful burn unless you uncheck the appropriate checkbo...

Страница 72: ...st screen that displays systems that you have connected to If you have only one stand alone system you will see one system listed on this screen If you have configured multiple systems with the Networ...

Страница 73: ...here you add systems to your Systems List that you will connect to with your client application for viewing live and recorded video To add an HDVR to your System List click the New button and enter th...

Страница 74: ...tem has been added to the Systems List the Client will automatically connect to the system All authorized video viewing searching and system configuration functions will be available to your client ap...

Страница 75: ...system To view model number and serial number information for a system right click the system name To view MAC address and license key information for a system and copy it to the clipboard right clic...

Страница 76: ...or PTZ focus You can disable the blue motion and red alarm border by deselecting the Show Record Status checkbox and the green PTZ border by deselecting the PTZ Focus checkbox The VGA Acceleration Mod...

Страница 77: ...utton is displayed for all clients but you can hide it for an individual client by deselecting the checkbox Instead of seeing the Live Search and Setup icons the restricted Windows user will only see...

Страница 78: ...on the color bar in the Colors window To return to the Default colors simply click the Default button The Event Buttons field allows you to create a shortcut to any Soft Triggers you have set up See E...

Страница 79: ...To select your icon click the Change Icon button The system will automatically provide icon options of black blue green or red buttons Click the desired file and then the Open button You can also cust...

Страница 80: ...displayed in the box to the right Continue this process until you have created all of the icons you desire The icons will be displayed next to the Soft Trigger icon on the Live mode toolbar You will n...

Страница 81: ...he Calibrate button There are several Position Controls that can be adjusted to suit your personal preferences The sensitivity of the joystick can be adjusted by moving the Sensitivity slide bar to th...

Страница 82: ...n in the picture above You can configure the joystick to zoom in by twisting the joystick to the right or left depending on your personal preference When the Invert Rudder checkbox is selected the cam...

Страница 83: ...layout Clicking the button again will return it to the original layout Toggle Digital PTZ Switches between digital and mechanical PTZ NOTE If the camera does not have mechanical PTZ this setting will...

Страница 84: ...e account You can then change the user s password on that system and confirm it by typing it in the Password and Confirm columns You can also change the user s User Group on that system by selecting i...

Страница 85: ...r account NOTE When you add a user from an Active Directory or OpenLDAP directory the password used for that account in the HDVR is the same as the password assigned to that account in the directory E...

Страница 86: ...o the camera displaying the most recent door opening the event would be added to a list You could then click on the item to display the video This may be useful if a guard needs to leave the monitor f...

Страница 87: ...o adjust the spacing to suit your needs Group Setup The Group Setup screen is where you create logical groups of cameras from single or multiple HDVR systems This is a useful feature when you have mul...

Страница 88: ...oup and search To access the Group Setup page click Group Setup from the Setup Site Tree Create a new group by clicking on the New Group button In the Group Details setup box Group Name will be popula...

Страница 89: ...utton Once your group is complete click the Apply button Should you decide you don t want to finish setting up the group you can click the Cancel button as long as you haven t clicked the Apply button...

Страница 90: ...rom the Navigation Pane Click New and then enter a Name and Description optional for the map Click Choose Map to open the Map File window which allows you to browse for the graphic file that you want...

Страница 91: ...has a parent map a small map icon representing the parent map is displayed in the upper right corner You can drag this parent map icon anywhere on the map NOTE To complete a map click Apply To delete...

Страница 92: ...ime information synchronized with time nist gov You can change the time zone using the dropdown menu Use the radio buttons to indicate Daylight Savings or Standard time If you do not have access to ti...

Страница 93: ...disk or USB key To do this insert the disk or USB key then select the appropriate drive from the dropdown menu and click save If you need to restore your settings insert the disk or USB key and click...

Страница 94: ...the appropriate range of IP addresses to use NOTE Once you have assigned the appropriate IP address click the Rescan Network button to refresh the list of cameras in the IP Camera Finder You can then...

Страница 95: ...nnected to a HDVR system and the camera is producing a video signal the HDVR client application will automatically detect the video signal If a video signal is detected it is indicated with a green YE...

Страница 96: ...o masks Any camera settings that are not available in the HDVR software can be accessed through the camera s web page To view a camera s web page click the hyperlink in the IP Address field If you don...

Страница 97: ...stead of Motion Masks A Motion Mask is an area of a video window where motion is ignored whereas a Motion Window is an area of a video window where motion is monitored IMPORTANT NOTE This section disc...

Страница 98: ...ve the slider to the right and left or click on the control and use the left and right arrow keys The Percentage slider control increases or decreases the portion of the mask area that must be filled...

Страница 99: ...displayed Anything outside of the rectangle will be cropped If you are not happy with the new configuration and you haven t clicked Apply yet you remove the setting by clicking the Cancel button You...

Страница 100: ...le of seconds before displaying the new cropped image In this example you will notice that the Avg Image Size decreased from 215539 to 174054 If you wish to restore the camera image to full size simpl...

Страница 101: ...er to the Back Panel Layout If a camera has been connected to an HDVR system and the camera is producing a video signal the HDVR client application will automatically detect the video signal If a vide...

Страница 102: ...e change you must click the Apply button to make the change Camera Setup The Camera Setup screen is where you configure the individual camera settings such as camera name video settings recording qual...

Страница 103: ...ou can position the camera name time and date on six different locations on the video display by clicking on the Top Left Top Center Top Right Bot Right Bot Center or Bot Right By default the On Scree...

Страница 104: ...age size 6 The Motion Detection Sensitivity sliders control increases and decreases the sensitivity of the motion detection algorithm used to record video The slider control ranges from 1 on the left...

Страница 105: ...setting to 5 the car motion is not detected or recorded The Smooth End slider control specifies that amount of time in seconds from zero 0 to two 2 that the system will continue recording motion vide...

Страница 106: ...want to delete them click the Edit button again and then click the Clear button All of the masks will be cleared from the window You can now add a new mask or keep the window clear Remember to click t...

Страница 107: ...ea is now masked from both live and recorded video To clear the mask click the Clear button 10 The Video Settings slider controls are used to adjust the image on your screen The system defaults to 50...

Страница 108: ...to enable digital PTZ You can disallow digital PTZ by deselecting this box You can create camera analog or digital presets by clicking one of the Presets buttons to access the PTZ Control window Anal...

Страница 109: ...presets until you get the desired order You can add a preset multiple times if you want to view a camera more frequently than the others 9 The Dwell Time field controls the amount of time the camera...

Страница 110: ...The HDVR System ships with the audio input positions disabled due to legal restraints on audio recording in some jurisdictions You may want to seek legal guidance prior to recording any audio inputs T...

Страница 111: ...input triggers There are 16 Trigger Position that correspond to the 16 Trigger Inputs on the back of the HDVR NDVR see Trigger Input You can assign a new logical name and change the Normal State from...

Страница 112: ...DVR see Trigger Input You can assign a new logical name and change the Normal State of the 15 TTL Alarm Outputs from the default of Hi 5 VDC to Lo 0 VDC The Status is NORMAL in either the Hi or Lo Nor...

Страница 113: ...ou will see the Front Door Alarm is toggled from NORMAL to ALARM Video Output Setup The Video Output Setup screen is where you configure your security spot monitor for touring switching between video...

Страница 114: ...k on the check box or camera name video will be displayed to visually assist you to select the cameras you want to include Slide the Dwell Time control to desired length of time before the monitor swi...

Страница 115: ...ot record video to this drive as a precaution Your other drives will also be visible on this screen You can review and adjust the drive configuration but if you purchased a HDVR System this should be...

Страница 116: ...trl or Shift buttons Then select the camera name in the list on the right You can configure two types of expiration To delete video after a certain amount of time select At Most from the Type drop dow...

Страница 117: ...and then monitor the Storage Setup page to ensure that the settings will meet the storage requirements Time lapse Setup You can set your HDVR system to take a periodic snapshot even if the cameras are...

Страница 118: ...h live video or recorded and stored You can also input an Event Keyword that will trigger a system alarm or action when certain items are being purchased To view an existing profile simply click on it...

Страница 119: ...the HDVR System when the transaction has ended You will want to enter the last line on the receipt to tell the system to start a new transaction each time it sees that line For example www marsh net...

Страница 120: ...To mask the live video feed tab to or check the Mask Display box To mask the recorded transaction data tab to the Mask Record Box or click in the box The Days to keep POS data field will automaticall...

Страница 121: ...w created the new POS profile If you entered any data in the Event Keywords box you must link the profile to the appropriate Action through the Event Linking Return to the Event Linking system using t...

Страница 122: ...he Events Red highlight indicates that one of the event parameters has been changed making the event invalid NOTE To link your profile to an event begin by clicking the button Select POS Profile as th...

Страница 123: ...ne cigarettes and or liquor appear on the receipt The system will default to 0 for every Action Type except Record Audio Record Audio defaults to five seconds prior and after the event occurs You can...

Страница 124: ...used POS Point Of Sale or PTZ Pan Tilt Zoom Generally the POS mode is used to record transactions at a cash register The PTZ mode is used to control the motion of a PTZ camera by default the last seri...

Страница 125: ...fault to 80 Generally you will keep the setting at 80 but you can change the length by clicking on the up or down arrows When you are finished save the settings by clicking the Apply button at the bot...

Страница 126: ...ick on the Server Description field and enter a descriptive name of email server so that you can uniquely identify it if you use more than one mail sever This is a required field Enter the address and...

Страница 127: ...lecting it from the Message Profile list and clicking the Test Profile button You can make modifications as necessary by selecting the profile from the Message Profile list making the appropriate chan...

Страница 128: ...it to an event HDVR Recall Configuration Click on the Change to Configuration page button to go to the HDVR configuration page In the Setup menu on the left of your screen click on the name of the HDV...

Страница 129: ...Status box is where you select check or unselect uncheck that the CD DVD drive should be automatically ejected when the system finishes burning it It s an option because if the front door on the syste...

Страница 130: ...profile In Use will be indicated as well The Drive Status box indicates whether the system has a writable CD DVD drive and if so what kinds of blank discs are compatible with it i e CD R CD RW DVD R e...

Страница 131: ...d The default setting is 30 but you can increase or decrease the time by using the up or down arrows Repeat this process to export the appropriate number of minutes after the button is pushed This wil...

Страница 132: ...pply button At this point you have completed the process for creating an HDVR Recall profile but the system will NOT use your settings until you link the profile to an event on the Event Linking scree...

Страница 133: ...utton Input Next go to the Action Type field and select HDVR Recall Finally choose the appropriate profile as the Action Target In this case we selected Entrances Finally click the Apply button at the...

Страница 134: ...helps to narrow the information you are looking for As an example let s say you want to find video every time a door opened in a busy lobby If a camera that is pointed at a door and is set to record u...

Страница 135: ...elected Event Source Video Motion Any one of the cameras connected to the HDVR server Video Loss Any one of the cameras connected to the HDVR server Input Trigger Any input trigger on the back of the...

Страница 136: ...nnected to the HDVR server Output Trigger Any output triggers on the back of the HDVR server or IP cameras Output Video 1 Any of the analog cameras connected to the HDVR server Notify Any of the profi...

Страница 137: ...cameras to record based on motion or a specific event The Schedule screen is where you setup your camera and event recording schedule HDVR software ships with Motion Light Green recording as the defau...

Страница 138: ...izing a recording schedule is quick and easy There are four scheduling tabs The Days and Cameras tabs are used to customize camera recording schedules You can use either or both tabs to customize the...

Страница 139: ...of the week or Customize the schedule by clicking on either the Days or Camera tab Next select the Motion Free or the Off button to select the recording mode In this example the Free recording mode w...

Страница 140: ...only want the camera to record when the door opens on a specific day of the week or during set hours you can use the Events schedule to customize when the actions will operate To customize an event s...

Страница 141: ...io To turn the audio recording off select the Off radio button and drag it over any green squares you want to turn off Once you have completed your schedule click the Apply button to set the Audio Inp...

Страница 142: ...m an account that already exists in an Active Directory or OpenLDAP directory For information about configuring your system to connect with a directory see the Active Directory OpenLDAP chapter of thi...

Страница 143: ...that have been previously created When you select a User Group the Custom User Permissions and Custom User Privileges sections display the permissions and privileges granted to that User Group To crea...

Страница 144: ...ate to that privilege are selected or deselected To enable the Custom User Permissions section deselect View Admin in the Custom User Privileges section Clicking on the camera name in the Custom User...

Страница 145: ...k Delete RAID Setup Your HDVR RAID system has redundant hard drive to protect data upon hard drive failure In the event that one hard drive fails the information can be recreated once the hard drive i...

Страница 146: ...essor Intel Celeron D Processor 325 2 53 GHz 533 FSB Intel Core 2 Quad Processor Q9400 6M Cache 2 66 GHz 1333 MHz FSB RAM 256 MB 2 GB Video card Minimum 64 MB video RAM 1024 768 display resolution 32...

Страница 147: ...147...

Страница 148: ...148 Hybrid Digital Video Recorder...

Страница 149: ...149...

Страница 150: ...em Startup in the installation procedure above If you didn t select this startup option follow the steps below Click the Windows Start icon Click the Windows All Program icon Click the HDVR folder Cli...

Страница 151: ...HDVR client application Repeat this process until all of your attached monitors have an open instance of HDVR client The next time you open an instance of HDVR client it will automatically open on th...

Страница 152: ...rt 445 UDP port 137 and UDP port 138 If you want to connect from a different subnet click Change Scope and specify a custom list as in the following example 192 168 1 0 255 255 255 0 192 168 100 0 255...

Страница 153: ...nstalling an HDVR server add a service principal name on the Active Directory server for the HDVR server To do this open a command prompt right click to run as an Administrator if necessary on the Act...

Страница 154: ...s or groups that you want to map in the HDVR software For example if the domain were hdvr test com the LDAP Base DN might be CN Users DC hdvr DC test DC com Check with the system administrator for the...

Страница 155: ...e slapd daemon 4 On the OpenLDAP Kerberos server ensure that your user accounts are associated with groups via an o attribute for each group Each inetOrgPerson object can have as many associated o att...

Страница 156: ...ver add a service principal name on the OpenLDAP Kerberos server for the HDVR server To do this open a terminal window on the OpenLDAP Kerberos server and execute the following command using your info...

Страница 157: ...hat you want to map in the HDVR software For example if the domain were hdvr test com the LDAP Base DN might be CN Users DC hdvr DC test DC com Check with the system administrator for the correct LDAP...

Страница 158: ...e leave the username and password fields empty on the Add Systems page select Use Single Sign On and click Apply You can use any domain user account Enter the account name in user REALM format as the...

Страница 159: ...select the Settings tab In the middle of the page is a Display dropdown It will identify the graphics chip manufacturer and model number Go to the manufacturer s website and download the latest drive...

Страница 160: ...160 Hybrid Digital Video Recorder Select the Offscreen radio button instead then close and restart the HDVR Client If the display issue persists repeat step 7 selecting the None radio button...

Отзывы: