background image

9

Frame Assembly

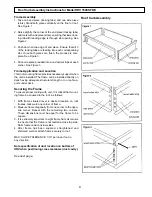
1. Take one end piece (locking tabs) and one side piece

(slots). Stand both pieces vertically on the floor or roof.
See Figure 1.

2. Raise slightly the corner of the end piece (locking tabs)

and mate with side piece (slots), ensuring that lower lock-
ing tab with leading edge is through slot opening. See
Figure 2.

3. Push down on top edge of end piece. Ensure that all 3

of the locking tabs are feeding into each corresponding
slot. Once both pieces are flush, the process is com-
plete. See Figure 3.

4. Drive one spike provided into wood nailer strips at each

corner. See Figure 3.

Frame Application and Location

This roof mounting frame provides necessary support when
the unit is installed. The frame can be installed directly on
deck having adequate structural strength or on roof sup-
ports under deck.

Securing the Frame

To ensure proper mating with unit, it is critical that mount-
ing frame be squared to the roof, as follows:

1. With frame situated level in desired location on roof

trusses, tack weld one corner of frame.

2. Measure frame diagonally from one corner to the oppo-

site corner. Repeat with the remaining two corners.
These dimensions must be equal for the frame to be
square.

3. It is extremely important to sight frame from all corners

to ensure that the frame is not twisted across top side.
Shim frame under any low sides.

4. After frame has been squared, straightened and

shimmed, weld or attach frame securely to roof.

MAX. SLOPE TOLERANCE: 1/16" per linear foot in
any direction.

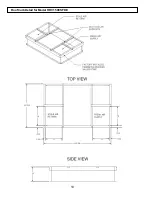
Note specification of duct location on bottom of
HRV when positioning cross members (duct cavity).

See next page.

Roof Curb Assembly Instructions for Model HRV 1500 SFDE

Roof Curb Assembly

Содержание 1500 SFDE

Страница 1: ...l failure may result in the backdrafting or improper function ing of vented combustion equipment TO BE COMPLETED BY CONTRACTOR AFTER INSTALLATION ___________________________________________________________________ Installing Contractor ___________________________________________________________________ Telephone Contact ___________________________________________________________________ Serial Num...

Страница 2: ...s being exhausted These instructions are intended as a general guide and do not supercede local codes in any way Con sult authorities who have jurisdiction before install ing INTRODUCTION TABLE OF CONTENTS Cover Installation Information 1 General 2 Engineering Data 3 4 Function and Controls 5 Additional Features 6 Servicing 7 Mounting the 1500 8 Roof CurbAssembly Instructions 9 Roof Curb Detail 10...

Страница 3: ...s with 1 2 O D drain connections MOUNTING Unit to be set on support brackets hung by threaded rod type apparatus Brackets and rod not included CONTROLS FUNCTION Integrated microprocessor circuit board 3 independently adjustable motor speeds WEIGHT 480 lbs 218 kg SHIPPING WEIGHT 525 lbs 238 kg Engineering Data Model HRV 1500 SFD DIMENSIONS 1500SFD inches A B C D E F G H I J L SFD 18 2 5 18 12 37 66...

Страница 4: ...oated steel insulated 1 thick Elastomeric insulation DRAIN Two powder coated galvanized steel drain pans with 1 2 O D drain connections MOUNTING Rooftop mounted on optional roof curb Part No 28 125 CONTROLS FUNCTION Integrated microprocessor circuit board 3 independently adjustable motor speeds WEIGHT 480 lbs 218 kg SHIPPING WEIGHT 525 lbs 238 kg DIMENSIONS 1500SFDE inches A B C D E F G H I J K L ...

Страница 5: ...he designated speed taps A jumper wire is factory installed in the low speed position Note It is recommended to use the optional speed control Part 28 895 in order to obtain full fan speed control Optional Speed Control Part 28 885 Micro Processor Board Optional Remote Dehumidistat Part 28 882 Boosts unit to high speed when humidity is higher than setpoint Optional DVC Control Part 28 883 Same as ...

Страница 6: ... desired airflow This is done on the ECM circuit board located within the Additional Features electrical box Both motors contain a separate ECM circuit board to allow for independent adjustment of the motors The adjust tap will change the airflows on all three of the speeds Please note that this unit has been factory set to obtain 1500CFM at 1 w g external static pressure Adjust ment of the high s...

Страница 7: ...in access to either side of the unit Servicing Filters 1 Remove filter service panel one or both sides 2 Remove first set of filters 3 Remove filter divider panels if only accessing from one side 4 Remove filters from behind filter divider panel 5 Replace all filters Ensure that filter divider panels are reinserted into unit Servicing Cores 1 Remove core service panel one or both sides 2 Slide cor...

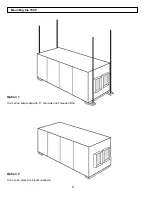
Страница 8: ...8 Option 1 Unit can be suspended with U channels and Threaded Rod Mounting the 1500 Option 2 Unit can be placed on blocks sleepers ...

Страница 9: ...having adequate structural strength or on roof sup ports under deck Securing the Frame To ensure proper mating with unit it is critical that mount ing frame be squared to the roof as follows 1 With frame situated level in desired location on roof trusses tack weld one corner of frame 2 Measure frame diagonally from one corner to the oppo site corner Repeat with the remaining two corners These dime...

Страница 10: ...10 Roof Curb Detail for Model HRV 1500 SFDE ...

Страница 11: ...uires exterior hoods to be provided by the contractor NOTE It is extremely important to design and install the fresh air intake in an area where the hoods will gather the freshest air free from restriction Recommended No less than 10 ft 3 m apart from each other or per local code restriction At least 18 in 46 cm above ground level Away from sources of contaminants such as automobile exhaust fumes ...

Страница 12: ...ve the contaminants while not allowing them to enter the breathing zone of the occupants For contaminants that are lighter than air grilles should be located high on the wall If contaminants are heavier than air a lower placement of the grilles will be required Information on a contaminants specific gravity and toxicity should be available from the chemical data sheets Fresh Air Supply System The ...

Страница 13: ... 1500 SFD SFDE have been programmed to provide constant airflow on each airstream for external static pres sures of up to 1 w g but at a location closer to the air handler The air handler would have a constant running blower to effectively distrib ute the fresh air and remove the stale air Balancing damp ers would be located in both the HRV supply and exhaust ducts between the return air plenum an...

Страница 14: ...n the ductwork Procedure should be performed with the HRV on high speed The first step is to operate all mechanical systems on high speed which have an influence on the ventilation system i e the HRV itself and the forced air fur nace or air handler if applicable This will provide the maximum pressure that the HRV will need to overcome and allow for a more accurate balance of the unit Drill a smal...

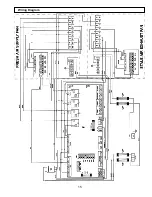
Страница 15: ...15 Wiring Diagram ...

Страница 16: ...arasota FL 941 351 3441 or fax 941 351 3442 to find the name of your nearest dealer in order to repair the product The labor required to install any replacement part s shall be dealt with at the option of the customer in either of the following ways a The customer may supply labor at their own expense or b If the product was purchased from a dealer then the dealer will supply labor at cost to the ...

Отзывы: