Amcrest AMC026AMC029 Скачать руководство пользователя страница 41

41 


5.


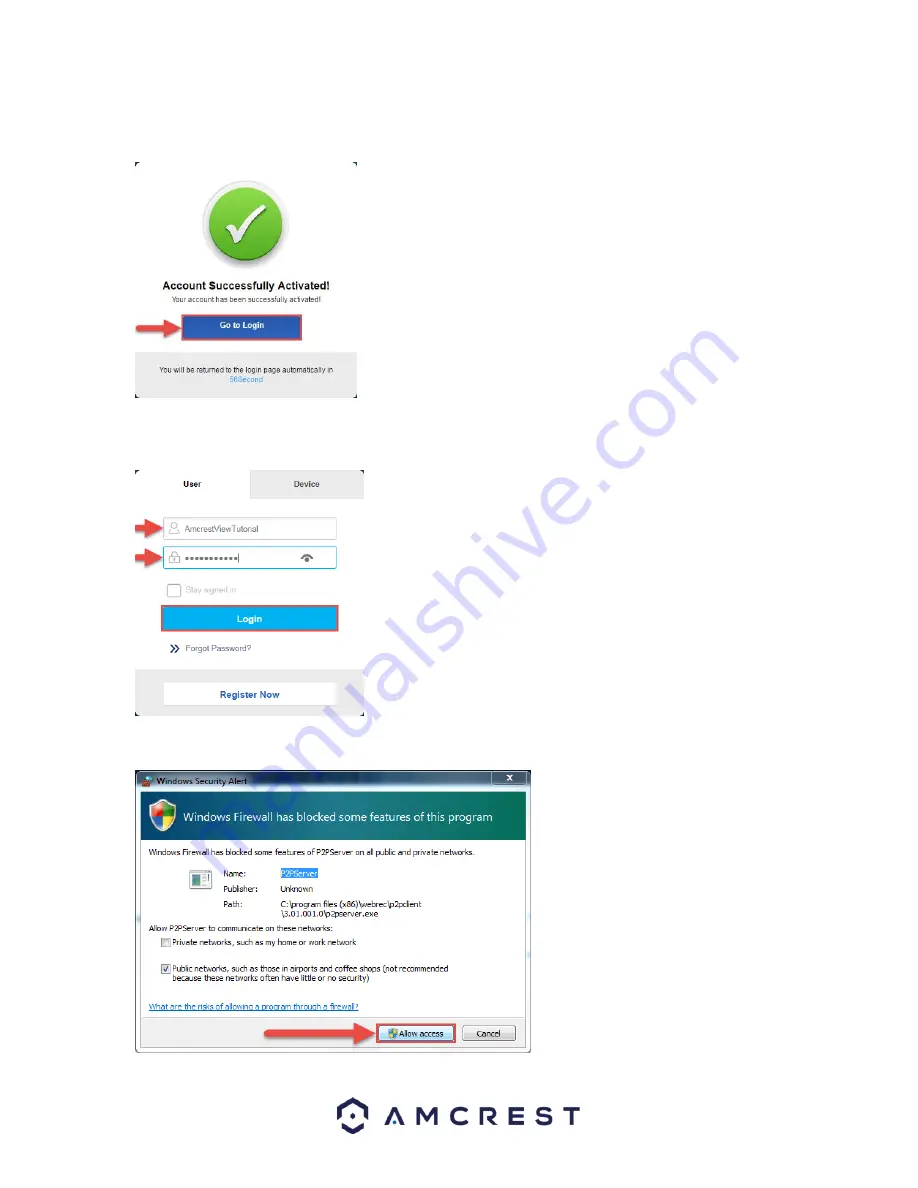
You will be taken back to AmcrestView.com and shown confirmation that your account has been activated. 
Click 

Go to Login


6.


You will be taken back to the login screen. Enter your new AmcrestView.com username and password, then 
click 

Login

:


7.


A popup will appear from your Windows Firewall. Click 

Allow access

:


Содержание AMC026AMC029

Страница 1: ...1 IP4M 1028W EU IP4M 1028W IP4M 1028B EU IP4M 1028B IP2M 841B EU IP2M 851B IP2M 851W EU IP2M 851W IP Camera User Manual Version 2 1 3 Revised October 13 2017...

Страница 2: ...your camera for the first time 13 4 2 2 Accessing your camera using multiple mobile devices 13 4 2 3 Configuring advanced settings on your camera 13 4 2 4 Using Amcrest Cloud for remote viewing stora...

Страница 3: ...s Setup 45 4 7 1 UPnP DDNS Remote Web Access Setup 45 4 7 2 Port Forwarding Remote Web Access Setup 46 4 8 NVR Access 47 5 Operation and Interface 48 5 1 Live 48 5 2 Playback 50 5 3 Setup 52 5 3 1 Cam...

Страница 4: ...1 Schedule 81 5 3 4 2 Destination 84 5 3 4 3 Record Control 86 5 3 5 System 87 5 3 5 1 General 87 5 3 5 2 Manage Users 89 5 3 5 3 Restore Factory Settings 90 5 3 5 4 Import Export 90 5 3 5 5 Auto Mai...

Страница 5: ...5 FCC Statement 100 Appendix A Toxic or Hazardous Materials or Elements 101 IC Statement and Additional Information 102...

Страница 6: ...rt please do one of the following Visit http amcrest com contacts and use the email form Call Amcrest Support using one of the following numbers Toll Free 888 212 7538 International Callers Outside of...

Страница 7: ...ems caused by unauthorized modifications or user attempted repair 5 Environment The camera should be kept in a cool dry place away from direct sunlight flammable materials explosive substances etc Thi...

Страница 8: ...f internet connected devices including PCs iPhones iPads Android tablets and Android phones Cloud Storage Functionality The Vandal Dome network camera is able to record video streams to the Amcrest Cl...

Страница 9: ...thernet Network Input Output port The images below shows the dimensions for the camera antennas not shown The measurements are in millimeters mm To access the reset button and to adjust the camera ang...

Страница 10: ...addition to connecting the camera to a computer the camera should also be connected to a power source by connecting the included power cable to both a power outlet and the camera 3 2 Installation Guid...

Страница 11: ...through 5 If the camera s cable will be exiting through the side of the camera route the cable through the U shaped channel on the side of the enclosure 6 Align the camera with the installation sticke...

Страница 12: ...efault Username and Password To login to the system for the first time use one of the following default username password combinations Once you ve successfully logged in it is highly recommended to ch...

Страница 13: ...our other devices 4 2 3 Configuring advanced settings on your camera If you would like to configure your camera to enable advanced features such as motion detection e mail alerts FTP image adjustments...

Страница 14: ...screenshots below as updates are released Below you ll find instructions on how to set up your camera as well as instructions on how to configure different settings on your camera such as motion detec...

Страница 15: ...r the phone to ensure that the entire QR code is visible and focused in the frame In case the QR code cannot be scanned please tap Enter S N Manually to enter in the camera s serial number 5 Tap WiFi...

Страница 16: ...name and password Once you ve filled out all of the fields tap Next Note Most Amcrest cameras can only connect to 2 4 GHz WiFi networks so please ensure that your phone is connected to a compatible ne...

Страница 17: ...ercase letters and numbers Then tap Change Password 12 Your camera is now ready to go Tap the Start Live Preview button to get started Still not working If you have a dual band router and your camera...

Страница 18: ...s a great backup method Alternatively this method can also be used as an initial setup method if preferred It will take a few more steps but still ends with your camera being added to WiFi for wireles...

Страница 19: ...our router via an Ethernet cable Don t worry once the camera is set up the camera can be unplugged and moved to a different location Tap Next when finished 7 Ensure your mobile phone is connected to t...

Страница 20: ...mber 8 Scan the QR code QR code icon from the sticker on your camera 9 Double check to ensure that your S N Serial Number is entered correctly Then tap Next Note The default username is admin and the...

Страница 21: ...ure the security of your camera you will be asked to change the password for your camera s default username admin Please select a password that is at least 8 characters long and one that uses a combin...

Страница 22: ...your camera will not be added to your WiFi network by the end of the app setup alone like in the WiFi Configuration setup method Instead in this case the camera must be added to WiFi separately for i...

Страница 23: ...r the phone to ensure that the entire QR code is visible and focused in the frame In case the QR code cannot be scanned please tap Enter S N Manually to enter in the camera s serial number 6 Scan the...

Страница 24: ...a is now ready to go Tap the Start Live Preview button to get started 4 3 4 App walkthrough Once you ve set up your camera the app will present you with a popup that offers a walkthrough of different...

Страница 25: ...ou complete control over how to make motion detection work the way you want it to Here is a list of all the advanced configuration options for motion detection Schedule Modify motion detection recordi...

Страница 26: ...the camera that you want to modify motion detection settings for 5 By default motion detection is enabled To configure advanced settings tap the toggle switch in the Advanced Config row 6 From this sc...

Страница 27: ...f events trigger a notification Note This feature is only available on the Amcrest View Pro version of the app which is free to download Here is a list of the configuration options for push notificati...

Страница 28: ...story of past push notifications 4 Select the camera that you want to modify push notification settings for 5 Tap your camera s toggle switch to activate push notifications and configure settings 6 Fr...

Страница 29: ...ly if they so choose Before accessing your camera through a web browser the following two steps must be completed 1 You must access the camera s web interface with its IP address 2 You must install th...

Страница 30: ...oose Downloads from the dropdown 3 This brings you to the downloads page Click the IP Config Software download link on this page for either Windows or Mac 4 Find the download in your Downloads folder...

Страница 31: ...31 6 Once you see the first page of the installer wizard click Next to continue 7 On the next page check the box next to I agree then click Install...

Страница 32: ...ra The e icon to the right allows you to launch directly into your web browser from this screen Note This e icon will automatically take your camera s IP address and use your computer s default web br...

Страница 33: ...center Click Install 2 An install button will appear on the bottom of the screen for the plugin webplugin exe Click Run then go through the prompts of the install wizard 3 Once you see the notificati...

Страница 34: ...lowing default username and password Username admin Password admin Note After logging in for the first time you will be prompted to change your password To find the camera s IP address please refer to...

Страница 35: ...Dseries WiFi Cameras For additional assistance please contact us at www amcrest com or give us a call at 1 888 212 7538 4 5 Amcrest Cloud Setup Amcrest cameras are able to sync with Amcrest Cloud a se...

Страница 36: ...View com the user method registering an account for login and the device method instant direct access using the serial number Both of these methods require that the Amcrest browser plugin be installed...

Страница 37: ...e prompted by the browser to install the plugin Click Run 5 You may be prompted to verify this download This software is not harmful to your computer and will not make any unwanted changes To verify s...

Страница 38: ...ther notification from your browser asking you to allow this plugin on this web page Click the small arrow next to Allow then click Allow for all websites 10 Another popup will appear asking you to al...

Страница 39: ...t to set up your camera 1 On the main login screen www amcrestview com click the Register Now button 2 You will be taken to the registration form Enter your Username Password then Confirm Password typ...

Страница 40: ...n Successful message and a confirmation email will be sent to you Check your email and click the confirmation email from AmcrestView com 4 Once you ve opened the email click the confirmation link insi...

Страница 41: ...wn confirmation that your account has been activated Click Go to Login 6 You will be taken back to the login screen Enter your new AmcrestView com username and password then click Login 7 A popup will...

Страница 42: ...hen fill in the S N serial number this can be found on the sticker attached to the bottom of your camera or through the web interface click the i icon in the top bar then click Version Enter your user...

Страница 43: ...er will give you a notification asking you to allow popups from AmcrestView com Click Options for this site then click Always allow 12 You will be taken to the live view page and given a notification...

Страница 44: ...dded cameras to see their live feeds In the top right panel there is a channel list Click the small square icon to enable your feed for an added camera to see the video feed Click the S to change it t...

Страница 45: ...he Connections menu item on the left hand menu and ensure that the HTTP port has changed 7 Click the DDNS menu item on the left hand menu pick Amcrest DDNS from the drop down box click the checkbox ne...

Страница 46: ...Static 8 Write down the IP Address that is currently in the IP address field 9 Click the Save button 10 Using the left hand menu go to the Connection menu and write down the TCP UDP and HTTP port numb...

Страница 47: ...t working please contact Amcrest Support via one of the following options Visit http amcrest com contacts and use the email form Call Amcrest Support using one of the following numbers Toll Free 888 2...

Страница 48: ...tions the camera can perform The main interface of the camera contains 6 major tabs on the top of the screen By default the interface opens on the Live tab NOTE This camera does not support PTZ functi...

Страница 49: ...Zoom Click this button to activate the zone selection function This allows the user to use the mouse to select a zone to zoom in on Snapshot Click this button to take a screenshot of the live feed Th...

Страница 50: ...eed The options are Original and Adaptive Original uses the aspect ratio of the stream s set resolution and adaptive fits the feed to the aspect ratio of the monitor display the feed is being viewed o...

Страница 51: ...ic date range From here the user can download these videos to their PC 5 Trim Panel This panel allows the user to trim playback video for download By specifying time stamps the user can trim down 6 Re...

Страница 52: ...display any menu items that fall under their category 2 Menu Items These menu items each open up a different menu that allows the user to change specific settings for the camera 3 Menu Tab These tabs...

Страница 53: ...video will be adjusted accordingly You can use this function when the whole video is too dark or too bright Please note the video may become hazy if the value is too high The recommended value ranges...

Страница 54: ...ht Outdoor and Customized Selecting customized opens a menu that allows the user to set specific red or blue values Day Night This dropdown box allows the user to select which type of picture is displ...

Страница 55: ...ent settings run on There are 3 options Normal Full Time and Schedule Normal means that the system can automatically alternate between night and day based on the profiles for each Full Time means that...

Страница 56: ...pdown box allows the user to select a compression protocol The system supports H 264 and MJPEG video compression protocols Resolution This dropdown box allows the user to set the resolution The system...

Страница 57: ...menu item Below is an explanation for each of the fields on the Snapshot tab in the Video menu item Snapshot Type This dropdown box allows the user to select a snapshot mode There are two snapshot mod...

Страница 58: ...ter boxes click the remove all button For Channel Title the radio button enables or disables the feature The Input Channel Title field allows the channel title to be modified For Time the radio button...

Страница 59: ...ayback video downloads to Click the Browse button to select a different destination folder The Video Clips field allows the user to select where to save video clips to Click the Browse button to selec...

Страница 60: ...function To view the current IP address DHCP needs to be disabled Note When PPPoE is enabled modification of the IP Address Subnet Mask and Gateway becomes prohibited MAC Address This field shows the...

Страница 61: ...Status This field displays the status of the P2P connection Once the camera is connected to a device this field should display the word Online S N This field displays the Token ID for the camera The...

Страница 62: ...fault value is 37777 UDP Port This field designates the User Datagram Protocol UDP port number The default value is 37778 HTTP Port This field designates the Hypertext Transfer Protocol HTTP port numb...

Страница 63: ...resh the page click the Refresh button To save the settings click the Save button 5 3 2 3 PPPoE PPPoE stands for Point to Point Protocol over Ethernet This screen allows users to configure PPPoE conne...

Страница 64: ...an account with a DDNS service The camera supports a variety of DDNS services such as AmcrestDDNS Quick DDNS NO IP DDNS CN99 DDNS and Dyndns DDNS Based on which service is selected different options m...

Страница 65: ...n Trusted Sites This checkbox allows the user to enable the IP Filter feature for trusted sites Add IP MAC This button opens a popup that allows the user to add IP or MAC addresses to the trusted site...

Страница 66: ...at even though you can use the same email address as both the sender and receiver it is highly recommended that you create a brand new email preferably a Gmail account to use and configure for email a...

Страница 67: ...l receive any emails pertaining to alert and alarm emails sent by the camera Up to 3 email addresses can be entered in this field Interval This field allows the user to define in seconds how long the...

Страница 68: ...unication from the router to the camera To edit this click the pencil button in the modify column for that line item o The fifth column shows the External Port used by that service to establish commun...

Страница 69: ...field shows which SNMP community has read access Write Community This field shows which SNMP community has write access Trap Address This field allows the user to write in a trap address Trap Port Th...

Страница 70: ...is a screenshot of the multicast screen Below is an explanation of the fields in the Multicast settings screen Enable This checkbox allows the user to enable Multicast functionality Multicast Address...

Страница 71: ...The WPS tab of the WiFi menu is used to connect to a wireless network through the WPS connection method Below is an explanation of the fields on the WPS tab of the WiFi menu Enter PIN This radio butto...

Страница 72: ...etwork particularly the performance seen by the users of the network Below is a screenshot of the QoS screen Below is an explanation of the fields on the QoS screen Realtime Monitor This field allows...

Страница 73: ...led using the period settings on the bottom half of the screen There are a total of 6 periods that can be set Anti Dither This field allows the user to set the anti dither time The values in this fiel...

Страница 74: ...ion detection screen Remember to click the save button on the motion detection settings screen otherwise the motion detection zones will not go into effect Clicking the cancel button to leave the moti...

Страница 75: ...ideo when a video tampering alarm is triggered Record Delay This field specifies in seconds how long the delay between alarm activation and recording should be Relay Out This checkbox allows the user...

Страница 76: ...sts Based on relay activation a buzzer can go off a snapshot can be taken or the camera can begin recording o For example if the anti dither time is set to 10 seconds each alarm may last 10 seconds if...

Страница 77: ...checkbox allows the user to enable the camera to send an email when an alarm is activated Snapshot This checkbox allows the user to enable the camera to take a snapshot when an alarm is activated To r...

Страница 78: ...Card SD Card Error and Capacity Warning Enable This checkbox enables the SD Card abnormality trigger for the camera Relay Out This checkbox allows the user to enable the camera to trigger an alarm whe...

Страница 79: ...r for the camera Record This checkbox allows the user to enable the camera to record video when a network abnormality is detected Record Delay This field specifies in seconds how long the delay betwee...

Страница 80: ...failed login attempts must be attempted in order to trigger an Illegal Access abnormality event Relay Out This checkbox allows the user to enable the camera to trigger an alarm when illegal access is...

Страница 81: ...the camera captures all footage for the specified time period General recording is represented by the color green o Motion Motion Detection recording means that the camera captures only footage when t...

Страница 82: ...een o Motion Motion Detection means that the camera only takes snapshots when the motion detection alarm is activated Motion recording is represented by the color yellow o Alarm Alarm means that the c...

Страница 83: ...pe they want to configure on the schedule There are 2 types of recordings o Record This checkbox is referring to video recording o Snapshot This checkbox is referring to snapshot recording Calendar Th...

Страница 84: ...e sent to To reset to default settings click the Reset Defaults button To refresh the page click the Refresh button To save the settings click the Save button 5 3 4 2 2 SD Card This tab is where the u...

Страница 85: ...eld allows the user to designate the port number for the FTP server User Name This field allows the user to input the username used to login to the FTP server Password This field allows the user to in...

Страница 86: ...ettings are configured Below is a screenshot of the record control menu Below is an explanation of the fields on the Record Control settings tab Pack Duration This field allows the user to set how man...

Страница 87: ...elow is a screenshot of the General tab Below is an explanation of the fields on the General settings tab Device Name This field allows the user to change the device s name Language This dropdown box...

Страница 88: ...savings time for the camera DST Type This radio button allows the user to select whether DST is based on the week or a specific day Start Time This dropdown box and field allow the user to enter in t...

Страница 89: ...tab shows the usernames available on the camera Group This tab shows the user groups available on the camera No This column shows the user s number on the user list User Name This column shows the use...

Страница 90: ...thod to conduct a Factory Reset for the device is to press and hold the indicator light reset button on the back of the device for 10 seconds until the light changes 5 3 5 4 Import Export This screen...

Страница 91: ...ill auto reboot Auto Delete Old Files This checkbox allows the user to enable the auto deletion of old files on the camera Manual Reboot This button allows the user to manually reboot the camera To re...

Страница 92: ...reen On this screen software version web interface version and ONVIF version are displayed Also the S N Token ID is displayed here 5 3 6 2 Log This screen is where the camera s activity log is kept Be...

Страница 93: ...he alarm log and all of the alarm instances that have occurred The checkboxes allow the user to narrow down which alarms they want to see in the alarm log Clicking the checkbox next to Prompt will cau...

Страница 94: ...ning 3 The system does not detect an SD Card Below are a few possible reasons why this may be occurring The SD card is broken The SD card slot is malfunctioning The SD card has not been formatted prop...

Страница 95: ...orking Below are a few possible reasons why this may be occurring Windows version is pre Windows 2000 service pack 4 Use a more recent version of Windows ActiveX controls have been disabled The PC is...

Страница 96: ...amera s firmware 13 Alarms are not working Below are a few possible reasons why this may be occurring The alarm is not setup correctly The alarm cable is not connected correctly The alarm input signal...

Страница 97: ...k of the camera to execute a factory reset This will restore the device to its factory settings and will reset ALL of the camera s settings 17 When I login via HTTPS a dialogue says the certificate ha...

Страница 98: ...in Stream is the main streaming protocol for the camera Main stream uses more bandwidth and attempts to keep quality and fluency high NO NC Normally Open and Normally Closed are options for sensor typ...

Страница 99: ...between internet connected devices whether on a local network or a on the Internet at large Threshold Threshold is the level that the motion detection needs to reach in order to trigger an alarm UPnP...

Страница 100: ...limits are designed to provide reasonable protection against harmful interference in a residential installation This equipment generates uses and can radiate radio frequency energy and if not installe...

Страница 101: ...concentration of the hazardous substance of at least one of all homogeneous materials in the parts is above the relevant threshold of the SJ T11363 2006 standard During the environmental friendly use...

Страница 102: ...les aux appareils radioexempts de licence L exploitation est autoris e aux deux conditions suivantes 1 1 l appareil ne doit pas produire de brouillag 2 2 l utilisateur de l appareil doit accepter tout...

Отзывы: