background image


                                                                                                                                                                     User instructions 

    9 


User instructions 


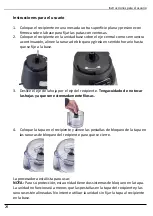
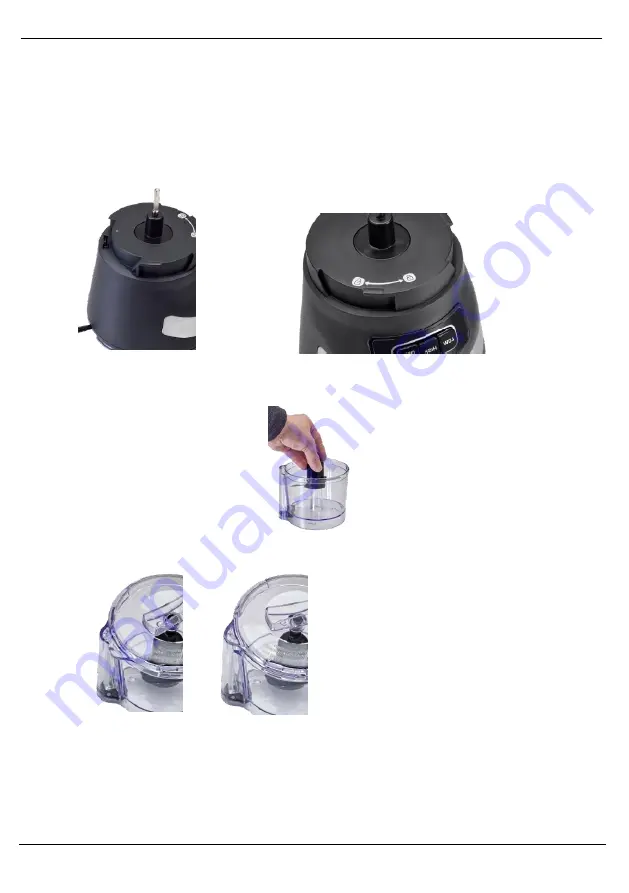
1.


Place the bowl on a counter or other flat surface and firmly press on the base 
to secure the suction cup feet.


2.


Place the bowl on the base unit over the center stem as shown below, lining 
up the locking slot, turning clockwise until the bowl locks securely to base.  


3.


Slide the blade shaft down over the shaft of the bowl. 

Be careful not to touch 

the blades as they are extremely sharp. 


4.


Place the lid on the bowl, lining up the locking tabs of the lid to the locking 
slots of the bowl until it locks.  


The food chopper is now ready for use. 


NOTE:

 For your protection, this unit has two lid locking systems. The unit will not 

operate unless the tabs in the bowl lid and slots in the bowl align. Do not attempt 
to operate the unit without locking the bowl and lid in place with the base.


Содержание FP9045B-UL

Страница 1: ...3 CUP FOOD CHOPPER PROCESADORA DE 3 TAZAS User Manual Manual del usuario English 3 Espa ol 18...

Страница 2: ...3 Before first use 4 Important safety instructions 5 User instructions 8 Helpful hints 9 Troubleshooting 10 Chopping Guide 11 Recipes 12 Cleaning and maintenance 14 Other useful information 15 Technic...

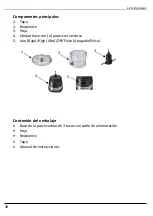
Страница 3: ...s list 3 Main parts 1 Lid 2 Bowl 3 Blade 4 Base unit with 4 suction cup feet 5 Low High Off Pulse Contents of Packaging 3 cup food chopper base with power cord Blade Bowl Lid Instruction manual 2 1 3...

Страница 4: ...the box 2 Wipe clean all the parts with a soft damp cloth or sponge and warm water Rinse and dry thoroughly DO NOT IMMERSE THE 3 CUP FOOD CHOPPER BASE IN WATER OR ANY OTHER LIQUID AT ANY TIME 3 Using...

Страница 5: ...n water or any other liquid 5 Do not operate the food chopper with a damaged cord or plug or if the food chopper malfunctions or has been damaged in any manner Return the food chopper to the nearest a...

Страница 6: ...ric burner or in a heated oven 15 Do not use the food chopper with a damaged outlet 16 Make sure hands are dry when plugging in and unplugging the food chopper 17 Do not use this food chopper for othe...

Страница 7: ...cised in their use If an extension cord is required special care and caution is necessary Also the cord must be 1 marked with an electrical rating of 125V and at least 13 A 1625 W and 2 the cord must...

Страница 8: ...leave the food chopper unattended while connected to the electrical outlet 3 Use the food chopper on a stable work surface away from water 4 Do not unplug from the wall outlet by pulling on the supply...

Страница 9: ...ide the blade shaft down over the shaft of the bowl Be careful not to touch the blades as they are extremely sharp 4 Place the lid on the bowl lining up the locking tabs of the lid to the locking slot...

Страница 10: ...ffee beans or similar hard substances as this can damage the blade 9 Always cut large pieces of food into smaller pieces of even size about inch This will help to make sure you get an even chop 10 Do...

Страница 11: ...or make sure pieces are cut smaller and in similar size 3 Food seems to be watery or too fine The food may have been over chopped Make sure to use brief pulses for a shorter time making sure blade sto...

Страница 12: ...W to desired consistency no longer than 30 seconds at a time Cut into 1 2inch pieces Remove from refrigerator 20 30 minutes beforehand Up to 3 ounces at a time Soft cheese PULSE to break up process on...

Страница 13: ...mooth and creamy Transfer to a serving bowl cover and refrigerate for 30 minutes before serving Stir in or top with chopped fresh tomatoes If desired add cumin for a zesty Texan flavor Creamy Roasted...

Страница 14: ...d fresh basil leaves washed and dried completely cup extra virgin olive oil Place inch pieces of cheese into bowl and pulse 5 times process continuously on LOW about 15 seconds Remove and reserve Add...

Страница 15: ...e food chopper can lead to better tasting food 1 When performing any cleaning or maintenance to this unit be sure to unplug from power outlet first 2 Remove the individual parts from the food chopper...

Страница 16: ...place any heavy items on top of the food chopper during storage as this may result in possible damage Service center If you have any questions in regard to the operation of this food chopper or in nee...

Страница 17: ...del primer uso 18 Importantes instrucciones de seguridad 19 Instrucciones para el usuario 22 Consejos tiles 23 Soluci n de problemas 24 Gu a de corte 25 Recetas 26 Limpieza y mantenimiento 27 Informac...

Страница 18: ...Tapa 2 Recipiente 3 Hoja 4 Unidad base con 4 patas con ventosa 5 Low Bajo High Alto Off Pulse Apagado Pulso Contenido del embalaje Base de la procesadora de 3 tazas con cable de alimentaci n Hoja Reci...

Страница 19: ...caja 2 Limpie todas las piezas desmontables con un trapo suave o esponja humedecidos con agua tibia Enjuagar y secar bien NUNCA SUMERJA LA BASE DE LA PROCESADORA DE 3 TAZAS EN AGUA NI NING N OTRO L QU...

Страница 20: ...si la procesadora tiene una aver a o si se ha da ado de alguna forma Devuelva la procesadora al centro de servicio autorizado m s cercano para su revisi n reparaci n o recibir un reembolso 6 Mantenga...

Страница 21: ...macorriente da ado 17 Aseg rese de que tener las manos secas al enchufar y desenchufar la procesadora 18 No utilice la procesadora para un uso que no sea el previsto 19 No use la procesadora para mole...

Страница 22: ...idado en su uso Si se requiere usar un cable de extensi n es necesario tener especial cuidado y precauci n Adem s el cable debe 1 estar marcado con una clasificaci n el ctrica de 125 V y al menos 13 A...

Страница 23: ...esadora desatendida mientras est conectada a la red el ctrica 3 Utilice la procesadora en una superficie de trabajo estable lejos del agua 4 No la desconecte del tomacorriente tirando del cable de ali...

Страница 24: ...a la base 3 Deslice el eje de la hoja por el eje del recipiente Tenga cuidado de no tocar las hojas ya que son extremadamente filosas 4 Coloque la tapa en el recipiente y alinee las pesta as de bloqu...

Страница 25: ...o granos de caf o sustancias duras similares ya que pueden da ar la hoja 9 Siempre corte los trozos grandes de alimentos a otros m s peque os y uniformes de aproximadamente pulgada Esto lo ayudar a ob...

Страница 26: ...os y uniformes 3 Los alimentos parecen estar muy licuados o delgados Puede haber procesado de m s los alimentos Aseg rese de usar pulsos breves por menos tiempo verifique que la hoja se detenga por co...

Страница 27: ...LOW hasta obtener la consistencia deseada no m s de 30 segundos a la vez Cortar en trozos de pulgada Quite del refrigerador 20 30 minutos de antemano Hasta 3 onzas a la vez Queso suave Use PULSE para...

Страница 28: ...un taz n para servir cubra y guarde en el refrigerador por 30 minutos antes de servir Agregue los tomates frescos picados para mezclarlos o solo para tapar Si lo desea agregue comino para obtener un s...

Страница 29: ...ta de sal kosher 1 taza llena de hojas de albahaca fresca lavadas y secadas por completo taza de aceite de oliva extra virgen Coloque trozos de pulgada de queso en el recipiente use PULSE 5 veces y pr...

Страница 30: ...s gustosos 1 Al limpiar o dar mantenimiento a esta unidad aseg rese de desenchufarla del tomacorriente primero 2 Quite las piezas individuales de la base de la procesadora 3 Lave las piezas en agua t...

Страница 31: ...sados sobre la procesadora durante el almacenamiento ya que esto podr a da arla Centro de servicio Si tiene alguna pregunta en relaci n con el funcionamiento de esta procesadora o necesita un recambio...

Страница 32: ......

Страница 33: ...DISTRIBUTED BY DISTRIBUIDO POR ALDI INC BATAVIA IL 60510 WWW ALDI US MODEL FP9045B UL 08 2018 53159...

Отзывы: