To avoid risk of electrical shock, personal injury, or death, disconnect electrical power source to unit, unless test
procedures require power to be connected. Discharge capacitor through a 10,000 ohm resistor before attempting
to service. Ensure all earthing wires are connected before certifying unit as repaired and/or operational.
RS5280001 Rev. 0
42
!
WARNING
Evaporator Defrost Heater
See Drain block disassembly procedure.
1.
Pull drain block 6.3cm to 10cm (2 1/2” to 4”) from
evaporator.
2.
Remove hex head screw from left side of coil and 2
from right side.
3.
Remove defrost thermostat.
4.
Pull drain block 6.3cm to 10cm (2 1/2” to 4”) from
evaporator. (Complete steps 1–3 of evaporator coil
removal.)
5.
Disconnect both heater electrical leads.
6.
Pull evaporator away from back all until evaporator
mounting clips disengage.
7.
Remove two clips securing heater to evaporator
bottom and slide heater down until disengaged
from evaporator.
Evaporator
NOTE:
Evaporator and heat exchanger must be
replaced as an assembly.
Replace compressor when repairing low-side
leaks.
Reclaim refrigerant before proceeding with evaporator
removal. To avoid refrigeration system contamination,
do not leave refrigeration system or compressor open
for more than 10 minutes
1.
See drain block disassembly procedure. Pull drain
block 6.3cm to 10cm (2 1/2” to 4”) from evaporator.
2.
Remove hex head screw from left side of coil and 2
from right side.
3.
Remove defrost thermostat.
4.
Remove defrost heater by removing wire clips hold
heater to bottom of evaporator coils. (Remove
heat exchanger and machine compartment
covers.)
5.
Shield interior from heat source and unbraze
suction tube at compressor.
6.
Score and break capillary tube at drier.
7.
Straighten heat exchanger and pull evaporator out
of plastic clips holding it to back wall of unit. Pull
evaporator and heat exchanger through front of
refrigerator as a unit.
NOTE:
If styrofoam block on outer case back wall is
damaged during evaporator removal, seal
damaged area with mastic sealer.
Disassembly
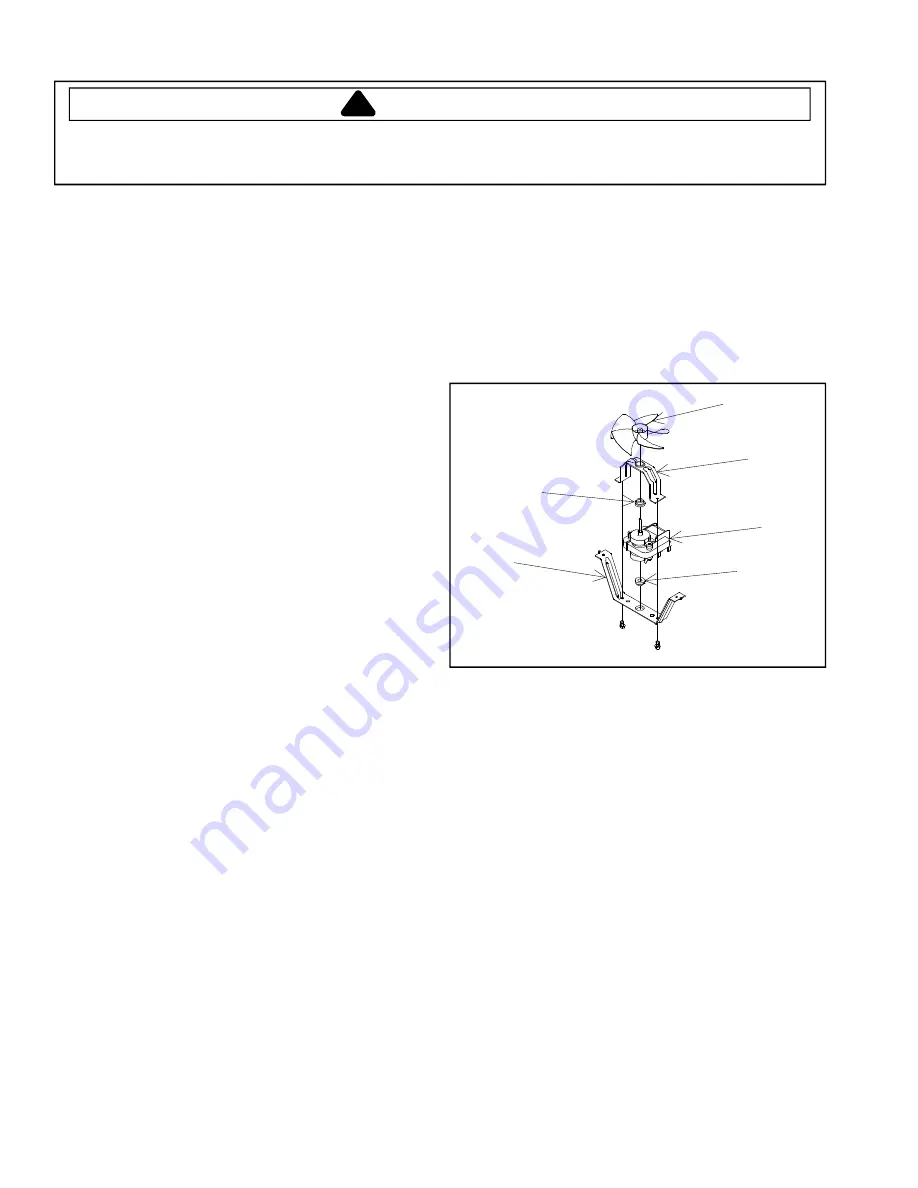
Evaporator Fan Motor
1.
Remove freezer back panels.
2.
Remove two screws Mounting sheet metal duct
cover to bottom of fan shroud.
3.
Remove two screws mounting top of fan shroud to
cabinet.
4.
Lay fan motor and shroud over and remove wiring.
5.
Remove hex head screws from brackets.
Fan Motor
Bracket
Fan Grommet
Fan Blade
Fan Grommet
Fan Motor
Bracket
Fan Motor
Evaporator Fan
Evaporator Fan Blade
1.
See Evaporator Fan Motor steps 1–3
.
2.
Pull fan blade off motor shaft.
NOTE:
When replacing fan blade, 6.35mm of motor
shaft should extend through hub of fan blade.
Drain Heat Transfer Clip
1.
Remove freezer back panels.
NOTE:
The heat transfer clip is inserted between
evaporator coil fins down into drain in block and
snaps onto heater, clipping to evaporator tube.
2.
Pull up and out to remove strap from drain tube.
Cantilever Ladders (708 Litre models only)
1.
To remove center freezer ladder, remove back
freezer panels.
2.
Remove mounting screws securing ladder to back.


