background image


THIN-LINE

®

 SERIES 180M WELD HEADS 

990-133 

B-1


APPENDIX B 

ACCESSORIES 


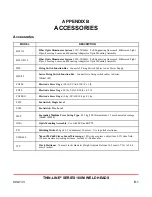
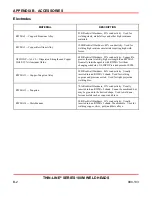
Accessories 


MODEL DESCRIPTION 

BLFOI 

Fiber Optic Illuminator System

, 115V-50/60Hz.  Self-Supporting Gooseneck, Bifurcated Light 

Pipes, Focusing Lenses, and Mounting Adapter for Optic Mounting Assembly. 

BLFOI/230 

Fiber Optic Illuminator System

, 230V-50/60Hz.  Self-Supporting Gooseneck, Bifurcated Light 

Pipes, Focusing Lenses, and Mounting Adapter for Optic Mounting Assembly. 

DFS 

Firing Switch Junction Box

.  Connects 2 Firing Switch Cables to one Power Supply. 

DFS/88 

Series Firing Switch Junction Box

.  Connects two firing switch cables in Series. 

(Model 188) 

FG100 

Electrode Force Gage

, 100 lb, SCALE 100 lb x 1 lb. 

FG20 

Electrode Force Gage

, 20 lbs, SCALE 20 lb x 0.2 lb 

FG10KG 

Electrode Force Gage

, 10 kg, SCALE 10 kg x 0.1 kg. 

FS1L 

Footswitch, Single Level

FS2L 

Footswitch, Two Level

MSP 

Footpedal, Medium Force Swing Type

, 45.5 kg (100 lb) maximum, 5:1 mechanical advantage  

(Model 180MF). 

OMA 

Optic Mounting Assembly

.  Use with SZO and BPTL. 

PD 

Polishing Disks

, 600 grit, 1.5 in. diameter, 50 pieces.  Use to polish electrodes. 

SMZ-660 

Nikon SMZ 660 Stereo Zoom Microscope, 

 10X wide eyepieces, object lens 0.5X wide field, 

195 mm maximum working distance.  Includes C-Bonder arm. 

WP 

Work Positioner

, 76 mm (3 inch) diameter, Height Adjustable from 36.5 mm (1-7/16) to 50.8 

mm (2 inches). 


Содержание THIN-LINE 180 M Series

Страница 1: ...990 133 REV F WELD HEAD THINLINE 180 M SERIES OPERATION MANUAL ...

Страница 2: ...ithout the written authorization of Amada Miyachi America Printed in the United States of America REVISION RECORD Revision EO Date Basis of Revision A 19405 8 02 Production release B 21776 05 08 Update to Miyachi Unitek logo and added new CAUTION information C 42860 11 13 Update to Miyachi America name and logo D 43481 11 14 Updated to Amada Miyachi America name and logo E 43866 08 15 Updated to A...

Страница 3: ...via California 91016 Phone 626 303 5676 FAX 626 358 8048 E mail info amadamiyachi com The purpose of this manual is to supply operating maintenance and service personnel with the information needed to properly and safely operate and service the THIN LINE SERIES 180M Weld Heads We have made every effort to ensure that the information in this manual is accurate and adequate Should questions arise or...

Страница 4: ...e the head and void the warranty Never work on electronic equipment unless there is another person nearby who is familiar with the operation and hazards of the equipment and who is competent in administering first aid The technician who is aided by operators must warn them about the hazards Whenever possible turn the power supply to the equipment OFF before beginning work on it Do not touch high v...

Страница 5: ...ion II System Components 1 3 Model 180MA 1 3 Model 180MF 1 3 Section III Welding Capabilities 1 4 Opposed Welding 1 4 Dual Opposed Welding 1 4 Series Welding 1 4 Step Welding 1 5 Section IV Operating Controls 1 6 Chapter 2 Installation Section I Introduction 2 1 Overview 2 1 Requirements 2 1 Work Area 2 1 Utilities 2 1 AC Power 2 1 Compressed Air 2 1 Section II Weld Head Installation 2 2 Overview ...

Страница 6: ...Section V Install Electrodes 2 10 Model 180MF and Model 180MA Offset Electrodes 2 10 Chapter 3 Operating Instructions Section I Getting Started 3 1 Installation Checklists 3 1 Welding Force Theory 3 1 Troubleshooting 3 2 Section II Model 180MF Manually Actuated Head Setup 3 4 Section III Model 180MA EZ AIR Air Actuated Head Setup 3 6 Chapter 4 User Maintenance Section I General Maintenance 4 1 Ins...

Страница 7: ...TY RIGHTS OF A THIRD PARTY WHETHER EXPRESS OR IMPLIED BY LAW COURSE OF DEALING COURSE OF PERFORMANCE USAGE OF TRADE OR OTHERWISE Notwithstanding the foregoing in the event of the failure of any Third Party Product Seller will assist within reason Buyer at Buyer s sole expense in obtaining from the respective third party any if any adjustment that is available under such third party s warranty e Se...

Страница 8: ... replace such Goods or the defective part or ii credit or refund the price of such Goods at the pro rata contract rate provided that if Seller so requests Buyer shall at Buyer s expense return such Goods to Seller i THE REMEDIES SET FORTH IN SECTION 1 H SHALL BE BUYER S SOLE AND EXCLUSIVE REMEDY AND SELLER S ENTIRE LIABILITY FOR ANY BREACH OF THE LIMITED WARRANTY SET FORTH IN SECTION 1 A Represent...

Страница 9: ...itions for Additional Acceptance Tests either at Seller s or Buyer s facility shall be mutually agreed in writing prior to issuance or acceptance of the Acknowledgement Performance Warranty The system is warranted to pass the identical performance criteria at Buyer s site as demonstrated during final Acceptance Testing at the Testing Site during the Warranty Period as provided in the Acknowledgeme...

Страница 10: ...efect in material and workmanship which are apparent upon receipt by Buyer The foregoing warranty is negated after the initial use No warranty made hereunder shall extend to any product whose serial number is altered defaced or removed Remedies With respect to any such Goods during the Warranty Period Seller shall in its sole discretion either repair such Goods or the defective part THE REMEDIES S...

Страница 11: ...esign of the aluminum extrusion mounting system and main shaft ensures that the offset electrodes do not slide from side to side more than 0 381 mm 0 015 inch at 445 N 100 pounds The four mounting holes on the head spine allow you to easily incorporate the head into your custom welding machines In addition you can modify the aluminum extrusion used for the base of the head to accommodate your cust...

Страница 12: ...he Models 180MF and 180MA use 6 mm diameter ES0800M Series Electrodes Welding Cables Depending upon model either 2 or 2 0 Welding Cables are provided to connect Series 180M Heads to the power source Miyachi Unitek Heads deliver maximum performance when used with the appropriate Miyachi Unitek power sources Footpedal Actuation The Series 180MF Weld Head is manually actuated using the Model MSP Swin...

Страница 13: ... depth of 25 72 cm 10 125 inches The Model 180MF Weld Head includes the Model HE180KM Offset Electrode Holder Block and the Model HE2000M Electrode Holders Model 180MF This is a manually actuated head that uses the Model MSP Foot Pedal for operation This head includes the Model HE180KM Offset Electrode Holder Block and the Model HE2000M Electrode Holders These electrode holders use the 6 mm diamet...

Страница 14: ...ed in a simultaneous or alternate fashion depending on your manufacturing requirements Opposed welding provides maximum weld strength repeatability The Table Electrode or a user supplied fixture acts as a support for the workpieces in step welding If the Table is insulated from the workpieces there is no possibility of shunting current away from the electrode Series Welding In series welding appli...

Страница 15: ...maximum thickness to a larger part that cannot easily accommodate an opposed electrode In step welding the size of the weld and the surface marking is frequently controlled by the diameter of the face of each electrode If the Electrode is significantly larger than the Electrode the lower workpiece will not have any marking and the weld will be under the Electrode ...

Страница 16: ...The Model FS1L or FS2L Foot Switch is used to initiate all of these Miyachi Unitek weld energy controls Series 180M 24 VAC air actuated heads can also be used in automated environments where a programmable logic control PLC provides solenoid power and timing control The Footswitch can be a single or two level types depending on the power supply and the user s preference Lubricators should not be u...

Страница 17: ...he weld head is attached to the mounting post If necessary the air head if used foot pedal if used and optics if used are installed Electrodes and weld cables are installed on the weld head Requirements Work Area We recommend that you install your weld head in a well ventilated area that is free from excessive dirt and moisture The workstation must be stable free from vibration and capable of supp...

Страница 18: ...hased with or without mounting hardware Amada Miyachi America provides an extruded aluminum post with channels on the front and back By inserting T Nuts into the channels mounting plates can be screwed onto the front for weld head back for air head or both sides of the post only the weld head is shown This installation allows you to adjust the height of the weld head and air head separately Typica...

Страница 19: ... the mounting post to expose the channels in the mounting post 8 Raise the weld head and mounting plate above the mounting post insert the bottom T nut into the front channel of the mounting post and slowly lower the weld head until you can insert the top T nut into the channel Slide the weld head to the desired height then tighten the mounting screws 9 If you are using an air head install it on t...

Страница 20: ...s on the mounting plate adapter as illustrated and slide Head up or down the stand 3 Pull out the pin on footpedal adapter block as illustrated Insert the pullrod and allow the pin to snap back into place 5 Attach the pullrod to footpedal Adjust the height of head loosen two Allen head cap screws on the mounting plate adapter as shown and slide Head up or down the stand 6 Attach the pullrod to foo...

Страница 21: ... by the user For instructions on connecting EZ AIR to an air supply follow the procedures in the separate EZ AIR Operator Manual supplied with the weld head Optics If you are using any of the optional optics microscope or illuminator 1 Verify that the optics mounting post is securely attached to the optics baseplate 2 Install the optics following the instructions provided with the optics ...

Страница 22: ... inductive losses added by the intervening support post could substantially increase the amount of energy required to join metal satisfactorily Connect Cables to Head Place the washer securing the welding cable terminal between the screw head and the welding cable terminal not the welding cable terminal and the terminal to which the cable is being attached Make sure the connections are free of oxi...

Страница 23: ...flat washer Place the washer between the bolt head and the welding cable terminal do not place the washer between the Cable and the Power Bar because you will get an unstable connection and consequently unstable current flow Tighten connections securely 4 Connect the longer welding cable to the lower electrode holder or user supplied welding fixture using the procedures in Step 3 5 Connect the oth...

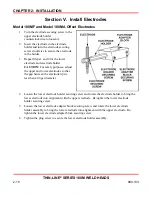
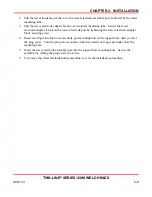
Страница 24: ...g parts of the head Doing so may hurt welding performance damage the head and void the warranty Models 180MF and 180MA Offset Electrode Holders 1 Install the upper insulating washer on the linear bearing rod followed by the upper insulating tube Note Do not remove the upper retainer ring from the linear bearing rod 2 Slip the upper electrode adapter block over the upper insulating tube The linear ...

Страница 25: ...wer electrode post by tightening the lower electrode adapter block securing screw 6 Insert one finger into the lower electrode post mounting hole in the support base until you feel the plug screw Turn the plug screw counter clockwise until it no longer protrudes from the mounting hole 7 Insert the lower electrode assembly post into the support base mounting hole Secure the assembly by turning the ...

Страница 26: ...TION For safety purposes adjust the upper and lower electrodes so that the gap between the electrode tips is less than a finger diameter 4 Loosen the lower electrode holder securing screw and rotate the electrode holder to bring the lower electrode into alignment with the upper electrode Re tighten the lower electrode holder securing screw 5 Loosen the lower electrode adapter block securing screw ...

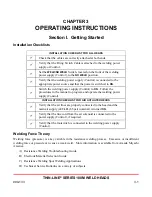
Страница 27: ...the manual to program and operate the welding power supply Control INSTALLATION CHECKLIST FOR AIR ACTUATED HEADS Verify that the air lines are properly connected to the head and the main air supply 448 kPa 65 psi nominal is turned ON Verify that the line cord from the air solenoid is connected to the power supply Control if required Verify that the footswitch is connected to the welding power supp...

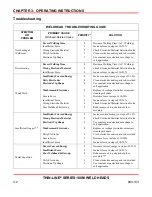
Страница 28: ...eps of 5 10 Clean electrodes and or parts to be welded Use constant area electrodes or shape to suit application Replace or reshape electrodes or increase cleaning schedule Decrease force in steps of 10 20 Increase force in steps of 10 20 Check Electrode Material Selection Guide Reduce mass of top electrode holder assembly Insufficient Nugget Insufficient Current Energy Wrong Electrode Material El...

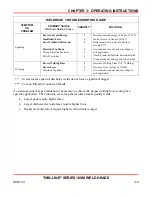
Страница 29: ...eck Electrode Material Selection Guide Clean electrodes and or parts to be welded Warping Excess Welding Time Excess Force Electrode Tip Shape 1 1 2 Decrease Welding Time A C Welding Decrease force in steps of 10 20 Use constant area electrodes or shape to suit application In most cases capacitor discharge welds do not have a significant nugget For non Miyachi Unitek weld heads A certain amount of...

Страница 30: ... current energy in steps of 5 10 Increase force in steps of 10 20 Use constant area electrodes or shape to suit application Decrease force in steps of 10 20 Check Electrode Material Selection Guide Clean electrodes and or parts to be welded Priority numbers refer to troubleshooting priority with 1 as highest priority Start troubleshooting with 1 and then proceed to 2 and so on When there are multi...

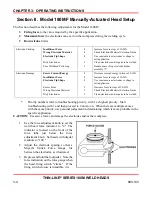
Страница 31: ...nto the slot on the force tube Re tighten both setscrews 7 If necessary re adjust the electrodes in their holders to accommodate the workpiece 8 Turn the downstop screw counter clockwise to its fullest extension without actually disengaging it This will allow maximum downward travel of the upper arm The following downstop adjustment should be made only if the workpiece would be damaged if the uppe...

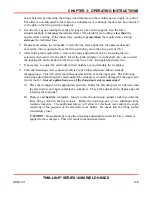
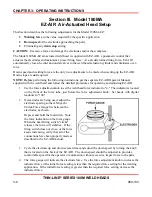
Страница 32: ...AIR 1 Use the force adjustment knob to set the weld head force indicator to 4 The indicator is located on the front of the force tube just below the force adjustment knob Set heads with digital readouts to 100 2 If electrodes are being used adjust the electrode spacing so that a Miyachi Unitek Force Gauge fits between the electrodes as shown Depress and hold the footswitch Note the force indicatio...

Страница 33: ... Invert the knob and place it on the shaft Be sure to insert the locking tab on the knob into the slot on the force tube Re tighten both setscrews 6 If necessary re adjust the electrodes in their holders to accommodate the work piece 7 A down stop is never required when using EZ AIR Turn the down stop screws counter clockwise to their fullest extension without actually disengaging them This will a...

Страница 34: ......

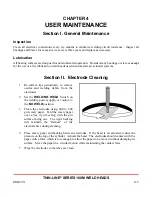
Страница 35: ...remove oxides and welding debris from the electrodes 2 Set the WELD NO WELD Switch on the welding power supply or control to the NO WELD position 3 Clean the electrodes using 400 to 600 grit emery paper Fold the emery paper over a flat rigid backing with the grit surface facing out The rigid backing will maintain the flatness of the electrode face during cleaning 4 Place emery paper and backing be...

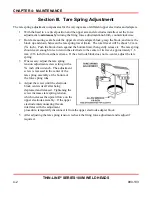
Страница 36: ...should exert enough force to return the electrode to the center of its travel approximately 1 6 mm 1 16 inch from either extreme If the electrode block does not re center adjust the tare spring 3 If necessary adjust the tare spring tension adjustment screw setting with a inch Allen wrench The adjustment screw is recessed in the center of the tare spring assembly at the bottom of the force spring t...

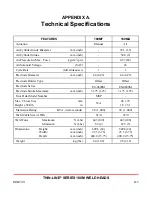
Страница 37: ...m inch 6 4 0 25 6 4 0 25 Electrode Holder Type Offset Offset Electrode Series ES 0800M ES 0800M Electrode Stroke Maximum mm inch 31 75 1 25 31 75 1 25 Foot Pedal Model Number MSP Max Throat Size mm Height x Width in N A 46 x 79 1 8 x 3 1 Maximum Rating KVA watt seconds 20 1 000 20 1 000 Weld Cable Size AWG 2 0 2 0 Weld Force Maximum N Lbs Minimum N Lbs 445 100 8 9 2 445 100 22 3 5 Dimensions Heigh...

Страница 38: ......

Страница 39: ...n Box Connects two firing switch cables in Series Model 188 FG100 Electrode Force Gage 100 lb SCALE 100 lb x 1 lb FG20 Electrode Force Gage 20 lbs SCALE 20 lb x 0 2 lb FG10KG Electrode Force Gage 10 kg SCALE 10 kg x 0 1 kg FS1L Footswitch Single Level FS2L Footswitch Two Level MSP Footpedal Medium Force Swing Type 45 5 kg 100 lb maximum 5 1 mechanical advantage Model 180MF OMA Optic Mounting Assem...

Страница 40: ...eater thermal stability higher strength than RWMA 2 Generally interchangeable with RWMA 2 without changing schedules GLIDCOP is a trademark of SCM RWMA 11 Copper Tungsten Alloy 90B Rockwell Hardness 46 conductivity Usually inserted into an RWMA 2 shank Used for welding cuprous and precious metals Used for light projection welding dies RWMA 13 Tungsten 70A Rockwell Hardness 32 conductivity Usually ...

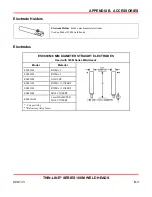
Страница 41: ...electrodes Used on Model 180M weld heads Electrodes ES0800M 6 MM DIAMETER STRAIGHT ELECTRODES Used with 180M Series Weld Heads Model Material ES0802M RWMA 2 ES0803M RWMA 3 ES0850M GLIDCOP ES0811M RWMA 11 INSERT ES0813M RWMA 13 INSERT ES0820M MOLY INSERT ES0820AM 3 mm DIAMETER MOLY INSERT Copper Alloy Refractory Alloy Insert ...

Страница 42: ......

Страница 43: ...chheim Germany TEL 49 89 839403 0 FAX 49 89 839403 10 AMADA MIYACHI TAIWAN CO LTD Rm 5 2F No 9 Dehui St Zhongshan Dist Taipei 10461 Taiwan R O C TEL 886 2 2585 0161 FAX 886 2 2585 0162 AMADA MIYACHI VIETNAM CO LTD M floor 400 Nguyen Thi Thap Street Tan Quy Ward District 7 Ho Chi Minh City Vietnam TEL 84 8 3771 7972 FAX 84 8 3771 7974 AMADA MIYACHI THAILAND CO LTD 40 14 Bangna Tower C 17th Floor Un...

Страница 44: ...AMADA MIYACHI AMERICA INC 1820 South Myrtle Ave Monrovia CA 91016 U S A TEL 1 626 303 5676 FAX 1 626 358 8048 ...

Отзывы: