background image

60 


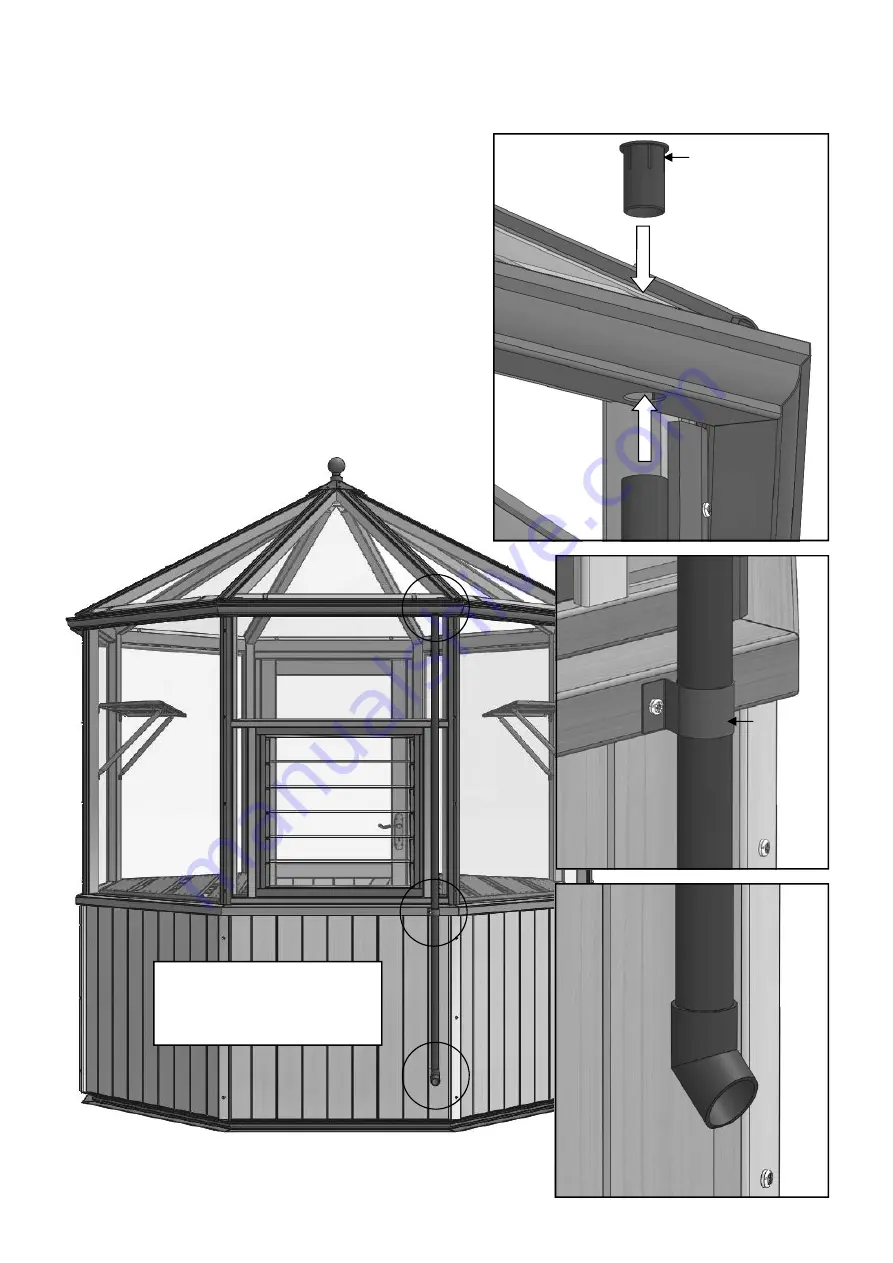
Downpipe Installation


20 

Diagram 158 

In the gutter section supplied to take the downpipe 
there are two holes, you can decide which hole to use 
for the outlet and then simply blank the other hole 
off with the insert supplied (D214). 
Start by adding a small amount of silicone to the 
underside of the collar on the outlet (D201), diagram 
130.  Push the outlet through the hole and attach the 
downpipe (D211). 
While supporting the downpipe slide the downpipe 
clip (EV0740M) on from the bottom of the pipe.  Fix 
this to the mid rail with a 25mm round head screw 
(diagram 159). 
When secure fit the downpipe shoe (D207) to the 
bottom of the pipe (diagram 160). 

Add silicone here 

D201 

D211 

EV0740M 

D211 

D211 

D207 

Diagram 159 

Diagram 160 

Diagram 157 

If using a water butt, use the 
downpipe shoe as a joint to 
divert the pipe into the butt. 

Dia. 158 

Dia. 159 

Dia. 160 

Содержание Evolution Octagonal 9x6

Страница 1: ...1 04 19...

Страница 2: ...Positions Glazing part 1 Gutter Installation Glazing part 2 Slam Rail and Ridge Board Roof Cowl and Finial Roof Vent Installation Staging Installation High Level Shelf Installation Downpipe Installati...

Страница 3: ...r in other vulnerable locations To minimise the risk of wind damage try to select as sheltered a site as possible e g beside a hedgerow or garden fence Additional Considerations Please bear in mind th...

Страница 4: ...n be a particular nuisance and should be avoided Choose a site where the greenhouse is relatively easy to get to and convenient to bring water to and possibly a supply of electricity Finally and most...

Страница 5: ...to tiny pieces if you catch an edge on a hard surface such as concrete You should also wear suitable gloves when handling the glass this also helps to keep it clean Option of gluing joints This is not...

Страница 6: ...bolt channel in the aluminium base and fix through the largest hole in the base bracket Also attach three small base brackets D174M one in the middle in the rear of the building diagram 3 and one eith...

Страница 7: ...e 40mm screws Diagram 6 Diagram 7 Diagram 8 X 4 Diagram 5 Dia 6 40mm Screw Once you have attached all the cast eaves brackets you can fix two standard side glazing bars to the eaves rails Make sure th...

Страница 8: ...hole through the side of the glazing bar and fix with an 80mm screw diagram 10 Fix both ends of the mid rail like this 80mm Screw Next slot the cill into place This is not fixed at this stage it is s...

Страница 9: ...the left of the door position this on the base and either ask a helper to hold it in place or secure it to a step ladder With this in place you will then need to slot a cill section EV0950 in next to...

Страница 10: ...4 40mm Screw EV0953 Diagram 13 Diagram 14 Dia 14 Add the next side frame next you can then slot an eaves rail EV0953 into place Remember to drill pilot holes and then fix with 40mm screws diagram 14...

Страница 11: ...11 Side Assembly 4 Slot two cill sections EV0952 into place followed by the next standard side frame EV0952 Diagram 15 EV0952...

Страница 12: ...e top of the glazing bar into the mortice hole and fix with a 40mm countersunk screw diagram 17 Slot the assembly into place locating the bottom of the glazing bar onto the tenons of the cill sections...

Страница 13: ...into place and position the final side frame to the right of the door opening With this in place you can now fit the eaves rail to secure it Drilling and fixing with 40mm screws diagram 20 Diagram 19...

Страница 14: ...ot the top of the glazing bars into the mortise hole and fix with a 40mm countersunk screw diagram 22 Slot the assembly into place locating the bottom of the glazing bar onto the tenons of the cill se...

Страница 15: ...d rail brackets EV0999M are different in diagram 25 and 26 This is to leave space for the staging brackets There is also an order to inserting the screws follow the order on the diagrams as it makes i...

Страница 16: ...the door EV0961 Slot this into place and fix with a mid rail bracket EV0999M diagram 28 Then drill a pilot hole through the side of the glazing bar to the left of the door and secure the mid rail with...

Страница 17: ...diagram 31 Then drill a pilot hole through the inside face of the rear glazing bar central to the mid rail and fix with a 50mm countersunk screw diagram 32 Diagram 31 Internal 1 2 3 4 5 EV0999M Diagra...

Страница 18: ...ssembly 4 Once you have fitted the brackets to one side do the same on the other side as a mirror image Remember that screw 5 always picks up the loose mid rail through the glazing bar Diagram 33 Mirr...

Страница 19: ...sition of the handle on the door Fix the handle with the 3 5 x 25mm countersunk screws supplied Diagram 34 Diagram 35 Diagram 36 Slot the door section into the assembly the internal surfaces should be...

Страница 20: ...se frame Follow the examples in diagrams 37 38 and 39 these show what size screw should be used On each base bracket its best to start by fixing the 40mm Pan head screws EV0332 followed by the 25mm Pa...

Страница 21: ...ches the frame The board will drop slightly and the bottom baton will rest on the cill Work your way around the building until all the boards are in place Once in position you can fix them with the ce...

Страница 22: ...d be level with the notches on the underside of the ridge and over hang each end by about 25mm Next you can attach the two ridge brackets EV1004 Line the tab up with the grove on the underside of the...

Страница 23: ...assembly each end of the roof bar will slot into the cast eaves bracket at the top of the side glazing bars diagram 50 Internal Now attach four roof bars on the middle tabs of the ridge brackets Dril...

Страница 24: ...ars to the top bracket with 35mm screws Now fit the middle glazing bars into the ridge then lower them down onto the trench in the eaves bars Drill pilot holes top and bottom and fix with 50mm screws...

Страница 25: ...ing the bottom of the roof bars make sure they are pulled tight into the side glazing bar leaving no gap diagram 54 When in position drill vertically down in the location shown in diagram 55 Then fix...

Страница 26: ...rt building your louvre you first need to assemble the sides Connect the two side section with the two inserts as shown here D166 D166 D168L D168L Pinch all glass retainers before glazing D166 D168R D...

Страница 27: ...r seal flush with the ends Attach the top and bottom of the louvre with the 19mm assembly screws in each end This locates with a screw channel in the side sections Makes sure you pinch the glass retai...

Страница 28: ...ram 63 just behind the mortice hole Fix with 50mm screws Diagram 62 Diagram 63 Diagram 64 Dia 53 EV0 973 EV 09 73 EV0974 EV0974 EV0973 50mm Screw Slot the louvre into the louvre frame Important Make s...

Страница 29: ...he louvre frame top you need to drill pilot holes through the bottom of the mortice hole diagram 67 Drill as close to the middle of the mortice hole as possible Then slot this onto the louvre frame si...

Страница 30: ...on high level or mid level The louvre can be installed at any of the locations indicated by the arrows Diagram 68 Diagram 69 Door High Level Louvre Mid Level Louvre Requires extra component request tw...

Страница 31: ...ill a pilot hole through the top rail of the louvre frame and secure to the eaves rail with a 50mm screw Diagram 60 EV795X392 Diagram 70 Diagram 71 Next drill a pilot hole through the glazing bar diag...

Страница 32: ...he bottom rail of the louvre frame and secure to the mid rail with a 50mm screw Diagram 77 Next drill a pilot hole through the glazing bar diagram 75 diagram 76 shows the ideal angle of the screw Agai...

Страница 33: ...he building by inserting one of the narrow panes EV610x76 next to the louvre frame If you have the louvre in the mid level position as below you also need to install the glass above the louvre EV795X3...

Страница 34: ...top as shown in diagram 84 12 Before you install the large panes it helps to place each bar capping around the building ready for installation When ready insert the large side pane next to the louvre...

Страница 35: ...n the middle at the rear of the building is slightly different to the standard capping If you have aluminium capping this also needs rubber inserting along the channels It is installed with 40mm Pan h...

Страница 36: ...ou would like the downpipe before starting and leave a space for this section as you install the other sections The first section of gutter to be installed goes above the door Make sure the ends of th...

Страница 37: ...gutter joint EV1070 Slide this in until the corner in the middle of the gutter joint meets the end of the gutter With this in place you can now prep the next section of gutter Apply another silicone...

Страница 38: ...tallation 13 Keep repeating this process working from the front to the rear on each side leaving a gap where you would like the downpipe section to be This can go in place of any of the shorter sectio...

Страница 39: ...to be made you can do this now When you re happy with the fit add a bead of silicone to both ends then fix the section in place with 25mm round head screws Make sure you line up both ends as best you...

Страница 40: ...agram 96 External Finally you can add the last two gutter joints With the silicone beads applied to the gutter lower the joint into position first locating the front edge then push the base of the joi...

Страница 41: ...need to place the glass stops EV0313M on the eaves bars Hang two glass stops between each glazing bar as shown in diagram 97 Space these around 100mm in from the roof glazing bars diagram 98 Dia 98 D...

Страница 42: ...iece of roof glass into place be careful to support this and try to slide it up one roof bars until it reaches the other When lowered into the glass stops the glass should fit either side of the rebat...

Страница 43: ...a slightly different capping diagram 105 106 Important Please make sure that you use the 40mm countersunk EV0338 screws where the vent s will be located the usual pan headed EV0332 screws will prevent...

Страница 44: ...If you haven t already done so you can now install the louvre glass Carefully slide each piece into the glass retainers until it hits the small stop diagram 108 Diagram 108 Dia 108 External D729 525mm...

Страница 45: ...screw through the side of the glazing bar sink the head slightly into the timber for a neat finish diagram 111 Diagram 109 Diagram 111 Diagram 112 Diagram 113 Dia 111 Dia 112 E V 0 9 6 7 EV0129 80mm S...

Страница 46: ...lts diagram 115 Now fix the cowl assembly to the ridge using 19mm pan head screws diagram 114 Prepare the ridge hinge EV0314M by running a bead of silicone along the back edge diagram 117 Fix in place...

Страница 47: ...610mm x 469mm pane of glass and locate this in the vent hinge Before lowering this down completely slot the glass stops onto the open edge EV0315M EV0323 EV1106M Cedar capping part number EV1110 Diagr...

Страница 48: ...llation Next slide the roof vent along the channel of the ridge hinge and secure with another vent stop diagram 123 You can now lower the vent until it rests on the roof bars Diagram 122 Diagram 123 E...

Страница 49: ...to secure the top arm of the autovent to the roof vent do this with the roof vent in the closed position so that you get the bracket in the correct position Adjust the lower arm on the slam rail until...

Страница 50: ...ram 127 Always use the large head 25mm screw supplied for the staging brackets and supports EV0326 30 m m 34mm Diagram 126 Diagram 127 Diagram 128 Diagram 129 Diagram 130 Dia 128 Dia 129 Dia 130 Dia 1...

Страница 51: ...brackets with a 10mm bolt HE576 and nut HE579 as shown in diagram 133 and 134 If you struggle to line the holes up try loosening the screws fix the nut and bolt an then tighten the screw again Diagra...

Страница 52: ...sest to the ends locate with the holes in the staging arms diagram 136 The longest slat EV1111M nearest to the middle of the greenhouse needs 5 x 10mm bolts Diagram 135 Diagram 136 Dia 136 The ends of...

Страница 53: ...taging arm at the rear diagram 141 once happy with the position tighten all the nuts The extra bolt in the longest slat should be left towards the rear of the building as this is used to connect the n...

Страница 54: ...iagram 142 143 You will need to remove the 25mm round head screw to fix the brackets on the rear mid rail As before fix in place with the large head 25mm screw Next attach the staging support bracket...

Страница 55: ...arm while you fit the first couple of slats Slide three 10mm bolts into each of two infill staging slats EV1116M and position them as shown in diagram 144 Loosely attach these for now as you may need...

Страница 56: ...V1124M up with the bolt on the 2nd slat in from the front and attach nuts to both E V 0 3 5 0 M E V 1 1 2 4 M Make sure all the staging slats are level before fixing the diagonal support with a large...

Страница 57: ...is a good position from the eaves as this allows you room for small plant pots on the shelf but won t interfere with larger pots on the staging top diagram 150 The left hand bracket should be fitted i...

Страница 58: ...with a 10mm bolt in the hole nearest the square end diagram 151 Next slide 4 x 10mm bolts down each shelf slat use the two nearest the ends to attach to the outer shelving arms diagram 153 Dia 153 Di...

Страница 59: ...assembly to the shelving slats and slot them on to the bolts already inserted Line up with the front edge and at the rear with the outer shelving arm attach nuts and fix when you re happy with the po...

Страница 60: ...et D201 diagram 130 Push the outlet through the hole and attach the downpipe D211 While supporting the downpipe slide the downpipe clip EV0740M on from the bottom of the pipe Fix this to the mid rail...

Страница 61: ...and your door opens and closes well you can fix the building down You need at least one fixing per base bracket supplied if the building is exposed to high winds it would be a good idea to use 2 fixin...

Страница 62: ...Evo Louvre Make up Glass 2 EVOCTBOX69 Evo Octagonal Greenhouse BOX 6x9 EV0313M Evo Glass Stop 24 EV0950 Octagonal Cill_Angled EV0950 793mm 6 EV0952 Octagonal Cill_Straight_Angled EV0952 800mm 2 EV0953...

Страница 63: ...x9 EV1001M Octagonal Base Bracket EV1001M MOSS 8 EV1004M Octagonal Ridge Bracket 69 EV1004M MOSS 2 EV1011M Octagonal Cowl 69_Assembly EV1011M MOSS 1 EV1014M Octagonal Base_Single EV1014M 824mm MOSS 6...

Страница 64: ...HE579 Nut M6 Stainless 62 EV0326 25mm Pan Poz No 5 SS EV0326 30 EVOCTSHE6 Evo Octagonal Greenhouse Shelving 6x6 and 6x9 End Single HE300M Base Bracket MOSS 2 EV0348M Atlas shelf tubular support 02 221...

Отзывы: