background image

50

-EN


Alpine introduces IMPRINT - the world’s first technology that 
thoroughly eliminates in-car acoustic problems that normally degrade 
sound quality, which enables us to experience music the way the artist 
intended.
When the IMPRINT audio processor (PXA-H100) (sold separately) is 
connected to this unit, MultEQ and the following sound adjustment can 
be performed.

Changing MultEQ mode

MultEQ, developed by Audyssey Labs, automatically corrects the audio 
for the listening environment. The system is optimized for selected 
positions in the vehicle. To accomplish this, MultEQ must take 
measurements of the vehicles response characteristics. For details on the 
set up procedure, consult your authorized Alpine dealer.

1

Touch 

[SETUP] 

on the main source screen.

The SETUP selection screen is displayed.

2

Touch 

[IMPRINT


SETUP]

.

The display changes to the IMPRINT Setup screen.

3

Touch 

[

]

 or 

[

]

 of MultEQ.

Select the desired setting range.

Setting range : OFF (Manual Mode) / CURVE1 (MultEQ-1) / 

CURVE2 (MultEQ-2)

The Curve mode can be selected only when curve 1 and curve 2 are 
stored.

When MultEQ is set to CURVE 1 or CURVE 2, MEDIA XPANDER, 


X-OVER, T.CORR, SUBWOOFER PHASE, SUBWOOFER 
CHANNEL, TW SETUP, P-EQ, G-EQ and F-EQ can not be adjusted.

When an external audio processor is connected, the MultEQ function 
cannot be used.

Adjusting Sound Setting in Manual Mode

You can change these sound settings to create your own preference 
when the MultEQ mode is set to OFF (Manual Mode).


1

Check whether the Defeat mode is off.

2

Touch 

[SETUP]

 on the main source screen.

The SETUP selection screen is displayed.

3

Touch 

[AUDIO SETUP]

.

The AUDIO SETUP screen appears.

4

Touch 

[

of 

[A.PROCESSOR]

.

The A.PROCESSOR SETUP screen appears.

5

Touch 

[

]

[

]

 or 

[

]

, etc., of the desired item to 

change its setting.

Setting items: MEDIA XPANDER / X-OVER / T.CORR / 


T.CORR PARAMETER / G-EQ / P-EQ / F-EQ / 


TW SETUP

*

*

This function can be operable only when PXA-H100 (sold 
separately) is connected and 2.2ch (3WAY) mode is set. For details, 
refer to the Owner’s Manual of PXA-H100.

Touching [ESC] will change to the main source screen.

Touching [

] to return to the previous screen.

Media Xpander, F-EQ, P-EQ and G-EQ Adjustment are inoperable 
when Defeat is set to ON.

MX (Media Xpander) makes vocals or instruments sound distinct 
regardless of the music source. The CD, USB memory and iPod, will be 
able to reproduce the music clearly even in cars with a lot of road noise.

Setting item: MEDIA XPANDER

1

Touch

 [

or 

[

]

 of MEDIA XPANDER to select ON 

or OFF. 

2

Touch 

[

]

 after setting to ON.

The MEDIA XPANDER setup screen appears.

3

Touch 

[

]

 or 

[

]

 of the desired MX mode.

Music source (such as CDs, iPod, etc.) level can be set.

IMPRINT Operation 
(Optional)

The Parking Brake must be engaged to access the IMPRINT 
mode screen. Attempting to access this screen while driving will 
display the warning-CAN’T OPERATE WHILE DRIVING.

Use steps 1 to 5 to select one of the Sound menu 
modes to modify. See the applicable section below for 
details about the selected item.

Setting the MX Level (MEDIA XPANDER)

OFF:

Turns off the MX effect of every music source.

ON:

Turns on the specified MX mode.

Содержание IVA-W520R

Страница 1: ...57 4631 ALPINE ELECTRONICS OF CANADA INC 777 Supertest Road Toronto Ontario M3J 2M9 Canada Phone 1 800 ALPINE 1 1 800 257 4631 ALPINE ELECTRONICS OF AUSTRALIA PTY LTD 161 165 Princes Highway Hallam Vi...

Страница 2: ...ving Traffic Information While Playing CD or Radio 19 Priority News 19 Displaying Radio Text 19 CD MP3 WMA AAC Playback 20 Repeat Play 20 M I X Random Play 20 Selecting Folders concerning MP3 WMA AAC...

Страница 3: ...witching Background Textures 36 Setting Automatic Background Textures 36 Switching the Font Back Display Colour 36 Adjusting the Touch Panel 36 Visual EQ Visual EQ Setting Operation 37 Selecting the V...

Страница 4: ...High Range Speaker TW SETUP 53 Storing Settings in the Memory 53 Calling up the Preset Memory 54 Setting the Subwoofer 54 Adjusting the Subwoofer Level 54 Setting the Subwoofer Phase 54 Setting the S...

Страница 5: ...Artist Album Genre Composer Episode Category 64 Random Play Shuffle M I X 64 Repeat Play 64 Information About DVDs 65 Terminology 65 List of Language Codes 67 List of Country Codes 68 In Case of Diff...

Страница 6: ...driver from looking ahead of the vehicle and cause an accident DO NOT DISASSEMBLE OR ALTER Doing so may result in an accident fire or electric shock USE ONLY IN CARS WITH A 12 VOLT NEGATIVE GROUND Ch...

Страница 7: ...llpoint pen Playing a disc while driving on a very bumpy road may result in skips but this will not scratch the disc or damage the player Irregular Shaped Discs Be sure to use round shaped discs only...

Страница 8: ...car must be parked and the parking brake must be engaged for the procedure described in the Owner s Manual to be valid The warning CAN T OPERATE WHILE DRIVING will be displayed if any attempts are ma...

Страница 9: ...ecoder The following information is designed to help you create your own music CDs either Audio CD or MP3 WMA AAC encoded CD R RW files What is the difference between an Audio and MP3 WMA AAC CD An Au...

Страница 10: ...s may not be performed The audio file format that can be played back on the unit is MP3 WMA AAC Artist song name etc can be displayed however characters may not be correctly displayed On Handling USB...

Страница 11: ...otherwise authorized by Macrovision Reverse engineering or disassembly is prohibited Manufactured under license from Dolby Laboratories Dolby and the double D symbol are trademarks of Dolby Laboratori...

Страница 12: ...switch Be sure to press the RESET switch when using the unit for the first time after installing the CD changer after changing the car battery etc Turn off the unit power press RESET with a ballpoint...

Страница 13: ...creen This function is adjustable while driving If the monitor touches an obstacle while the angle is being adjusted it will stop immediately The screen colour will vary when viewed at certain angles...

Страница 14: ...screen Changes to the SOURCE selection screen to Step 1 screen Displays the source name such as radio band etc that is selected Changes the display style refer to Selecting the Display Style page 16...

Страница 15: ...nges to the Bass 1 Treble 1 and Subwoofer 2 Level adjustment screen directly When an optional external audio processor with the MEDIA XPANDER function is connected to this unit and Defeat is set to OF...

Страница 16: ...seek tuning 2 Touch P1 2 to change the function guide 3 Touch and hold any one of the preset buttons P SET 1 through P SET 6 for at least 2 seconds The selected station is stored 4 Repeat the procedu...

Страница 17: ...broadcast If traffic information is not being broadcast the unit is set in the standby mode When a traffic information broadcast begins the unit automatically receives it and the display shows T INFO...

Страница 18: ...set to a mode other than the LW and MW modes 1 Touch NEWS to activate the PRIORITY NEWS mode The NEWS indicator appears in the display Touch NEWS again to deactivate the Priority News mode and return...

Страница 19: ...ion on page 29 However the search mode function does not work in the CD changer mode The playback time may not be correctly displayed when a VBR Variable Bit Rate recorded file is played back Repeat P...

Страница 20: ...ers and the underscore For non supported characters NO SUPPORT is displayed The number of characters may be limited or not correctly displayed depending on the tag information Playing back MP3 WMA AAC...

Страница 21: ...s Display example for DVD Video main screen SOURCE button Refer to page 15 VISUAL button Displays the VISUAL selection screen SETUP button Displays the SETUP selection screen Style button Refer to pag...

Страница 22: ...VDs menu screens may appear automatically If this happens perform the operation described below to start playback Direct Menu Operations 1 Touch the DVD menu directly Menu Operations 1 Touch CONTROL t...

Страница 23: ...f a menu screen appears on page 23 1 Touch P1 2 on the DVD mode main screen The function guide changes 2 Touch MENU CONT The menu operation mode screen appears For further operation see If a menu scre...

Страница 24: ...ters Playing Still Frames Pausing 1 During playback touch 2 Touch to resume playback No sound is played during the still frame mode The image or sound may stop temporarily when playback starts from th...

Страница 25: ...nt to play See page 24 for operation of the numeric keypad 4 Touch ENT to confirm your selection Playback will start from the selected chapter or track This function is not available for a disc on whi...

Страница 26: ...appears on page 23 Displaying the Disc Status for DVD Use the procedure described below to display the status title number chapter number etc of the currently playing DVD on the monitor 1 During playb...

Страница 27: ...ch 3WAY 4 2ch FRONT REAR SUBW switch of the IMPRINT audio processor PXA H100 to 2 2ch 3WAY you cannot adjust the FADER mode For details refer to the Owner s Manual of PXA H100 Adjusting the Balance To...

Страница 28: ...d When an external processor or IMPRINT audio processor PXA H100 is connected the display changes from H P F to the A PROCESSOR item For A PROCESSOR operation refer to External Audio Processor Optiona...

Страница 29: ...ntertainment function independently routes different sources to the front and the rear inside a car For example while listening to the radio or other audio source in the front DVD can be enjoyed in th...

Страница 30: ...uality 1 Touch VISUAL on the main source screen The VISUAL selection screen is displayed 2 Touch OFF The backlit display portion goes out 3 Touch OFF again to cancel the display backlight To make the...

Страница 31: ...lected the primary subtitle language among the recorded ones is played To play in a language other than those displayed 1 Touch CODE The numeric keypad screen is displayed 2 Touch the 4 digit numeral...

Страница 32: ...he selected screen size For details refer to the explanation on the disc s jacket 4 3 LETTER BOX Select this when connected to a conventional 4 3 size normal TV aspect ratio monitor There may be black...

Страница 33: ...ration was started When ON is selected the clock is adjusted automatically based on the time data sent from the RDS broadcast Setting item RDS CLOCK DISP Setting contents OFF ON If the difference in v...

Страница 34: ...ER DIMMER LOW LEVEL BACKGROUND AUTO BACKGROUND DATA DOWNLOAD 3 BASE COLOR SCREEN ALIGNMENT 1 This function is adjustable while driving 2 When the current source is iPod Audio or USB Audio you can not...

Страница 35: ...nd turned back on again Setting item AUTO BACKGROUND Setting contents OFF ON Wallpapers downloaded from Downloading the BACKGROUND data page 43 are recalled You can choose from 4 different display col...

Страница 36: ...display shows MIN or MAX respectively When any Visual EQ Preset is selected the brightness is automatically adjusted according to the car s interior lighting as long as AUTO is set in Setting the Brig...

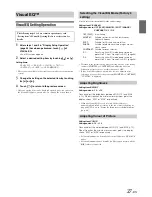
Страница 37: ...preset No touch MEMORY The adjusted Visual EQ mode is stored by the above operations You can recall the Visual EQ mode stored here from P 1 or P 2 of Selecting the Visual EQ Mode Factory s setting pa...

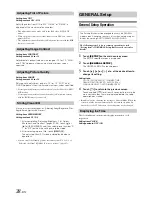
Страница 38: ...E3 MODE4 You can adjust the brightness of the button lighting at night with the dimmer Setting item LED DIMMER LEVEL Setting level 2 to 2 Setting the Time HOUR Adjust the hour MINUTE Adjust the minute...

Страница 39: ...the icon of an external device such as a telephone whenever a phone call comes in to tell you there is a phone call Setting item IN INT ICON Setting contents INT TEL For optional remote control operat...

Страница 40: ...Setting items PRIMARY SECONDARY 1 Setting contents OFF 2 AUX 3 DVD GAME TV DVB T EXT DVD NAV 4 DVD CHG USB VIDEO 1 When a USB Video box or TUE T200DVB both are sold separately and cannot be connected...

Страница 41: ...n the SOURCE selection screen ON The RSE item is displayed on the SOURCE selection screen Touch RSE to change to the REAR selection screen and then touch the desired source The selected source picture...

Страница 42: ...he downloaded data will not be deleted even when the battery power cord is removed You can recall a wallpaper in Switching Background Textures page 36 or Setting Automatic Background Textures page 36...

Страница 43: ...y of data This data is used to reproduce the sound cleanly by making use of the data quantity MX CMPM OFF CMPM MX 1 to 3 This corrects information that was omitted at the time of compression This repr...

Страница 44: ...tion is activated Touch or of CENTER WIDTH CONT to adjust the level The level can be adjusted between 0 to 7 When the level increases the centre channel position moves from the centre speaker position...

Страница 45: ...rection value for the front left speaker to 5 1 ms sets a virtual distance matching the distance to the farthest speaker 4 Touch or of T CORR Select L R or L R 5 Touch of T CORR The T CORR adjustment...

Страница 46: ...vel are fine tuned independently to make the necessary corrections The parametric equalizer function is an advanced tool for serious audiophiles Setting item P EQ 1 Select L R or L R by touching or of...

Страница 47: ...n five steps 6 3 0 3 and 6 The higher the level the more bass is output from the rear speakers The effect differs according to the software DVD etc The REAR MIX function is turned off by touching OFF...

Страница 48: ...output from the subwoofer The volume signal level for Dolby Digital Dolby PL II DTS and PCM modes can be set Avoid stopping pausing switching the disc cueing fast forwarding or switching the audio ch...

Страница 49: ...et to OFF Manual Mode 1 Check whether the Defeat mode is off 2 Touch SETUP on the main source screen The SETUP selection screen is displayed 3 Touch AUDIO SETUP The AUDIO SETUP screen appears 4 Touch...

Страница 50: ...ting the Cut Off Frequency Touch or of FREQ then select the cut off frequency crossover point The adjustable bandwidth differs depending on the speaker channel 4 2ch FRONT REAR SUBW System Setting con...

Страница 51: ...ker by touching the respective or button L distance to farthest speaker distance to other speakers Refer to Time Correction Value List on page 55 3 Repeat step 2 to set another speaker By setting thes...

Страница 52: ...Hip Hop Rap Easy Listening Country Classical User1 User2 User3 User4 User5 User6 Only one type can be set to ON By selecting User s 1 to 6 you can recall the stored preset number in Adjusting the Gra...

Страница 53: ...s Adjust the time correction level of the front left speaker to a high value and the rear right to zero or a low value The sound is not balanced because the distance between the listening position and...

Страница 54: ...67 6 7 227 8 89 8 17 1 7 57 8 22 8 68 6 8 231 2 91 1 18 1 8 61 2 24 1 69 6 9 234 6 92 5 19 1 9 64 6 25 5 70 7 0 238 0 93 8 20 2 0 68 0 26 8 71 7 1 241 4 95 1 21 2 1 71 4 28 1 72 7 2 244 8 96 5 22 2 2...

Страница 55: ...ected Rearview Camera be sure to set CAMERA IN to NTSC or PAL before using the Rearview Camera refer to Setting the Rear Camera Input on page 41 Switching the Rear Camera Screen Optional The rear view...

Страница 56: ...ouch SOURCE on the main source screen The source screen appears on the display 2 Touch AUX 1 or AUX 2 The external input screen is displayed 3 Touch NTSC PAL to change the video input 1 The name which...

Страница 57: ...enu Screen Touch MENU to call up the main menu screen Calling up Menu Operation Mode Touch MENU CONT to call up the menu operation mode Switching the Source Touch A V The source switches with each tou...

Страница 58: ...e select buttons DISC 1 through DISC 6 DISC 1 through DISC 6 select the discs from the first disc to 6th disc When a 12 Disc CD Changer is connected You can select the disc numbers 1 to 6 in the same...

Страница 59: ...K or to select the desired BANK Each operation can be performed in the selected bank Even if the files are contained in the same folder they may be saved as different BANK Playback 1 Touch SOURCE on t...

Страница 60: ...last search mode 2 Touch of ARTISTS The ARTISTS search screen is displayed 3 Select the desired artist To play back the artist directly 1 Touch next to the artist s name All songs of the selected arti...

Страница 61: ...yer media Corresponding File Systems This device supports FAT 12 16 32 for USB memory device Portable audio player An iPod iPhone can be connected to this unit by using the USB connection cable When t...

Страница 62: ...ed select the MUSIC or VIDEOS search mode by touching at first If VIDEOS mode is selected the Video playlists Movies Music Videos TV Shows Video Podcasts search mode may be used depending on the conne...

Страница 63: ...not possible If Playlist Artist Album Genre Composer Episode are not searched this operation is not possible Random Play Shuffle M I X The Shuffle function of the iPod is displayed as M I X on the IVA...

Страница 64: ...ted from the unit Multi story function With this function a single movie includes various story lines You can select different story lines to view various versions of the same movie Operation differs...

Страница 65: ...done with an advance high sound quality matrix surround decoder which draws out the spatial properties of the original recording without adding any sounds to or changing the sound of the source The se...

Страница 66: ...79 6983 6984 6985 7065 7073 7074 7079 7082 7089 7165 7168 7176 7178 7185 7265 7273 7282 7285 7289 7365 Abbreviation IE IK IN IS IT IW JA JI JW KA KK KL KM KN KO KS KU KY LA LN LO LT LV MG MI MK ML MN...

Страница 67: ...IS IT JM JO JP KE KG KH 6877 6879 6890 6967 6969 6971 6972 6982 6983 6984 7073 7074 7075 7077 7079 7082 7165 7166 7168 7169 7170 7172 7173 7176 7177 7178 7180 7181 7182 7183 7184 7185 7187 7189 7275 7...

Страница 68: ...8371 8372 8373 8374 8375 8376 8377 8378 8379 8382 8384 8386 8389 8390 8467 8468 8470 8471 8472 8474 8475 8477 8478 8479 8480 8482 8484 8486 8487 8490 8565 8571 8577 8583 8589 8590 8665 8667 8669 8671...

Страница 69: ...be is exhausted Replace the fluorescent tube The fluorescent tube replacement is not free of charge even within the warranty period for the tube is an article of consumption Radio Unable to receive st...

Страница 70: ...structions Playback does not start Disc is loaded upside down Check the disc and load it with the labeled side facing upward Disc is dirty Clean the disc A disc not able to play back with this unit is...

Страница 71: ...A copy protected WMA file was played back You can only play back non copy protected files A sampling rate bit rate not supported by the unit is used Use a sampling rate bit rate is supported by the u...

Страница 72: ...e into the CD Changer to receive the disc left inside the CD Changer No magazine is loaded into the CD Changer Insert a magazine No indicated disc Choose another disc Indication for iPod Mode The iPod...

Страница 73: ...nnected and the cable is not excessively bent Caused by the Portable audio player Software Version not being compatible with this unit Update the Portable audio player Software Version to be compatibl...

Страница 74: ...le System FAT12 16 32 MP3 Decoding MPEG 1 2 AUDIO Layer 3 WMA Decoding Windows Media Audio AAC Decoding AAC LC format m4a file Number of Channels 2 Channel Stereo Frequency Response 5 20 000 Hz 1 dB T...

Страница 75: ...AND INSTALL THEM SECURELY Be sure to use only the specified accessory parts Use of other than designated parts may damage this unit internally or may not securely install the unit in place This may c...

Страница 76: ...ge 78 Slide the mounting sleeve into the dashboard and fix it with the metal shackles If B or C is used make sure that there is a enough space depthwise before installing the unit If the unit is forci...

Страница 77: ...nting sleeve 2 Pull the unit out keeping it unlocked as you do so 4 When your vehicle has the Bracket mount the long hex bolt onto the rear panel of the IVA W520R and put the Rubber Cap on the hex bol...

Страница 78: ...position and the battery may be discharged IVA W520R Red Yellow SPST SW Optional FUSE 5A Optional FUSE 20A Optional Battery ACC BATTERY To prevent external noise from entering the audio system Locate...

Страница 79: ...nition key Red White Amplifier Amplifier Amplifier To plus side of the back lamp signal lead of the car To Video Output terminal To back up camera To Video Input terminals To Audio Input terminals R L...

Страница 80: ...the two switches to different settings Be sure to turn the power off to the unit before changing the switch position Power Supply Connector BLUETOOTH interface connector Blue Connect this to an option...

Страница 81: ...Front Speaker Output Lead White Black Right Front Speaker Output Lead Grey Black Right Front Speaker Output Lead Grey Right Rear Speaker Output Lead Violet Black Right Rear Speaker Output Lead Violet...

Страница 82: ...reful not to bend the Fiber Optic Cable at a sharp angle Navigation system Sold Separately NVE M300P etc Audio Processor Ai NET Fiber Optic Digital compatible Sold Separately Fiber optic digital Input...

Страница 83: ...tor Connect this to the output or input connector of other product equipped with Ai NET Video Input Connector AUX INPUT Yellow Connect the video output lead of a DVD video player or DVD changer to thi...

Страница 84: ...input lead This lead outputs the controlling signals from the remote control Remote Control Input Lead White Brown Reverse Lead Orange White Use only when a back up camera is connected Connect to the...

Отзывы: