


13
-EN
01GB05IVAD511E.fm
ALPINE IVA-D511E 68-14470Z65-A (EN)
Moving the Monitor to be Flat
When you want to operate some function on the car (air conditioner,
etc.) which is hidden by the raised monitor, use this function.
1
When the monitor is open, press
FLAT
.
The monitor moves to the flat position.
2
Press
FLAT
again.
The monitor returns to the previous angle.
•
The monitor returns to the previous angle 10 seconds after being
moved to the flat position.
•
If an excessive force is added to the monitor when the monitor is flat,
putting an object on the back of the monitor for example, it may
cause a malfunction.
Adjusting the Volume
Adjust the volume by turning the
Rotary encoder
.
Volume: 0 - 35
Lowering Volume Quickly
Activating this function will instantly lower the volume level by 20 dB.
Press and hold
Rotary encoder (MUTE)
for at least 2
seconds.
The audio level decreases by about 20 dB.
Press and hold
Rotary encoder (MUTE)
for at least 2 seconds
again brings the audio back to its previous level.
How to view the Display
•
To protect the display, touch the onscreen button with the tip of your
finger.
•
If you touch a button and there is no reaction, remove your finger
from the display once, and try again.
•
If you touch two buttons at the same time, a malfunction may occur.
Here is an example explanation for the Radio mode display on how to
recall a source.
1
Press
SOURCE/
.
The SOURCE selection screen is displayed.
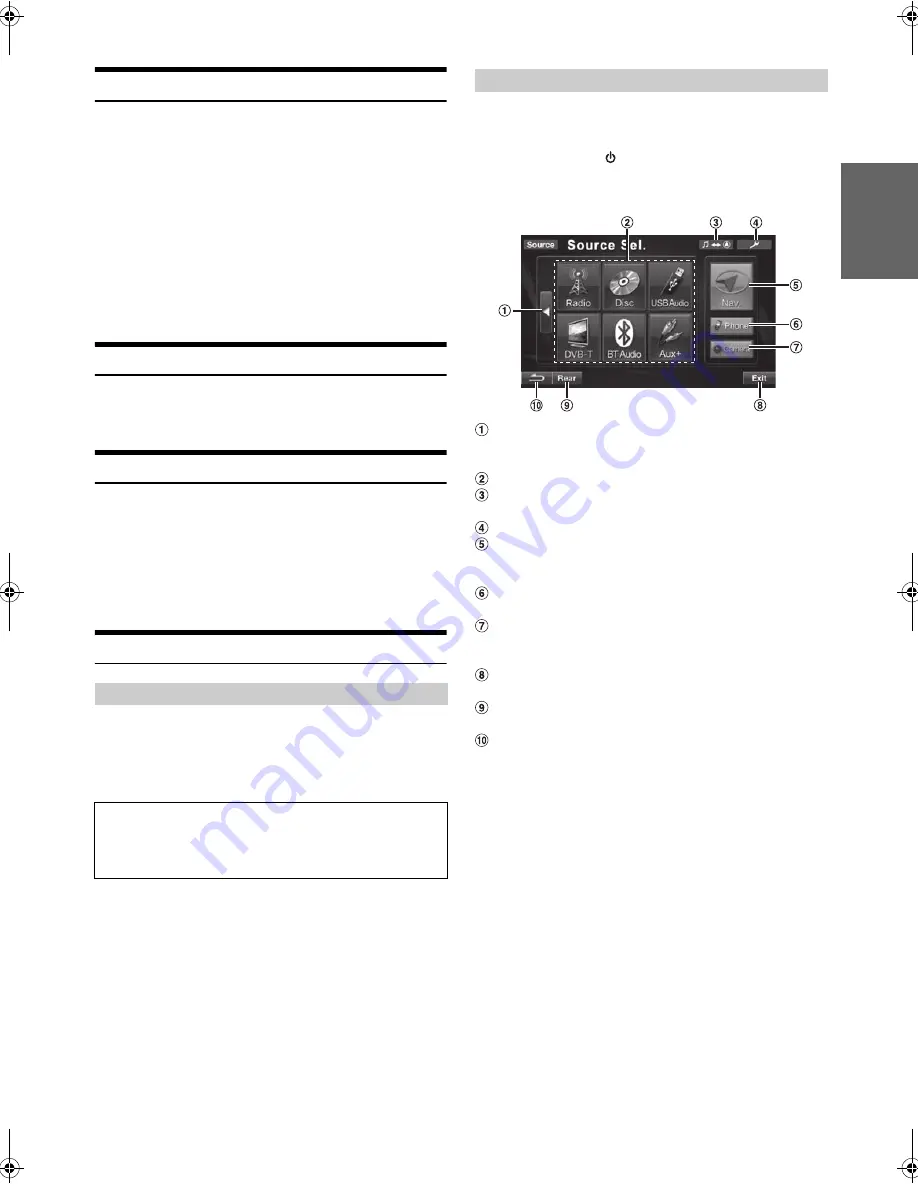
Display example for SOURCE selection screen
Changes the item of source selection list. (Depending
on the source quantity, this button may not be
displayed.)
Displays the source modes that can be selected.
Changes to Navigation screen. (Available only when ON
is set in “Setting the Navigation Mode” (page 42).)
Changes to SETUP main screen.
Changes to Navigation main screen. (When “ON” is set
in “Setting the Navigation Mode” (page 42) or “NAV.” is
set in “Adjusting the AUX1 name Mode” (page 43).)
Changes to the Telephone Menu screen.
(When “BLUETOOTH IN” is set to Adapter (page 44)).
Displays the rear view video.
(When an optional rearview camera is connected and
Camera IN is set to other than OFF (page 42).).
Turns off the Source Select screen, and returns to
previous source screen.
Changes to the Rear selection screen when “Setting the
Picture/Sound Output” (page 44) is set to ON.
Returns to the previous screen.
•
The kind of source modes that are displayed varies depending on
connection and setting.
2
Touch
[Radio]
.
The screen changes to the Radio mode main display.
TOUCH PANEL operation
Onscreen buttons are expressed as follows in this Owner’s
Manual.
•
Onscreen buttons are shown in bold, enclosed in [ ] (e.g.
[BAND]
).
Recalling the Source
01GB00IVAD511E.book Page 13 Friday, February 5, 2010 9:49 AM


