background image

15

-EN

DVD/Video CD

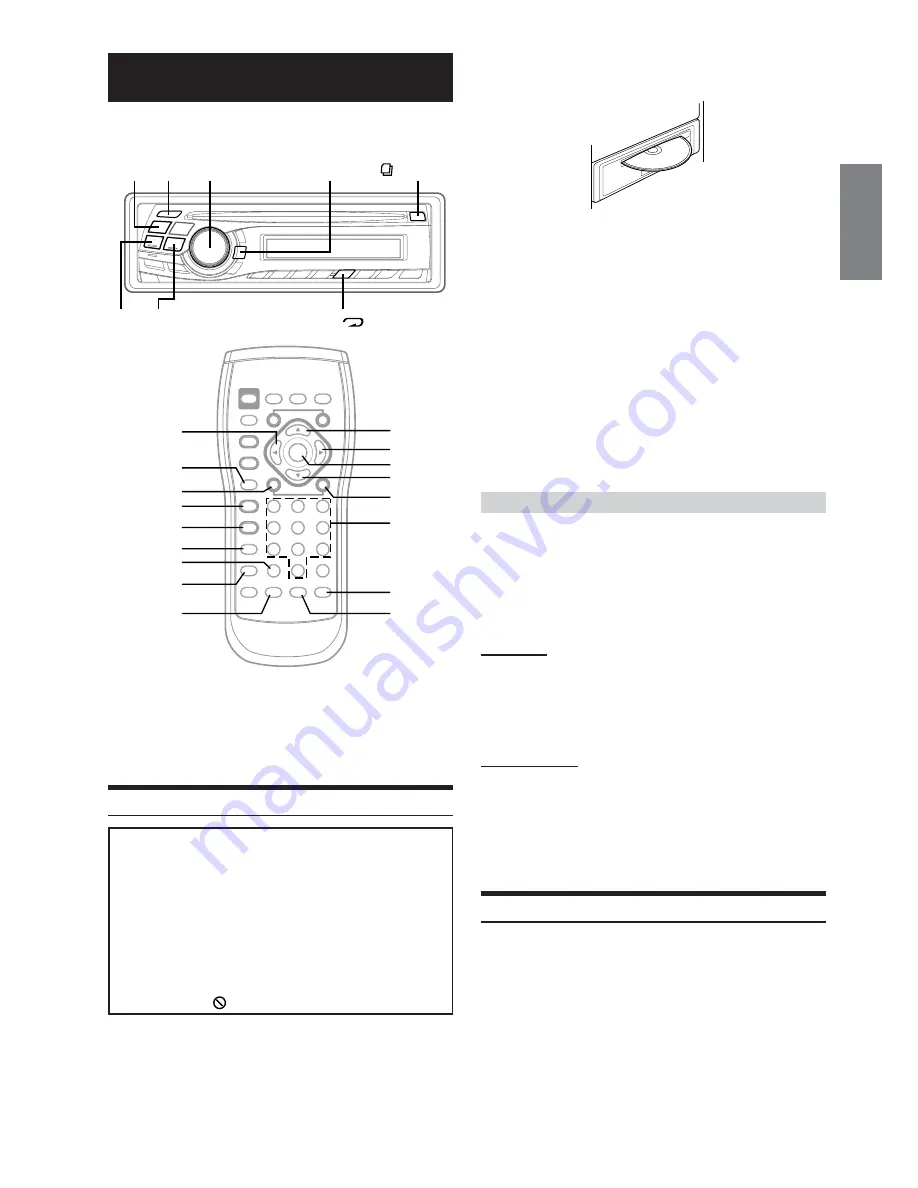
In this section, both remote control and main unit operation are described.

• DVD and Video CD operation can be controlled from both the

remote control and the main unit. In this section, both remote
control and main unit operation are described.

• To view DVD and Video CD, the optional TV monitor is required.
• DVA-9860R automatically changes the video output signal (NTSC

or PAL), according to the disc. To set NTSC or PAL on the
connected monitor, refer to the Owner's Manual of the monitor.

Playing DVD/Video CD

Caution

• Not all functions will operate for every DVD. See the individual

DVD’s instructions for details on the features supported.

• Fingerprints on a disc may adversely affect playback. If a

problem occurs, remove the disc and check for fingerprints on
the playback side. Clean the disc if necessary.

• When using the remote control, be careful to press one button

at time. Pressing multiple buttons at the same time may cause
erroneous operation.

• If you try to perform an invalid operation (based on the type of

disc being played), the following mark is displayed on the
monitor screen: 

Play Position Memory Function

Even if you turn power off or switch the Ignition Key to OFF during
playback or change the source, playback will continue from the point
where playback stopped when the power is turned ON again.

1

Insert a disc with the label side facing up.

The disc will be pulled into the unit automatically.

When a disc is already inserted, press 

SOURCE/POWER

on the main unit to switch to the DISC mode.

The mode will change every time the button is pressed.

TUNER 

 DISC

 →

 CD CHANGER

*

 → 

TUNER

* Only when the CD changer is connected

2

To eject the disc, press 

on the main unit.

• Do not remove a disc during its eject cycle. Do not load more than

one disc at a time. A malfunction may result from doing either.

• If the disc does not eject, press and hold 

c

 for at least 2 seconds.

• The reverse side of a double-sided DVD will not be played

automatically. Remove the disc, turn it over, and reinsert it.

• Never insert map discs for navigation purposes as they could

damage the equipment.

• Refer also to “DVD Setup” (pages 25 to 27).

 If a menu screen appears

On DVDs and video CDs with playback control (PBC), menu screens
may appear automatically. If this happens, perform the operation
described below to start playback.

• This operation is controlled using the remote control unit.
• For many discs, the menu screen can also be displayed by pressing

MENU

.

DVD menu

Press 

8

9

;

 or 

:

 to select the desired item, then

press 

ENT.

• For some discs it is possible to select items directly from the menu

screen using the 

number keys

 (“0” to “9”).

Video CD menu

Use the 

number keys

 (“0” to “9”) to select the desired

number, then press 

ENT.

• The menu screen does not appear when the PBC function is turned

off. In this case, set VCD PLAY MODE  to turn on the PBC
function. For details, refer to “Setting the Video CD Play Mode”
(page 28).

Stopping Playback (PRE-STOP)

Press 

L

 during playback to stop playback. That position is stored in

memory.

1

During playback, press 

L

 on the remote control

unit.

“PRE-STOP” is displayed.

2

Press 

-

/

J

 in the PRE-STOP mode.

Playback starts from the position at which it was stopped.

• For some discs, the position at which playback was stopped may

not be accurate.

RETURN

:

/

J

g

L

CLR

DISP/TOP M.

AUDIO

;

8

:

ENT.

9

f

number
keys
(0 to 9)

ANGLE

SUBTITLE

g


f

Rotary encoder

-

/

J

SEARCH/Q.S. 

c

4(

)

MENU

SOURCE/
POWER

Содержание DVA-9860R

Страница 1: ...lifornia 90501 U S A Phone 1 800 ALPINE 1 1 800 257 4631 ALPINE ELECTRONICS OF CANADA INC 777 Supertest Road Toronto Ontario M3J 2M9 Canada Phone 1 800 ALPINE 1 1 800 257 4631 ALPINE ELECTRONICS OF AUSTRALIA PTY LTD 161 165 Princes Highway Hallam Victoria 3803 Australia Phone 03 8787 1200 ALPINE ELECTRONICS GmbH Frankfurter Ring 117 80807 München Germany Phone 089 32 42 640 ALPINE ELECTRONICS OF U...

Страница 2: ... Search 13 About MP3 WMA 13 DVD Video CD Playing DVD Video CD 15 Stopping Playback PRE STOP 15 Stopping Playback 16 Fast forwarding Fast reversing 16 Finding the Beginning of Chapters or Tracks 16 Playing Still Frames pausing 16 Foward reverse frame by frame Playback 16 Slow Motion Playback 16 Searching by Title Number DVD only 16 Searching Directly by Chapter or Track Number 17 Quick Search 17 Ch...

Страница 3: ...2 Graphic Equalizer Adjustments 32 Parametric Equalizer Adjustments 33 Setting Bass Compressor 34 Setting Bass Focus 34 Speaker Setup 34 Setting of Dolby Digital 35 Adjusting the speaker levels 35 Mixing bass sound to the rear channel 35 Adjusting the acoustic image 35 Achieving powerful high volume sound 36 Adjusting the DVD Level 36 Using the Pro Logic II Mode 36 Linear PCM Setting 37 Storing Se...

Страница 4: ...JECTS IN INSERTION SLOTS OR GAPS Doing so may result in personal injury or damage to the product CAUTION This symbol means important instructions Failure to heed them can result in injury or material property damage HALT USE IMMEDIATELY IF A PROBLEM APPEARS Failure to do so may cause personal injury or damage to the product Return it to your authorized Alpine dealer or the nearest Alpine Service C...

Страница 5: ...to load more than one disc Make sure the label side is facing up when you insert the disc Your player will automatically eject any disc that is inserted incorrectly If the player continues to eject a correctly inserted disc push the RESET switch with a pointed object such as a ballpoint pen Playing a disc while driving on a very bumpy road may result in skips but this will not scratch the disc or ...

Страница 6: ...ave been recorded only on audio devices You can also play CD Rs CD RWs containing MP3 WMA formatted audio files Some of the following discs may not play on this unit Flawed discs discs with fingerprints discs exposed to extreme temperatures or sunlight e g left in the car or this unit discs recorded under unstable conditions discs on which a recording failed or a re recording was attempted copy pr...

Страница 7: ... system may be recognized as illegally copied In the following cases the disc may not play on this unit discs recorded by certain DVD recorders certain irregular discs flawed discs dirty discs when the pickup lens of this DVD player is dirty or when moisture condensation has occurred inside the unit Be sure to follow all cautions included with your DVD Rs DVD RWs discs Do not put stickers seals or...

Страница 8: ...carrying case Attaching 1 Insert the right side of the front panel into the main unit Align the groove on the front panel with the projections on the main unit 2 Push the left side of the front panel until it locks firmly into the main unit 2 1 1 Before attaching the front panel make sure that there is no dirt or dust on the connector terminals and no foreign object between the front panel and the...

Страница 9: ... FM1 F2 FM2 F3 FM3 MW LW F1 FM1 3 Press TUNE A ME to select the tuning mode DX SEEK Distance mode SEEK Local mode OFF Manual mode DX SEEK The initial mode is Distance mode Distance mode Both strong and weak stations will be automatically tuned in Automatic Seek Tuning Local mode Only strong stations will be automatically tuned in Automatic Seek Tuning Manual mode The frequency is manually tuned in...

Страница 10: ... the unit searches again for a station in the PI Programme Identification list If there are still no stations receivable in the area the unit displays the frequency of the preset station and the preset no disappears If the signal level of the Regional Local station being tuned becomes too weak to receive press the same preset button to tune in a Regional station in other district For presetting th...

Страница 11: ...st signal falls below a certain level the unit remains in the receiving mode for 1 minute If the signal remains below a certain level for over 1 minute the TA indicator blinks If you do not want to listen to the traffic information being received lightly press TA to skip that traffic information message The TA mode will remain in the ON position to receive the next traffic information message If t...

Страница 12: ...ome operations for example changing the source selecting the file by holding buttons up or down etc can be carried out on this unit The playback time may not be correctly displayed when a VBR Variable Bit Rate recorded file is played back If 8 is pressed during M I X DISC platyback new file will be played back in a random sequence If 9 is pressed the beginning of the current file will be played ba...

Страница 13: ...older Name Search mode 2 Turn the Rotary encoder within 10 seconds to select the desired folder 3 Press the Rotary encoder to play back the first file in the selected folder Folder Name Search mode is cancelled by pressing and holding SEARCH Q S for at least 2 seconds While in Folder Name Search mode press SEARCH Q S to switch to File Name Search mode ROOT is displayed for the root folder which do...

Страница 14: ...title artist name and album name ID3 tag WMA tag data This device can only display single byte alphanumeric characters and the underscore For non supported characters NO SUPPORT is displayed The number of characters may be limited or not correctly displayed depending on the tag information Producing MP3 WMA discs MP3 WMA files are prepared then written to a CD R or CD RW using CD R writing softwar...

Страница 15: ...ems This device supports discs formatted with ISO9660 Level 1 or Level 2 Under the ISO9660 standard there are some restrictions to remember The maximum nested folder depth is 8 including the root directory The number of characters for a folder file name is limited Valid characters for folder file names are letters A Z all caps numbers 0 9 and _ underscore This device also can play back discs in Jo...

Страница 16: ... DISC CD CHANGER TUNER Only when the CD changer is connected 2 To eject the disc press c on the main unit Do not remove a disc during its eject cycle Do not load more than one disc at a time A malfunction may result from doing either If the disc does not eject press and hold c for at least 2 seconds The reverse side of a double sided DVD will not be played automatically Remove the disc turn it ove...

Страница 17: ...n video and music CDs Playing Still Frames pausing 1 During playback press J 2 Press J to resume playback No sound is played during the still mode The image or sound may stop temporarily when playback starts from the pause mode This is not a malfunction Forward reverse frame by frame Playback 1 In the pause mode press g or f The picture advances or reverses by one frame each time the button is pre...

Страница 18: ...function to play the disc s titles chapters or tracks repeatedly During playback press 4 on the main unit The repeat mode switches each time the button is pressed DVD By pressing 4 for more than 2 seconds the unit will switch to REPEAT OFF VIDEO CD Displayed only in the changer mode The track disc repeat modes cannot be used on video CDs with playback control PBC Set VCD PLAY MODE to turn the PBC ...

Страница 19: ...cenes have been filmed from multiple angles the angle can be switched during playback This operation is controlled using the remote control unit During playback press ANGLE The angle switches between the angles recorded on the disc each time the button is pressed Some time may be required for the angle to change Depending on the disc the angle may switch in one of two ways Seamless The angle switc...

Страница 20: ...e BASS bass Center frequency control mode BASS TREBLE normal mode BASS Setting the Bass Center Frequency Press g or f to select the desired bass center frequency 60Hz 80Hz 100Hz 120Hz 60Hz Emphasizes the displayed bass frequency ranges Setting the Bass Band width Q Factor Press BAND to select the desired bass band width Changes the boosted bass band width to wide or narrow A wide setting will boos...

Страница 21: ...ally The treble level settings will be individually memorized for each source FM MW LW CD etc until the setting is changed The Treble frequency settings adjusted for one source are effective for all other sources FM MW LW CD etc Depending on the connected devices some functions and display indications do not work However Treble Level is still adjustable if an audio processor with the Treble functi...

Страница 22: ... and bit rate of the MP3 WMA file are displayed You cannot display title or text information for DVD or video CD Rotary encoder g f J TITLE About the indicator display When displaying Title Text the following indicators are lit according to the mode About Title and Text Title With this device it is possible to input the CD name page 22 This inputted name is referred to as a title You cannot input ...

Страница 23: ... to title your favourite CD s You cannot input titles for data discs containing MP3 WMAs DVD Video CD discs or radio stations 1 Press TITLE and select the Title Display For details see Displaying the Title Text page 21 2 Press and hold TITLE for at least 2 seconds The first character will blink 3 Turn the Rotary encoder to select the desired letter numeral symbol available for naming 4 Press Rotar...

Страница 24: ... is different from the main volume setting For example even at low volume settings the subwoofer is still audible Visual Customizing Changing Lighting Colour ILLUMI BLUE Initial setting GREEN AMBER RED You can change the lighting colour of the following four buttons SOURCE POWER BAND g and f BLUE GREEN AMBER RED BLUE According to the lighting colour of the above four buttons the colour of the othe...

Страница 25: ...ons some enhanced CDs playback may be difficult For these special cases you can select playback of CD data only When a disc contains both CD or the MP3 data playback starts from the CD data portion of the disc CDDA Only CD data can be played back CDDA MP3 Both CD data and MP3 file tracks can be played back Change discs after performing this setting Turning Mute Mode On Off MUTE ON Initial setting ...

Страница 26: ...dio track language SUBTITLE Set the language of the subtitles displayed on the screen MENU Set the language used for the menus title menu etc Setting contents AUTO 1 ENGLISH JAPANESE GERMAN SPANISH FRENCH ITALIAN PORTUGUESE RUSSIAN CHINESE OTHER 2 Press 8 9 or to select your desired language then press ENT 1 AUTO The disc is played with the audio language or subtitle language set as the priority l...

Страница 27: ... To change parental level and play press ENT The password input mode is displayed Input the 4 digit password you set in Setting the Rating Level Parental Lock then press ENT To play without changing the parental level press L When L is pressed playback will be at the parental level set with Setting the Rating Level Parental Lock Setting the TV Screen Use the procedure described below to set the ou...

Страница 28: ... Audio recording format DTS Dolby Digital Linear PCM MPEG2 MPEG1 Linear PCM DTS MPEG 1 Audio Layer3 Bit Rate 32kbps 320kbps Windows MediaTM Audio Bit Rate 32kbps 320kbps Digital output setting AUTO LPCM AUTO LPCM AUTO or LPCM AUTO or LPCM AUTO or LPCM AUTO or LPCM AUTO or LPCM AUTO or LPCM AUTO or LPCM AUTO or LPCM AUTO or LPCM AUTO LPCM AUTO or LPCM AUTO or LPCM AUTO or LPCM AUTO or LPCM AUTO or ...

Страница 29: ...SED AUDIO Only MP3 WMA data can be played back The initial setting at the factory is CD DA If a disc has already been inserted perform the setting after you remove the disc Setting the Video CD Play Mode When playing a Playback Control PBC enabled video CD you can choose to set PBC ON or OFF Setting item VCD PLAY MODE Setting contents PBC ON PBC OFF PBC ON The PBC menu is displayed PBC OFF The PBC...

Страница 30: ... Dolby Digital and DTS sound with greater accuracy Adjustmentpr ocedur e In case of combining the Automatic adjustments etc We recommend to make the Automatic adjustments before the Dolby Surround adjustments SpeakerSetup page34 Turning the speakers to be used on and off and setting their response Adjustingthespeakerlevels page35 Adjusting the signal output level to the various speakers Mixingbass...

Страница 31: ... MX COMPRESS MEDIA OFF CMPM 1 to 3 This corrects information that was omitted at the time of compression This reproduces a well balanced sound close to the original MX FM OFF FM MX 1 to 3 The medium to high frequencies become more clear and produces well balanced sound in all the bands MX DVD OFF MOVIE MX 1 to 2 The dialog portion of the video is reproduced more clearly DVD MUSIC This disk contain...

Страница 32: ...latethedif ferenceindistancebetweenthe far thestspeakerandtheotherspeakers L distance of farthest speaker distance of other speakers 3 Dividethedistancescalculatedforthedif ferent speakersbythespeedofsound 343m s temperature20 C This value is the time correction value for the various speakers Concrete examples Calculating the time correction value for the front left speaker on the diagram below Co...

Страница 33: ... the level of the graphic equalizer for that speaker cannot be adjusted Refer to Setting the Speakers page 30 Check the playable frequency ranges of the connected speakers before making the equalizer adjustments If the speaker s playable frequency range is 55 Hz to 30 kHz for example adjusting the 40 Hz or 20 Hz band has no effect Additionally you may overload and damage the speakers When graphic ...

Страница 34: ...rect for undesired peaks and dips at specific frequencies The parametric equalizer s centre frequency can be tuned to these specific frequencies Then the bandwidth Q and level are fine tuned independently to make the necessary corrections The parametric equalizer function is an advanced tool for serious audiophiles 1 CheckthatDefeatmodeisof f page19 2 Pressandhold CENTER f foratleast2seconds The a...

Страница 35: ...e of your speakers Check the playable frequency range of the speakers not including the subwoofer before performing this operation to verify whether the speakers can play low frequencies of about 80 Hz or less Avoid stopping pausing switching the disc cueing fast forwarding or switching the audio channel of this unit while making this adjustment The setting is cancelled if Decode mode is switched ...

Страница 36: ...mode is activated 3 Selectthe5 1CHSETUPmodebypr essing CENTER f repeatedly 4 SelectREARMIXbypr essing gor f 5 SelectREARMIXON OFFbytur ningandthen pressingthe Rotary encoder If ON is set the audio signal which is output from the rear speaker is mixed to the front audio signal 6 Adjustthelevel LEVEL bytur ningandthen pressingthe Rotary encoder The level can adjusted in five steps 6 3 0 3 and 6 The ...

Страница 37: ...ting the DVD Level The volume signal level for Dolby Digital Dolby PL II DTS and PCM modes can be set Avoid stopping pausing switching the disc cueing fast forwarding or switching the audio channel of this unit while making this adjustment The setting is cancelled if the Decode mode is switched 1 CheckthatDefeatmodeisof f page19 2 Pressandhold CENTER f foratleast2seconds The audio processor contro...

Страница 38: ...When the setting is complete it is recommended to store the setting contents For storing refer to page 37 Linear PCM Setting The output when playing discs recorded in linear PCM can be set to 2 or 3 channels 1 CheckthatDefeatmodeisof f page19 2 Pressandhold CENTER f foratleast2seconds The audio processor control mode is activated 3 SelectthePCMmodebypr essing CENTER f repeatedly 4 Select2CHor3CHby...

Страница 39: ...item Switches L R or L R Adjusts the selected setting item and changes the set contents Adjusts the selected setting item and changes the set contents Changes the setting item in the selected setting item Stores Recalls setting value CENTER f g f BAND Rotary encoder Turn Rotary encoder Turn Rotary encoder Press Preset buttons 1 to 6 Unit Button Remote Control Operation 1 2 4 5 6 7 8 3 ...

Страница 40: ...earch mode The search mode is automatically changed to the PLAYLIST search mode 4 seconds after PLAYLIST has been selected PLAYLIST ARTIST ALBUM PLAYLIST 2 1 Turn the Rotary encoder within 10 seconds and select a playlist 3 Press the Rotary encoder to play back a selected playlist To search for a song in the selected playlist 1 After selecting the playlist in step 2 1 press SEARCH Q S to change to...

Страница 41: ... the selected album 1 After selecting the album in step 2 3 press SEARCH Q S to change to the song search mode of the selected album 2 Turn the Rotary encoder within 10 seconds to select a song and press the Rotary encoder The selected song is played back Press and hold SEARCH Q S for at least 2 seconds in the search mode to cancel the search mode If you choose ALL in step 2 2 and you press the Ro...

Страница 42: ...bum Name Song Title IPOD Elapsed Time NO DATA is displayed if there is no tag information When the Scroll Setting page 23 is set to SCROLL MANU press and hold TITLE for at least 2 seconds to scroll the tag information only once Only alphanumeric characters ASCII can be displayed If the artist album or song name created in iTunes has too many characters songs may not be played back when connected t...

Страница 43: ...elect mode 7 to 12 This changes the D indicator to d Then press the desired select button The select buttons 1 to 6 will represent discs 7 to 12 respectively Playing MP3 Files with the CD Changer Optional If you connect a changer compatible with MP3 you can play CD ROMs CD Rs and CD RWs containing MP3 files on this unit 1 Press SOURCE POWER to switch to the MP3 Changer mode 2 Press any one of the ...

Страница 44: ...pause mode 7 J Button Switches between play and pause SEARCH Button MP3 WMA mode Pressing more than 2 seconds activates the Folder File Name Search mode 8 L Button Performs stop DVD Video CD Pressing once sets the PRE STOP Pressing twice sets stop 9 MENU Button DVD mode Shows the menu display CLR Button Removes numbers one character at a time that have been selected and input Press and hold for 2 ...

Страница 45: ...esponse observe the following Do not subject the remote control to excessive shock Do not put in a trouser pocket Keep away from food moisture and dirt Do not place in direct sunshine Battery Replacement Battery type CR2025 battery or equivalent 1 Opening the battery case Slide out the battery cover while firmly pressing in the direction of the arrow 2 Replacing the battery Put the battery in the ...

Страница 46: ...itch 1 6 µm Minimum pit length 0 9 µm 0 6 mm 0 6 mm Track pitch 0 74 µm CDs DVDs In addition DVDs offer a variety of functions Multiple audio page 17 Movies can be recorded in up to eight languages The desired language can be selected from the remote control Subtitles function page 18 Movies can include subtitles in up to 32 languages The desired subtitle language can be selected from the remote c...

Страница 47: ... other times certain scenes are skipped and other times certain scenes are replaced with other scenes Terminology Dolby Digital Dolby Digital is a digital audio compression technology developed by Dolby Laboratories that allows large quantities of audio data to be efficiently recorded on discs It is compatible with audio signals from mono 1 channel all the way up to 5 1 channel surround sound The ...

Страница 48: ...979 6983 6984 6985 7065 7073 7074 7079 7082 7089 7165 7168 7176 7178 7185 7265 7273 7282 7285 7289 7365 Abbreviation IE IK IN IS IT IW JA JI JW KA KK KL KM KN KO KS KU KY LA LN LO LT LV MG MI MK ML MN MO MR MS MT MY NA NE NL NO OC OM OR PA PL PS PT QU RM Code 7369 7375 7378 7383 7384 7387 7465 7473 7487 7565 7575 7576 7577 7578 7579 7583 7585 7589 7665 7678 7679 7684 7686 7771 7773 7775 7776 7778 ...

Страница 49: ... IS IT JM JO JP KE KG KH 6877 6879 6890 6967 6969 6971 6972 6982 6983 6984 7073 7074 7075 7077 7079 7082 7165 7166 7168 7169 7170 7172 7173 7176 7177 7178 7180 7181 7182 7183 7184 7185 7187 7189 7275 7277 7278 7282 7284 7285 7368 7369 7376 7378 7379 7381 7382 7383 7384 7477 7479 7480 7569 7571 7572 Dominica Dominican Republic Algeria Ecuador Estonia Egypt Western Sahara Eritrea Spain Ethiopia Finl...

Страница 50: ... 8371 8372 8373 8374 8375 8376 8377 8378 8379 8382 8384 8386 8389 8390 8467 8468 8470 8471 8472 8474 8475 8477 8478 8479 8480 8482 8484 8486 8487 8490 8565 8571 8577 8583 8589 8590 8665 8667 8669 8671 8673 8678 8685 8770 8783 8969 8984 8985 9065 9077 9087 PE PF PG PH PK PL PM PN PR PT PW PY QA RE RO RU RW SA SB SC SD SE SG SH SI SJ SK SL SM SN SO SR ST SV SY SZ TC TD TF TG TH TJ TK TM TN TO TP TR ...

Страница 51: ...n the DVD player Eject the disc and remove it The disc is being improperly inserted Re insert the disc following the instructions in the loading and unloading discs section Unable to fast forward or reverse the disc The disc has been damaged Eject the disc and discard it using a damaged disc in your unit can cause damage to the mechanism Disc playback sound skips due to vibration Improper mounting...

Страница 52: ... c press the RESET switch refer to page 7 and press c again If the disc still cannot be ejected consult your Alpine dealer PROTECT A copy protected WMA file was played back You can only play back non copy protected files UNSUPPORT The disc is not written in a MP3 WMA supported format Use a disc written at the MP3 WMA supported format Indication for DVD Video CD Player ERROR Audio display Monitor d...

Страница 53: ...sc is left inside the CD Changer Press the eject button to activate the eject function When the CD Changer finishes the eject function insert an empty CD magazine into the CD Changer to receive the disc left inside the CD Changer LOADING ERROR EJECT ERROR NO MAGZN No magazine is loaded into the CD Changer Insert a magazine NO DISC No indicated disc Choose another disc Indication for iPod Mode The ...

Страница 54: ...Video output level 1Vp p 75 ohms Video S N ratio DVD 70 dB Audio S N ratio 115 dB PICKUP Wave length DVD 665 nm CD 785 nm Laser power CLASS II REMOTE CONTROL Battery Type CR2025 battery Width 51 mm 2 Height 119 mm 4 11 16 Depth 13 mm 33 64 Weight 50 g 1 75 oz battery excluded CAUTION Bottom side of player CLASS 1 LASER PRODUCT GENERAL Power Requirement 14 4 V DC 11 16 V allowable Maximum Power Out...

Страница 55: ...pecified accessory parts Use of other than designated parts may damage this unit internally or may not securely install the unit in place This may cause parts to become loose resulting in hazards or product failure ARRANGE THE WIRING SO IT IS NOT CRIMPED OR PINCHED BY A SHARP METAL EDGE Route the cables and wiring away from moving parts like the seat rails or sharp or pointed edges This will preve...

Страница 56: ...alling location Dashboard Rubber Cap Included Bracket Mounting sleeve Included Hex Bolt Included this unit Metal Mounting Strap Screw Bolt Stud Hex Nut M5 this unit 3 Slide the DVA 9860R into the dashboard When the unit is in place make sure the locking pins are fully seated in the down position This can be done by pressing firmly in on the unit while pushing the locking pin down with a small scre...

Страница 57: ...ox 2 Mount the External Junction Box in a flat location where it will not interfere with driving operations floor carpet etc Make sure to apply the supplied velcro fastener to the bottom side of the External Junction Box to secure stability An unstable box may cause accidental damage to other equipment such as cables etc If the External Junction Box is installed in the foot area route the cable in...

Страница 58: ...ifier Amplifier Amplifier To the instrument cluster illumination lead Battery Rear Left Front Left Rear Right Front Right Front Left Rear Right Rear Left Speakers Speakers Front Right Pink Black AUDIO INTERRUPT IN Blue White REMOTE TURN ON Green Green Black White White Black Grey Black Grey Violet Black Violet Antenna ISO Antenna Plug Yellow BATTERY Blue POWER ANT Black GND Red IGNITION Orange DIM...

Страница 59: ...r Speaker Output Lead Violet Remote Control Input Lead White Brown Connect the external Alpine product to the remote control output lead Monitor Control Lead White Pink Connect this to the Monitor Control Lead of the touch panel compatible monitor Video Output Connector This connector is used in combination with the video inputs of another video product Touch panel compatible monitor etc External ...

Страница 60: ...s connected it is necessary to set the mode of this unit Refer to Setting the Digital Output page 24 and set to ON Then refer to Setting the Digital Audio Processor page 24 and switch the setting When connecting with PXA H510 Connect the fiber digital input terminal to the DVD DVA 9860R and DVA 5205P cannot be connected simultaneously when fiber digital is in use Please observe the following when ...

Страница 61: ...más versatilidad y más ventajas CHA S634 es un cambiador de seis discos de alto rendimiento con nuevo M DAC CD R RW PLAY BACK MP3 PLAY BACK y CD TEXT El modelo CHA 1214 Ai NET alberga 12 discos y el modelo CHM S630 M Bus es un cambiador de seis discos de tamaño reducido con un CD R RW PLAY BACK I caricatori CD Alpine danno di più Più scelta più versatilità più comodità Il modello CHA S634 è un car...

Страница 62: ...ndige Firmeninhaber freiberuflich Tätige 2 Leitende Angestellte 3 Sonstige Angestellte 4 Beamte 5 Schulbildung 6 Studium 7 Sonstige Q15 Kommentar Carte d informations sur le produit Français En remplissant volontairement cette fiche et en l envoyant à Alpine vous acceptez que ces informations soient utilisées par Alpine dans le cadre de développement de nouveaux produits Par ailleurs vous autorise...

Страница 63: ...o Q7 Modalità acquisto 1 Acquisto 2 Leasing Q8 Scopo acquisto 1 Aggiunta 2 Sostituzione Marca sostituita 1 Installato di fabbrica 2 Alpine 3 Altro Nome marca Q9 Avevate già acquistato prodotti Alpine 1 No 2 Due o tre volte Q10 Nell acquistarlo avete paragonato questo prodotto ad un altra marca 1 Si Nome marca 2 No Q11 SESSO 1 Maschile 2 Femminile Q12 ETÀ Q13 STATO CIVILE 1 Celibe nubile 2 Coniugat...

Страница 64: ......

Отзывы: