background image

21

-EN

iPod classic (160 GB) (Late 2009): Ver.2.0.4
iPod touch (2nd generation): Ver.4.2.1
iPod nano (4th generation): Ver.1.0.4
iPod classic (120 GB): Ver.2.0.1
iPod touch (1st generation): Ver.3.1.3
iPod nano (3rd generation): Ver.1.1.3
iPod classic (80 GB, 160 GB): Ver.1.1.2

• Confirmed devices regarding Made for iPhone. Correct function of 

earlier versions cannot be guaranteed.
iPhone 4S: Ver.5.1.1
iPhone 4: Ver.5.1.1
iPhone 3GS: Ver.5.1.1
iPhone 3G: Ver.4.2.1
iPhone: Ver.3.1.3

• For clarity in identifying your model of iPod, please see Apple’s own 

document “Identifying iPod models” at 
http://support.apple.com/kb/HT1353

• This unit does not support video playback from iPod/iPhone, even 

using a video-compatible cable.

Setting the iPod Control

When an iPod/iPhone is connected, operate it from its own controls or 
from the head unit.

1

Press and hold 



ENTER

OPTION

 for at least 2 seconds 

in the iPod mode.

The Option menu for iPod mode is activated.

2

Turn the 

Rotary encoder

 to select APP DIRECT, and then 

press 



ENTER

.

The iPod control mode will switch between iPod MODE and HU 
MODE.

HU MODE (HEAD UNIT):

Operate the iPod/iPhone via this unit.

iPod MODE:

Operate the iPod/iPhone using its own controls. When iPod is 
selected, some functions will not be operable via the head unit.

Notes

• During HU MODE, you can switch to iPod MODE directly by pressing 

BAND

.

• The  “

P

” indicator lights up when the iPod mode is activated.

• Once the control mode is changed, the iPod/iPhone is paused. Press 

 to continue.

• Depending upon the iPod used, iPod control may not be selectable. Or, 

if iPod is selected, operation must still be from the head unit.

Playback

1

Press 

SOURCE



 to switch to the iPod mode.

2

Press 

 or 

 to select the desired song.

Pressing and holding 

 or 

 will fast backward/fast 

forward the current track.

3

To pause playback, press 

.

Pressing 

 again will resume playback.

Notes

• A song playing on the iPod/iPhone while it is connected to this unit will 

continue to play from where it was paused after disconnection.

• If you listen to an episode from a selected Podcast or Audiobook, the 

episode can be changed by pressing 

1

 or 

2

.

• An episode may have several chapters. The chapter can be changed by 

pressing 

 or 

.

• During iPod/iPhone playback, press 

r

, and then you can quickly 

return to the hierarchy level selected last time in the search mode.

Searching for a desired Song

An iPod/iPhone can contain thousands of songs. Use one of the search 
modes listed below, that you deem most effective in finding a desired 
song.
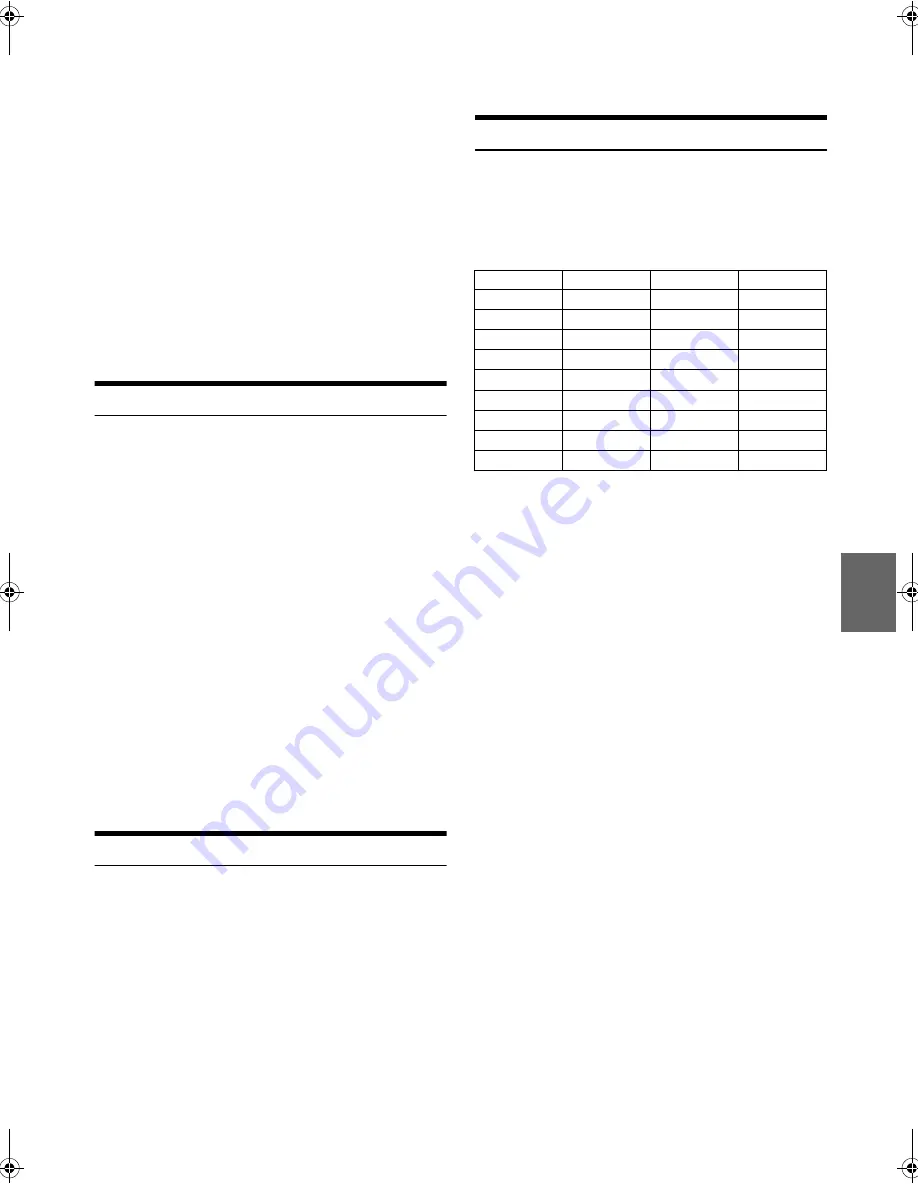
Each music category has its own individual hierarchy. Use the Playlist/
Artist/Album/Song/Podcast/Genre/Composer/Audiobook/Genius Mix 
search mode to narrow searches based on the table below.

Note

• You can select your preferred search mode. Refer to “iPod/iPhone 

Search Mode Setting” on page 19.

For example:

Searching by Artist name
The following example explains how an ARTIST search is performed. 
Another search mode can be used for the same operation, although the 
hierarchy differs.

1

Press 



ENTER

 to activate the search selection mode.

The “

” indicator lights up.

2

Turn the 

Rotary encoder

 to select the ARTIST search 

mode, and then press 



ENTER

.

SHUFFLE ALL

*1


 PLAYLIST 

 ARTIST 

 ALBUM 

 SONG 


PODCAST 

 GENRE 

 COMPOSER 

 AUDIOBOOK 


GENIUS MIX

*2/*3


 SHUFFLE ALL

*1

Refer to “Random Play Shuffle (M.I.X.)” on page 23.

*2

Depending on the connected iPod/iPhone, Genius Mix function 
may not be supported.

*3

When an iPod/iPhone with Genius Mix list created by iTunes is 
connected to this unit, GENIUS MIX search mode can be used 
to play back the songs of the list.

Note

• The display of search mode list varies depending on the setting of iPod 

LIST. For details, refer to “iPod/iPhone Search Mode Setting” on 
page 19.

3

Turn the 

Rotary encoder

 to select the desired Artist, and 

then press 



ENTER

.

4

Turn the 

Rotary encoder

 to select the desired Album, and 

then press 



ENTER

.

5

Turn the 

Rotary encoder

 to select the desired Song, and 

then press 



ENTER

.

Hierarchy 1

Hierarchy 2

Hierarchy 3

Hierarchy 4

Playlist

Song

Artist

*

Album

*

Song

Album

*

Song

Song

Podcast

Episode

Genre

*

Artist

*

Album

*

Song

Composer

*

Album

*

Song

Audiobook

Genius Mix list

00ALPINE.book  Page 21  Friday, October 12, 2012  3:21 PM

Содержание CDE-140E

Страница 1: ...alia Phone 03 8787 1200 ALPINE ELECTRONICS GmbH Wilhelm Wagenfeld Str 1 3 80807 München Germany Phone 089 32 42 640 ALPINE ELECTRONICS OF U K LTD Alpine House Fletchamstead Highway Coventry CV4 9TW U K Phone 0870 33 33 763 ALPINE ELECTRONICS FRANCE S A R L RCS PONTOISE B 338 101 280 98 Rue de la Belle Etoile Z I Paris Nord Il B P 50016 95945 Roissy Charles de Gaulle Cedex France Phone 01 48638989 ...

Страница 2: ... the Bass Control 13 Setting the Mid Control 14 Setting the Treble Control 14 Setting the Source Volume Level 14 Adjusting the High Pass Filter 14 Turning Subwoofer ON OFF 14 Adjusting the Low Pass Filter 14 Setting the Subwoofer Phase 14 Setting the Subwoofer System 15 External Device 15 Connecting to an External Amplifier POWER IC 15 Other Functions Displaying the Text 15 About the indication di...

Страница 3: ...ist Artist Album Genre Composer 22 Random Play Shuffle M I X 23 Repeat Play 23 Information In Case of Difficulty 23 Basic 23 Radio 23 CD 23 MP3 WMA 24 Audio 24 iPod CDE 142E CDE 141E CDE 141ETH only 24 Indication for CD Player 24 Indication for USB Memory 24 Indication for iPod Mode CDE 142E CDE 141E CDE 141ETH only 25 Specifications 26 Installation and Connections WARNING 27 CAUTION 27 PRECAUTION...

Страница 4: ...n personal injury or damage to the product CAUTION This symbol means important instructions Failure to heed them can result in injury or material property damage HALT USE IMMEDIATELY IF A PROBLEM APPEARS Failure to do so may cause personal injury or damage to the product Return it to your authorized Alpine dealer or the nearest Alpine Service Centre for repairing PRECAUTIONS Product Cleaning Use a...

Страница 5: ...g sound quality However most of them will influence the thickness and or diameter of the disc Using such accessories can cause the disc to be out of standard specifications and may create operational problems We recommend not using these accessories on discs played in Alpine CD players On handling Compact Discs CD CD R CD RW Do not touch the surface Do not expose the disc to direct sunlight Do not...

Страница 6: ...ted copyright protection cannot be played back USB Memory may take time to start playback If there is a particular file other than audio in the USB Memory it may take considerable time before the file is played back or searched The unit can play back mp3 or wma file extensions Do not add the above extensions to a file other than audio data This non audio data will not be recognised The resulting p...

Страница 7: ...mal usage especially the connector terminals on the back of the front panel This is not a malfunction To protect the front panel place it in the supplied carrying case When detaching the front panel do not apply excessive force as it may result in malfunction 1 Insert the right side of the front panel into the main unit Align the groove on the front panel with the projections on the main unit 2 Pu...

Страница 8: ...d with the new station Presetting Stations Automatically 1 Press BAND repeatedly until the desired radio band is displayed 2 Press and hold TUNE A ME for at least 2 seconds The frequency on the display continues to change while the automatic memory is in progress The tuner will automatically seek and store 6 strong stations in the selected band They will be stored into preset buttons 1 to 6 in ord...

Страница 9: ...2 off a 1 Only a track file is repeatedly played back 2 Only files in a folder are repeatedly played back MP3 WMA mode only 2 To cancel repeat play select off with the above procedure M I X Random Play 1 Press 5x The songs are played back in random sequence s 1 ALL s 2 3 off s 1 Only files in a folder are played back in random sequence MP3 WMA mode only 2 The tracks files are played back in random...

Страница 10: ...MPEG which is a joint activity institution of the IEC MP3 files contain compressed audio data MP3 encoding is capable of compressing audio data at extremely high ratios reducing the size of music files to as much as one tenth their original size This is achieved while still maintaining near CD quality The MP3 format realises such high compression ratios by eliminating the sounds that are either in...

Страница 11: ...ting music CDs WAVE AIFF files and other sound files into the specified audio compression format Tag Song information such as track titles artist names album names etc written into MP3 WMA files Root folder The root folder or root directory is found at the top of the file system The root folder contains all folders and files It is created automatically for all burned discs Adjusting Subwoofer Leve...

Страница 12: ...special low and high frequency emphasis at low listening levels This compensates for the ear s decreased sensitivity to bass and treble sound Setting item LOUDNESS Setting contents LOUD OFF Initial setting LOUD ON You can modify the Equalizer settings to create a response curve more appealing to your personal taste The setting of Bass Mid and Treble can be adjusted in this mode Setting item 3BAND ...

Страница 13: ...he treble level The adjustment can also be made by pressing AUDIO Refer to Adjusting Subwoofer Level Bass Level Middle Level Treble Level Balance Between Left and Right Fader Between Front and Rear Loudness Defeat on page 12 The output level of each source is individually adjustable For example if the TUNER level sounds lower than CD its output can be adjusted without affecting the other sources S...

Страница 14: ...mpatible disc It is also possible to display the folder name the file name and the tag etc while playing MP3 WMA files Press VIEW The display will change every time the button is pressed Note When the TEXTSCROLL is set to SCR MANUAL press and hold VIEW for at least 2 seconds the current text will be scrolled one time except Radio mode The display in Radio mode FREQUENCY The display in CD mode TRAC...

Страница 15: ...or at least 2 seconds to activate FAV setup mode 2 Turn the Rotary encoder to select a favourite source and then press ENTER The favourite source is set USB FM1 FM2 AM AUX DISC FAV OFF Notes You can also set the favourite source in SETUP mode refer to Setting your favourite source to the FAV button FAV SETUP on page 18 If you do not want to use this function select FAV OFF If no operation is perfo...

Страница 16: ...n this mode For details refer to Setting the AUX SETUP mode on page 18 Setting You can flexibly customize the unit to suit your own preferences and usage From the SETUP menu GENERAL Setting DISPLAY Setting etc can be modified 1 Press and hold AUDIO SETUP for at least 2 seconds to activate the SETUP mode 2 Turn the Rotary encoder to select the desired item and then press ENTER e g Select GENERAL AU...

Страница 17: ...ing contents AUXILIARY Initial setting TV DVD PORTABLE GAME Note PORTABLE is abbreviated as PMD in the display Playing MP3 WMA Data PLAY MODE This unit can play back CDs containing both CD and MP3 WMA data created in Enhanced CD CD Extra format However in some situations playback of an enhanced CD may be difficult In this case you can choose to play back the CD data session only When a disc contai...

Страница 18: ...arched and played back 1 Press SOURCE to switch to the USB AUDIO mode 2 To pause playback press Pressing again will resume the playback Notes The root folder is displayed as ROOT in the Folder Name Search mode This unit plays back files in the USB Memory with the same controls and modes as playback of CDs containing MP3 WMA For details refer to CD MP3 WMA on page 10 Before disconnecting USB Memory...

Страница 19: ...rmats Connecting an iPod iPhone An iPod iPhone can be connected to this unit by using the Interface cable for iPod included with iPod When an iPod iPhone is connected to this unit you can choose to control the iPod iPhone using its own controls or by the head unit controls For details refer to Setting the iPod Control on page 21 These instructions refer to controlling the iPod iPhone from this Hea...

Страница 20: ...where it was paused after disconnection If you listen to an episode from a selected Podcast or Audiobook the episode can be changed by pressing 1 or 2 An episode may have several chapters The chapter can be changed by pressing or During iPod iPhone playback press r and then you can quickly return to the hierarchy level selected last time in the search mode Searching for a desired Song An iPod iPho...

Страница 21: ... using this function you can quickly target any song 1 After selecting the search mode press BAND ABC SEARCH The letter selection list is displayed 2 Turn the Rotary encoder to select a desired letter e g M and then press ENTER The titles beginning with M are listed 3 Turn the Rotary encoder to select the desired title Notes While in Alphabet search mode pressing r will return to the previous mode...

Страница 22: ...ing normally please review the items in the following checklist This guide will help you isolate the problem if the unit is at fault Otherwise make sure the rest of your system is properly connected or consult your authorized Alpine dealer No function or display Vehicle s ignition is off If connected following instructions the unit will not operate with the vehicle s ignition off Improper power le...

Страница 23: ...e iPod No CD is inserted Insert a CD Although a disc is inserted NO DISC is displayed and the unit does not start to play or eject the disc Remove the disc by following these steps Press the button again for at least 2 seconds If the disc still does not eject consult your Alpine dealer Mechanism error 1 Press the button and eject the CD If not ejecting consult your Alpine dealer 2 When the error i...

Страница 24: ...n error Turn the ignition key off and then set to ON again Reset the iPod Check the display by reconnecting between the iPod iPhone and this unit using the iPod iPhone cable Caused by the iPod iPhone Software Version not being compatible with this unit Update the iPod iPhone Software Version to be compatible with this unit The iPod iPhone is not verified Reset the iPod Try another iPod iPhone if a...

Страница 25: ...00 Hz 1 dB Wow Flutter WRMS Below measurable limits Total Harmonic Distortion 0 008 at 1 kHz Dynamic Range 95 dB at 1 kHz Signal to Noise Ratio 105 dB Channel Separation 85 dB at 1 kHz Wave length 795 nm Laser power CLASS I USB requirements USB 1 1 2 0 Max Power Consumption 1 000 mA USB Class Mass Storage File System FAT 12 16 32 MP3 Decoding MPEG AUDIO Layer 3 WMA Decoding Windows Media Audio Pow...

Страница 26: ...cal skill and experience To ensure safety always contact the dealer where you purchased this product to have the work done USE SPECIFIED ACCESSORY PARTS AND INSTALL THEM SECURELY Be sure to use only the specified accessory parts Use of other than designated parts may damage this unit internally or may not securely install the unit in place This may cause parts to become loose resulting in hazards ...

Страница 27: ...Note For the screw marked 2 use an appropriate screw for the chosen mounting location 3 Slide the CDE 142E CDE 141E CDE 141ETH CDE 140E CDE 140ETH into the dashboard until it clicks This ensures that the unit is properly locked and will not accidentally come out from the dashboard Install the detachable front panel 1 Remove the detachable front panel 2 Insert the bracket keys into the unit along t...

Страница 28: ...D REMOTE TURN ON POWER ANT BATTERY IGNITION ILLUMINATION SPEAKER RIGHT FRONT SPEAKER RIGHT REAR SPEAKER LEFT REAR SPEAKER LEFT FRONT To amplifier Amplifier Front To power antenna Not used Ignition Key Blue White Red Black Blue Amplifier Battery Speakers Rear Left Front Left Front Right Rear Right Speakers Rear or Subwoofers Green Green Black White White Black Grey Black Grey Violet Black Violet Or...

Страница 29: ...Output Lead Violet Left Rear Speaker Output Lead Green Left Rear Speaker Output Lead Green Black Left Front Speaker Output Lead White Black Left Front Speaker Output Lead White Antenna Receptacle Front Output RCA Connectors RED is right and WHITE is left Rear Subwoofer Output RCA Connectors RED is right and WHITE is left Fuse Holder 10A Power Supply Connector RCA Extension Cable sold separately Fr...

Отзывы: