background image

6

-EN

disc has been inserted correctly, push the 

RESET

 button with a 

pointed object such as a ballpoint pen.
Playing a disc while driving on a very bumpy road may result in 
skips, but this will not scratch the disc or damage the player.

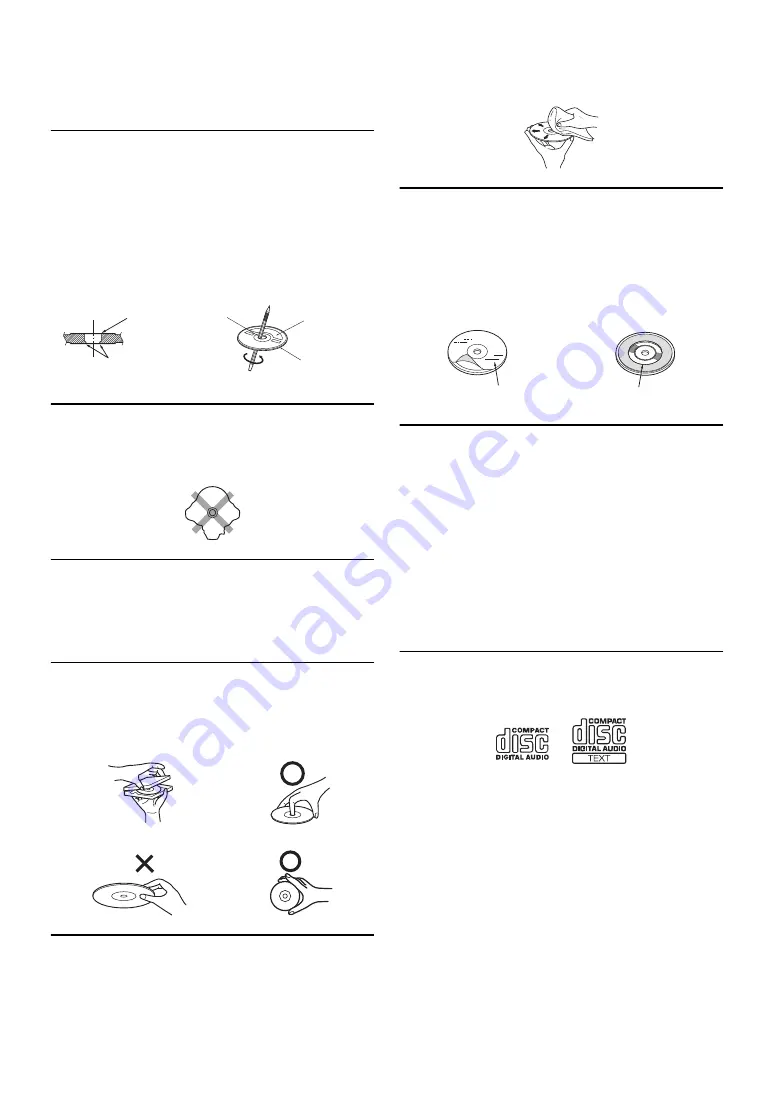
New Discs

To prevent the CD from jamming, “ERROR” is displayed if discs 
with irregular surfaces are inserted or if discs are inserted 
incorrectly. When a new disc is ejected immediately after initial 
loading, use your finger to feel around the inside of the center hole 
and outside edge of the disc. If you feel any small bumps or 
irregularities, this could inhibit proper loading of the disc. To 
remove the bumps, rub the inside edge of the hole and outside edge 
of the disc with a ballpoint pen or other such instrument, then 
insert the disc again.

Irregular Shaped Discs

Be sure to use round shape discs only for this unit and never use any 
special shape discs.
Use of special shape discs may cause damage to the mechanism.

Installation Location

Make sure this unit will not be installed in a location subjected to:
• Direct  sun  and  heat
• High humidity and water
• Excessive dust
• Excessive  vibrations

Correct Handling

Do not drop the disc while handling. Hold the disc so you will not 
leave fingerprints on the surface. Do not affix tape, paper, or 
gummed labels to the disc. Do not write on the disc.

Disc Cleaning

Fingerprints, dust, or soil on the surface of the disc could cause the 
CD player to skip. For routine cleaning, wipe the playing surface 
with a clean, soft cloth from the center of the disc to the outer edge. 

If the surface is heavily soiled, dampen a clean, soft cloth in a 
solution of mild neutral detergent before cleaning the disc.

Disc Accessories

There are various accessories available on the market for protecting 
the disc surface and improving sound quality. However, most of 
them will influence the thickness and/or diameter of the disc. Using 
such accessories can cause the disc to be out of standard 
specifications and may create operational problems. We 
recommend not using these accessories on discs played in Alpine 
CD players.

On handling Compact Discs (CD/CD-R/CD-RW)

• Do not touch the surface.
• Do not expose the disc to direct sunlight.
• Do not affix stickers or labels.
• Clean the disc when it is dusty.
• Make sure that there are no bumps around the disc.
• Do not use commercially available disc accessories.

Do not leave the disc in the car or the unit for a long time. Never 
expose the disc to direct sunlight.

 Heat and humidity may damage 

the CD and you may not be able to play it again.

To customers using CD-R/CD-RW

• If a CD-R/CD-RW cannot be played back, make sure the last 

recording session was closed (finalized).

• Finalize the CD-R/CD-RW if necessary, and attempt playback again.

About media that can be played

Use only compact discs with the label side showing the CD logo 
marks below.

If you use unspecified compact discs, correct performance cannot 
be guaranteed.
You can play CD-Rs (CD-Recordables)/CD-RWs 
(CD-ReWritables) which have been recorded only on audio devices.
You can also play CD-Rs/CD-RWs containing MP3 formatted 
audio files.
• Some of the following CDs may not play on this unit:

Flawed CDs, CDs with fingerprints, CDs exposed to extreme 
temperatures or sunlight (e.g. left in the car or this unit), CDs 
recorded under unstable conditions, CDs on which a recording failed 
or a re-recording was attempted, copy-protected CDs which do not 
conform to the audio CD industry standard.

• Use discs with MP3 files written in a format compatible with this 

unit. For details, refer to “About MP3” on page 12.

• ROM data other than audio files contained in a disc will not produce 

sound when played back.

Center Hole

Center Hole

New Disc

Outside 
(Bumps) 

Bumps

CORRECT

INCORRECT

CORRECT

Transparent Sheet

Disc Stabilizer

Содержание CDE-1338T

Страница 1: ...f product and software updates if applicable special promotions news about Alpine and entered for a chance to win prizes Merci d avoir acheté ce produit Alpine Nous vous invitons à consacrer un moment à la protection de votre achat en enregistrant votre produit dès maintenant à l adresse suivante www alpine usa com registration Vous serez tenu informé des mises à jour des produits et des logiciels...

Страница 2: ...lam Victoria 3803 Australia Phone 03 8787 1200 ALPINE ELECTRONICS GmbH Wilhelm Wagenfeld Str 1 3 80807 München Germany Phone 089 32 42 640 ALPINE ELECTRONICS OF U K LTD Alpine House Fletchamstead Highway Coventry CV4 9TW U K Phone 0870 33 33 763 ALPINE ITALIA S p A Viale C Colombo 8 20090 Trezzano Sul Naviglio MI Italy Phone 02 484781 ALPINE ELECTRONICS DE ESPAÑA S A Portal de Gamarra 36 Pabellón ...

Страница 3: ...Treble Control 14 Setting the Source Volume Level 15 Adjusting the High Pass Filter 15 Turning Subwoofer ON OFF 15 Adjusting the Low Pass Filter 15 Setting the Subwoofer Phase 15 Setting the Subwoofer System 15 External Device 15 Connecting to an External Amplifier POWER IC 15 Other Functions Displaying the Text 16 About the indication display 16 About Text 16 Using the Front AUX Input Terminal 16...

Страница 4: ...g function 24 Preset a number in the Phone Book Shortcut dial 24 Dialing the preset number 25 Adjusting the volume when receiving a Call 25 Muting the microphone input quickly Voice Mute 25 Call Switching Operation 25 BLUETOOTH Audio Operation 25 Recalling the BLUETOOTH Audio Mode 25 Selecting the desired Song 25 Pausing 25 Flash Memory optional Playing MP3 Files from Flash Memory optional 26 Flas...

Страница 5: ...ther injury DO NOT PLACE HANDS FINGERS OR FOREIGN OBJECTS IN INSERTION SLOTS OR GAPS Doing so may result in personal injury or damage to the product CAUTION This symbol means important instructions Failure to heed them can result in injury or material property damage HALT USE IMMEDIATELY IF A PROBLEM APPEARS Failure to do so may cause personal injury or damage to the product Return it to your auth...

Страница 6: ... and improving sound quality However most of them will influence the thickness and or diameter of the disc Using such accessories can cause the disc to be out of standard specifications and may create operational problems We recommend not using these accessories on discs played in Alpine CD players On handling Compact Discs CD CD R CD RW Do not touch the surface Do not expose the disc to direct su...

Страница 7: ...e Flash Memory type memory state or encoding software the unit may not play back or display properly A file that is copy protected copyright protection cannot be played back Flash Memory may take time to start playback If there is a particular file other than audio in the Flash Memory it may take considerable time before the file is played back or searched The unit can play back mp3 file extension...

Страница 8: ...tes The front panel may become hot in normal usage especially the connector terminals on the back of the front panel This is not a malfunction To protect the front panel place it in the supplied carrying case When detaching the front panel do not apply excessive force as it may result in malfunction 1 Insert the right side of the front panel into the main unit Align the groove on the front panel w...

Страница 9: ...radio band is displayed F1 FM1 F2 FM2 AM F1 FM1 3 Press TUNE A ME to select the tuning mode DX SEEK Distance mode SEEK Local mode off Manual mode DX SEEK Note The initial mode is Distance mode Distance mode Both strong and weak stations will be automatically tuned in Automatic Seek Tuning Local mode Only strong stations will be automatically tuned in Automatic Seek Tuning Manual mode The frequency...

Страница 10: ...ENTER to receive the selected frequency Note Press in the search mode to cancel Or the search mode will be canceled if no operation is performed for 10 seconds Playback 1 Insert a disc with the label side facing up The disc will be pulled into the unit automatically Note When a disc is already inserted press SOURCE to switch to the DISC mode 2 While playing back MP3 press 1 or 2 to select the desi...

Страница 11: ... Name Search concerning MP3 Folder and file names may be searched and displayed during playback 1 During MP3 playback press ENTER to activate the search mode The indicator lights up 2 Turn the Rotary encoder to select Folder Name Search mode and then press ENTER 3 Turn the Rotary encoder to select the desired folder 4 Press and hold ENTER for at least 2 seconds to play back the first file in the s...

Страница 12: ...ed if a disc exceeds the limitations described above Media supported The media that this device can play back are CD ROMs CD Rs and CD RWs Corresponding File Systems This device supports discs formatted with ISO9660 Level 1 or Level 2 Under the ISO9660 standard there are some restrictions to remember The maximum nested folder depth is 8 including the root directory The number of characters for a f...

Страница 13: ...t to ON 2 The FACTORY EQ s setting value and 3BAND EQ s setting value are linkage 3 The FACTORY EQ s setting value and 3BAND EQ s setting value are linkage In step 3 three sound adjustment items Bass Mid and Treble can be selected in 3BAND EQ mode turn the Rotary encoder to select the desired item and then press ENTER to continue to step 4 4 These functions are inoperable when Subwoofer is set to ...

Страница 14: ...tem and then press ENTER WIDTH Q CENTER FRQ LEVEL 2 Turn the Rotary encoder to select the desired setting value and then press ENTER 3 Press to return to the previous step Setting the Mid Bandwidth WIDTH Q Turn the Rotary encoder to select the desired Mid bandwidth WIDE 0 75 MEDIUM 1 00 MEDIUM 1 25 NARROW 1 50 Setting the Mid Center Frequency CENTER FRQ Turn the Rotary encoder to select the desire...

Страница 15: ... Hz All frequencies lower than the selected cutoff are output The subwoofer output phase is toggled SUBWOOFER NORMAL 0 or SUBWOOFER REVERSE 180 To adjust the level turn the Rotary encoder Setting item SUBW PHASE Setting contents NORMAL Initial setting REVERSE When the subwoofer is on you can select either SYS 1 or SYS 2 for the desired subwoofer effect Setting item SUBW SYS Setting contents SUBW S...

Страница 16: ... If there is no Text Disc Name or Track Name DISC TEXT TRACK TEXT is displayed Text compatible CDs contain text information such as the disc name and track name Such text information is referred to as text Notes Some characters may not be displayed correctly with this device depending on the character type NO SUPPORT is displayed if text information is not supported by the unit The text or tag inf...

Страница 17: ...trol on page 27 4 The setting items are the same as iPod setting in SETUP mode For details refer to iPod iPhone Setting on page 19 5 AUX NAME can be selected in this mode For details refer to Setting the AUX SETUP Mode on page 18 6 FW VERSION can be selected in this mode You can see the current firmware version about BLUETOOTH by using this setting 7 CALL SOUND SENDER ID PB UPDATE PB ORDER AUTO AN...

Страница 18: ...g AUX OFF When set to OFF AUX source cannot be selected AUX ON Set to ON when a portable device is connected If SOURCE is pressed and AUX is selected the sound of the portable device is input to the unit You can change the AUX NAME display when AUX SETUP is set to ON Press ENTER when AUX SETUP is set to ON and select AUX NAME by turning the Rotary encoder then press ENTER After that turn the Rotar...

Страница 19: ...stances This enables a hands free call or data transmission between BLUETOOTH compatible devices BLUETOOTH transmission is available in the unlicensed 2 4 GHz spectrum if the distance between devices is within 10 meters For details refer to the BLUETOOTH Home page http www bluetooth com Notes Depending on the BLUETOOTH version a BLUETOOTH compatible device may not be able to communicate with this ...

Страница 20: ...ted Note The BLUETOOTH setup mode can also be activated by pressing and holding w for at least 2 seconds 3 Turn the Rotary encoder to select the desired items and then press ENTER BLUETOOTH BT IN 1 PAIRED DEV VISIBLE M 1 SEARCH DEV 1 CALL SOUND 2 SENDER ID 2 PB UPDATE 2 PB ORDER 2 AUTO ANS 2 SEV NAME 2 SPEAKER SL 2 FW VERSION FW UPDATE 1 1 The items are not displayed during a phone call 2 The item...

Страница 21: ...vice CONNECTED is displayed and then the unit returns to normal mode Depending on the mobile phone it may be necessary to input a passcode In this case CODE 0000 is displayed Input the passcode 0000 in the BLUETOOTH compatible device to make the pairing After the pairing is completed the unit will automatically connect to the BLUETOOTH compatible device If you input the wrong passcode or the commu...

Страница 22: ...hen a call is received it is answered automatically after about 5 seconds Note If the received call setting on the mobile phone is on the call will be answered automatically even though this setting is set to OFF The service provider name of the connected BLUETOOTH compatible device will be displayed If a BLUETOOTH compatible device is not connected ID UNSENT will be displayed Setting item SEV NAM...

Страница 23: ...lso directly after connection the list may not be brought up to date 4 Turn the Rotary encoder to select a name or a telephone number from the list Note You can use Phone book alphabet search function to search a name or number from Phone Book For details refer to Phone book alphabet search function on page 24 5 Press ENTER The selected telephone will be called If one name has several numbers regi...

Страница 24: ...otary encoder to select the third letter e g C and then press ENTER The names stored in phone book which begin with MIC are searched 5 Turn the Rotary encoder to select the desired name e g Michael James and then press ENTER to make the call Notes If the selected name has several numbers registered in phone book you need to turn the Rotary encoder to select the desired number and then press ENTER ...

Страница 25: ...one and the speakers in the car While calling press BAND to switch the call sound between the unit and mobile phone Notes Depending on the mobile phone this operation may not be performed The operation can also be performed in the option menu of phone mode calling mode Refer to Option Menu Setting on page 17 BLUETOOTH Audio Operation Audio information of a BLUETOOTH compatible mobile phone a porta...

Страница 26: ... mode and then remove the Flash Memory Device If Flash Memory is removed in the Flash Memory mode data may be damaged When removing Flash Memory pull it out straight If sound is not output or Flash Memory is not recognized even when connected remove the Flash Memory Device once and then connect it again Route the USB cable away from other cables etc After removing the Flash Memory close the cover ...

Страница 27: ...earlier versions cannot be guaranteed iPhone 4 Ver 4 3 iPhone 3GS Ver 4 3 iPhone 3G Ver 4 2 1 iPhone Ver 3 1 3 For clarity in identifying your model of iPod please see Apple s own document Identifying iPod models at http support apple com kb HT1353 This unit does not support video playback from iPod iPhone even using a video compatible cable Setting the iPod Control When an iPod iPhone is connecte...

Страница 28: ...desired Playlist search mode and ENTER is pressed you can search for all songs in the iPod iPhone Also if you press and hold ENTER for at least 2 seconds all songs in the iPod iPhone are played back Depending on the iPod iPhone podcast search is not supported If any one of the preset buttons 1 through 6 is pressed in the search mode a search can be made quickly by skipping to the specified locatio...

Страница 29: ... played just once until all songs have been played 1 Press 5 s The songs are played back in random sequence s 1 s 2 off s 1 Shuffle Albums 2 Shuffle Songs 2 To cancel M I X play select off with the above procedure Note If a song is selected in the album search mode before selecting M I X play the songs will not play back randomly even when Shuffle Albums is selected Shuffle ALL Shuffle ALL plays a...

Страница 30: ...our CD insertion not possible A CD is already in the CD player Eject the CD and remove it The CD is being improperly inserted Make sure the CD is being inserted following instructions in the CD Player Operation section Unable to fast forward or backward the CD The CD has been damaged Eject the CD and discard it using a damaged CD in your unit can cause damage to the mechanism CD playback sound ski...

Страница 31: ...ble by the unit has been input Use a Flash Memory device with input text information that is supported by the unit Communication error Turn the ignition key off and then set to ON again Check the display by reconnecting between the Flash Memory and this unit Power surge error Excessive voltage current is supplied to the Flash Memory Try another Flash Memory if available The iPod iPhone is not conn...

Страница 32: ...Total Harmonic Distortion 0 008 at 1 kHz Dynamic Range 95 dB at 1 kHz Signal to Noise Ratio 105 dB Channel Separation 85 dB at 1 kHz Wave length 795 nm Laser power CLASS I USB requirements USB 1 1 2 0 Max Power Consumption 1 000 mA USB Class Mass Storage File System FAT 12 16 32 MP3 Decoding MPEG AUDIO Layer 3 Number of Channels 2 Channel Stereo Frequency Response 5 20 000 Hz 1 dB Total Harmonic D...

Страница 33: ... dealer where you purchased this product to have the work done USE SPECIFIEDACCESSORY PARTS AND INSTALL THEM SECURELY Be sure to use only the specified accessory parts Use of other than designated parts may damage this unit internally or may not securely install the unit in place This may cause parts to become loose resulting in hazards or product failure ARRANGE THE WIRING SO IT IS NOT CRIMPED OR...

Страница 34: ...rd until it clicks This ensures that the unit is properly locked and will not accidentally come out from the dashboard Install the detachable front panel 1 Remove the detachable front panel 2 Insert the bracket keys into the unit along the guides on either side The unit can now be removed from the mounting sleeve 3 Pull the unit out keeping it unlocked as you do so JAPANESE CAR Note Secure the gro...

Страница 35: ... ON AUDIO INTERRUPT IN IGNITION POWER ANT Amplifier Microphone Blue To power antenna Blue White To amplifier Pink Black Not used Orange To the instrument cluster illumination lead Red Ignition Key Yellow Black Battery Gray Speakers SPEAKER RIGHT FRONT Front Right Gray Black Violet Black SPEAKER RIGHT REAR Rear Right Violet Green SPEAKER LEFT REAR Rear Left Green Black White Black SPEAKER LEFT FRON...

Страница 36: ...eaker Output Lead Violet Left Rear Speaker Output Lead Green Left Rear Speaker Output Lead Green Black Left Front Speaker Output Lead White Black Left Front Speaker Output Lead White Fuse Holder 10A Power Supply Connector Steering Remote Control Interface Connector To steering remote control interface box You can operate this unit from the vehicle s control unit when an Alpine Steering Remote Cont...

Страница 37: ...shipped to an Authorized Alpine Service Center or Alpine Alpine will pay the return shipping charges You should provide a detailed description of the problem s for which service is required You must supply proof of your purchase of the product You must package the product securely to avoid damage during shipment To prevent lost packages it is recommended to use a carrier that provides a tracking s...

Страница 38: ...ty to operate the equipment México Este equipo opera a titulo secundario consecuentemente debe aceptar interferencias perjudiciales incluyendo equipos de la misma clase y puede no causar interferencias a sistemas operando a titulo primario Don t forget to take a moment to protect your purchase by registering your product now at the following address www alpine usa com registration N oubliez pas de...

Отзывы: