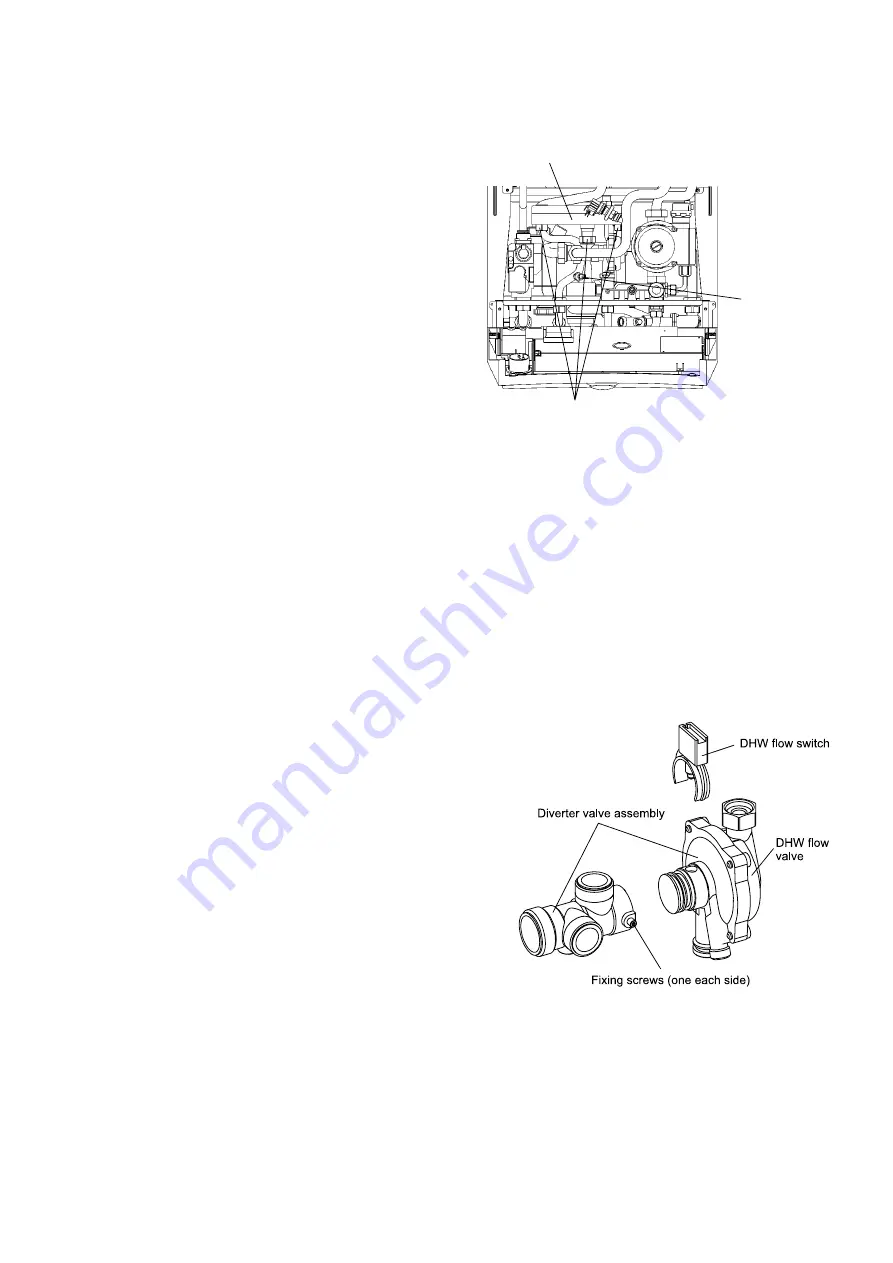
Alpha Alpha CD24 Скачать руководство пользователя страница 31

31

Fig. 35

Alpha CD24/32 - Component Replacement

Fig. 34 - CD24C/CD32C only

8.25 DHW HEAT EXCHANGER (CD24C and CD32C only) - Refer to Fig. 34

1.

Gain access behind the casing and drain the boiler heating
and hot water circuits as described in sections 8.1 and 8.2.

2.

Disconnect the three union nuts to the heat exchanger and
remove heat exchanger by lifting it upwards from the rear
right hand side 'O' ring seal connection.
Note: Be careful not to allow water to drip onto any
electrical components.

3.

Using the new washers supplied, re-assemble in reverse
order.

4.

Refill and pressurise the system. (Refer to Commissioning,
section 5.1).

8.26 MAINS WATER INLET FILTER (CD24C and
CD32C only) - Fig. 13

1.

Drain the boiler hot water circuit as described in section
8.2.

2.

Withdraw the filter after disconnecting the unions between
the inlet valve and boiler (item H in Fig. 13).

3.

Clean or replace and re-assemble in reverse order.

8.27 DIVERTER VALVE ASSEMBLY (CD24C and CD32C only)  - Figs. 31 and 35

1.

Gain access behind the casing and drain the boiler heating and hot water circuits as described in sections 8.1 and 8.2.

2.

Remove the domestic hot water heat exchanger and flow switch assemblies from the diverter valve as described in
sections 8.23 and 8.15.

3.

Disconnect the union connections from the diverter valve.

4.

Release the screws shown in Fig. 31 and raise the valve slightly to disengage it from the manifold, then lift it out of the
boiler.

5.

Re-assemble in reverse order using the new seals supplied.

6.

Refill and pressurise the system. (Refer to Commissioning, section 5.1).

8.28 DHW FLOW VALVE (CD24C and CD32C only) - Fig. 35

1.

Remove the diverter valve as described in section 8.27.

2.

Unscrew (not necessary to remove) the two screws securing the
DHW flow valve to the diverter valve and withdraw the valve.

3.

When re-assembling, push the new valve into position, holding
it in, while tightening the fixing screws.

4.

Re-assemble in reverse order.

8.29 EXPANSION VESSEL - Fig. 12

Note: If there is less than 450 mm clearance above the boiler or a
rear exit flue is used, it is not possible to replace the vessel, in which
case an additional vessel should be fitted external to the boiler in
the central heating return pipe, as close to the boiler as possible
(see Fig. 5).

1.

Gain access behind the casing and drain the boiler heating
circuit as described in sections 8.1 and 8.2.

2.

Disconnect the pipe from the pump inlet manifold and
expansion vessel.

3.

Remove the four screws securing the top support plate.

4.

Lift the expansion vessel out of the boiler.

5.

When replacing the vessel, ensure that the connection is towards the front of the boiler and re-assemble in reverse order
using new seals as necessary.

6.

Refill and pressurise the system. (Refer to Commissioning, section 5.1).

DHW heat exchanger

DHW sensor

Union nuts

Содержание Alpha CD24

Страница 1: ...cy Condensing Boilers Goldsel Road Swanley Kent BR8 8EX Fax 01322 615017 For Technical help or for Service call ALPHA HELPLINE Tel 01322 669443 Alpha CD24C G C No 47 532 19 Alpha CD24S G C No 41 532 0...

Страница 2: ...rise of 35 C IMPORTANT It is the law that all gas appliances are installed by a competent person ie CORGI registered personnel in accordance with the following recommendations Current Gas Safety Inst...

Страница 3: ...ng Sealed System Max Working System Pressure Min System Pressure Max System temperature Pressure Relief Valve Setting Expansion Vessel Size pre charge press Flow Connection Return Connection Relief Va...

Страница 4: ...flue length 12 m Maximum vertical flue length including terminal is 15 m Each additional CD 90 Bend is equivalent to 1 3 m of flue length Each CD 45 Bend is equivalent to 0 9 m of flue length The CD...

Страница 5: ...led chamber 10 Fan 11 Pressure differential test points Fig 2A 12 Flue hood 13 Overheat thermostat 14 Expansion vessel 15 Automatic air vent 16 Pump 17 Drain point 18 Pressure relief valve 19 Primary...

Страница 6: ...8 Pressure relief valve 19 Primary pressure switch 20 Ignition electrodes 21 Flame sensing electrode 22 DHW temperature sensor 23 Flue sampling point Alpha CD24 32 Technical Data 24 Gas service cock 2...

Страница 7: ...Note A cupboard or compartment used to enclose the boiler must be designed and constructed specifically for the purpose i e comply with the Building Regulations 3 4 FLUE SYSTEM Fig 3 The flue system m...

Страница 8: ...FLUE OPTIONS Lmax 12 metres L B C E 230 mm Alpha CD24 32 General Boiler Information L B C 230 mm C B E C B E B F B C L B E F 230 mm 90 bend 1 3 metre L B C 230 mm 2 x 45 bends 1 8 metre Fig 3 VERTICAL...

Страница 9: ...tted less than 2 m above a surface to which people have access the terminal must be protected by a terminal guard A suitable guard is available from you local boiler merchant 3 6 BOILER LOCATION The b...

Страница 10: ...or solid matter etc from the system Alpha CD24 32 General Boiler Information Feed cistern to be located above highest point in the system Mains water supply Stop valve Test cock Double check valve as...

Страница 11: ...eaks 2 Installing onto an existing system clean the system before fitting the new boiler a If the old boiler is still working i Switch on the boiler and allow the system to heat up to the normal opera...

Страница 12: ...oss All taps and mixing valves used with the hot water system must be suitable for operating at a mains pressure of up to 8 bar Showers A shower may be used with the boiler if required If a loose or f...

Страница 13: ...Figs 11 12 1 Decide upon the position of the boiler taking into account the clearances required for servicing and the flue terminal position 2 Tape the template to the wall ensure it is level and the...

Страница 14: ...dering to the boiler union bends ensure the bends are not connected to the valves otherwise the internal seals may be damaged 3 Connect the system pipework to the boiler Note Do not forget that the pr...

Страница 15: ...t 22 mm D Cold water mains inlet 15 mm E Heating return 22 mm F Pressure relief valve 15 mm G Heating drain point H Cold water inlet filter I Condensate discharge pipe J Cyclone drain point Note Disco...

Страница 16: ...aling the outside wall and that it is not restricting any of the openings of the flue terminal 5 Position the seal and clamp two screws supplied over the bend Fit the bend to the boiler and rotate to...

Страница 17: ...nger than the outer duct 5 Adjust the telescopic section of the Easy Flue to the required length and secure the Easy Flue with the sealing tape supplied Fit the Easy Flue to the extensions by locating...

Страница 18: ...as required Note If flue sealing collars are being used to make good the inside wall then they will need to be fitted before assembling the flue 4 8 CONNECT THE MAINS SUPPLY Fig 20 1 Gain access to th...

Страница 19: ...7 Carry out electrical system checks Short circuit Polarity Earth continuity and Resistance to earth with a suitable multimeter 4 9 FIT THE CLOCK KIT CD24C and CD32C only Fig 21 Ensure the electrical...

Страница 20: ...pe from the system check that this is actually happening 7 Continue to fill the system until the pressure gauge indicates 1 0 bar Close the fill point valve and check the system for water soundness re...

Страница 21: ...tart the fan will start and the main gas valve solenoid will open allowing the main burner to light 5 5 CHECK THE BURNER PRESSURES Fig 24 Turn the boiler off Loosen the burner pressure test point scre...

Страница 22: ...on to the fact that the system has been drained 5 Complete the details of the installation on the back page of this manual and the Benchmark log book 5 8 USER INFORMATION The User must be advised and...

Страница 23: ...the boiler from operating 6 2 DOMESTIC HOT WATER MODE CD24C and CD32C only When a demand for hot water by opening a hot tap etc is sensed by the flow switch the pump starts and the burner lights incr...

Страница 24: ...fittings are sound Remake any joints and check the tightness of any fittings that may be leaking 5 It is recommended that the operation of the safety valve is checked by turning the head anti clockwis...

Страница 25: ...remove the burner Clean the burner with a soft brush and check that the flame ports are clear Blockages may be removed with a stiffer brush Tap the burner open end down to remove any deposits from in...

Страница 26: ...cure with five screws do not overtighten 8 2 DRAINING THE BOILER Refer to Figs 2A 2B or 13 Isolate the electricity supply and close the boiler gas service cock see Fig 13 Allow the boiler to cool 1 He...

Страница 27: ...section 8 1 2 Disconnect the wiring from the overheat thermostat 3 Unscrew and remove the overheat thermostat from the heat exchanger 4 Fit the new overheat thermostat taking care not to cross thread...

Страница 28: ...nections 5 Light the boiler and adjust the PCB as described in the instructions supplied with the replacement PCB Alpha CD24 32 Component Replacement Fig 30 Fig 31 CD24C and CD32C only 8 15 DHW FLOW S...

Страница 29: ...surise the system Refer to Commissioning section 5 1 8 18 COMBUSTION CHAMBER INSULATION Gain access to the combustion chamber as described in section 8 1 Front insulation see Fig 27 1 Remove the elect...

Страница 30: ...cket head screws securing the pump head to the body Withdraw the head remove the wiring cover and disconnect the wiring 2 Connect the wiring to the new head as follows Brown to L Blue to N Green yello...

Страница 31: ...Release the screws shown in Fig 31 and raise the valve slightly to disengage it from the manifold then lift it out of the boiler 5 Re assemble in reverse order using the new seals supplied 6 Refill a...

Страница 32: ...Refer to Commissioning section 5 1 8 31 CONDENSATE TRAP Fig 12 1 Gain access behind the casing and drain the trap as described in sections 8 1 and 7 3 paragraph 10 2 Disconnect the top and drain conn...

Страница 33: ...e Sensor G G Fuse F2A Link Supply 230 240V 50Hz Fused at 3A 2 2 1 1 N L X6 X9 S3 S1 S2 X10 X8 L N X16 X7 X1 Main PCB CH SET DHW SET FUSE 315 mAT CH CAP MAX CAP X11 X12 X4 H1 Green LED H4 Yellow LED H3...

Страница 34: ...se F2A Link Supply 230 240V 50Hz Fused at 3A 2 2 1 1 N L X6 X9 S3 S1 S2 X10 X8 L N X16 X7 X1 Main PCB CH SET DHW SET FUSE 315 mAT CH CAP MAX CAP X11 X12 X4 H1 Green LED H4 Yellow LED H3 Red LED H2 Red...

Страница 35: ...34 33 3 55 2 24 49 26 51 25 50 22 47 23 48 27 21 46 Clock Optional 1 2 3 4 Pump Fan Gas Valve Primary Temperature Sensor DHW Switch Primary Pressure Switch NO COM Overheat Thermostat Spark Generator F...

Страница 36: ...45 38 13 43 39 14 34 33 3 55 2 24 49 26 51 25 50 22 47 23 48 27 21 46 1 2 3 4 Pump Fan Gas Valve Primary Temperature Sensor Primary Pressure Switch NO COM Overheat Thermostat Spark Generator Flue Lim...

Страница 37: ...age 37 A YES YES BUT Pump runs and fan runs Go to section page 38 I YES Go to section page 37 D Burner output modulates until set temperature is reached Burner goes out NO YES Operation sequence succe...

Страница 38: ...ter 50 seconds YES Operation sequence successful Pump stops YES Go to section page 37 D YES CH system pressure too low Re pressurise to 1 0 bar Flue or faulty fan Primary DHW temperature sensor fault...

Страница 39: ...k pressure tubes are connected Replace PCB C DHW Primary temp sensor faulty Cold resistance approx 12 14 k ohms resistance reduces with increase in temp i e when hot resistance is approximately 3 k oh...

Страница 40: ...locked heat exchanger pipework or pump not circulating water NO YES 240V at internal clock terminals 1 and 2 I 240V at PCB X1 connector terminals 55 and N 240V at PCB X1 connector terminals 34 and N W...

Страница 41: ...No E94 407 E96 565 E94 409 E96 566 E94 408 E96 567 E57 739 E96 568 E94 410 E57 666 E94 411 E96 569 E76 320 E65 154 E96 570 E57 751 E94 412 E94 413 E94 414 E94 415 E76 317 E76 378 E96 571 E94 416 E57 7...

Страница 42: ...ate of Installation Name of Installer Address Postcode Telephone No Boiler Serial Number see data label on inside of left hand case panel DETAILS OF BOILER SERVICE HISTORY Date of Service Details of S...

Страница 43: ...43...

Страница 44: ...d Swanley Kent BR8 8EX Tel 01322 669443 Fax 01322 615017 email info alphatherm co uk website www alpha boilers com Part No 1 019479 These instructions have been carefully prepared but we reserve the r...

Отзывы: