background image


iv


ASENNUS


SÄHKÖ —AUTOMAATTINEN JÄNNITTEENSÄÄTÖ
Tämä tuote säätää automaattisesti mihin tahansa jännitteeseen ohjetarrassa annettujen arvojen välillä.

SÄHKÖ —TYYPPILUOKAN 1 LAITTEET
TÄMÄ LAITE TÄYTYY MAADOITTAA. Pistoke täytyy liittää kunnollisesti maadoitettuun pistorasiaan. Virheellisesti johdotettu 
pistorasia voi altistaa metalliosat vaarallisille jännitteille.

SÄHKÖ —JOHTOON LIITTYVÄ HUOMAUTUS 
Käytä seuraavanlaista virtajohtoa: maksimipituus 4,5 metriä, minimiteho 6 ampeeria, 250 V, valmistettu HAR-johdostosta, muovattu IEC 
320 -liitin toisessa päässä ja käyttömaassa hyväksytty pistoke toisessa päässä.


ASENNUSSOHJEET


HUOMAUTUS: Nämä mallit on suunniteltu käytettäviksi VAAKA-asennossa. PYSTYASENNUSTA EI SAA TEHDÄ ilman Allied 
Telesyn -pystykiinnitysalustaa, joka on suunniteltu tähän tarkoitukseen.


HUOMAUTUS


: Ilmavaihtoreikiä ei pidä tukkia ja niillä täytyy olla vapaa yhteys ympäröivään huoneilmaan, jotta ilmanvaihto tapahtuisi.


HUOMAUTUS


: ÄLÄ irroita kumijalkoja tuotteesta, ellei Allied Telesyn-pystykiinnitysalusta ole käytössä.


KÄYTTÖLÄMPÖTILA


Tämä tuote on suunniteltu ympäröivän ilman maksimilämpötilalle 50


°


 C.


KAIKKI MAAT:


 Asenna tuote paikallisten ja kansallisten sähköturvallisuusmääräysten mukaisesti.


ENERGIA IRRADIATA


Questo prodotto commerciale è stato collaudato e risponde ai requisiti U.S.A. per i dispositivi di classe A.


NORME DI SICUREZZA


AVVERTENZE ELETTRICHE
ATTENZIONE: PERICOLO DI SCOSSE ELETTRICHE
Per evitare SCOSSE ELETTRICHE non asportare il coperchio. Le componenti interne non sono riparabili dall’utente. Questa unità ha 
TENSIONI PERICOLOSE e va aperta solamente da un tecnico specializzato e qualificato. Per evitare ogni possibilità di SCOSSE 
ELETTRICHE, interrompere l’alimentazione del dispositivo prima di collegare o staccare i cavi LAN. 

PERICOLO DI FULMINI
PERICOLO: NON LAVORARE sul dispositivo o sui CAVI durante PRECIPITAZIONI TEMPORALESCHE. 

ATTENZIONE: IL CAVO DI ALIMENTAZIONE È USATO COME DISPOSITIVO DI DISATTIVAZIONE.
PER TOGLIERE LA CORRENTE AL DISPOSITIVO staccare il cavo di alimentazione.


INSTALLAZIONE


ELETTRICITÀ—REGOLAZIONE AUTOMATICA DELLA TENSIONE 
Questo prodotto regolerà automaticamente la tensione ad un valore compreso nella gamma indicata sull’etichetta.


ELETTRICITÀ—DISPOSITIVI DI CLASSE 1


QUESTO DISPOSITIVO DEVE AVERE LA MESSA A TERRA. La spina deve essere inserita in una presa di corrente specificamente 
dotata di messa a terra. Una presa non cablata in maniera corretta rischia di scaricare una tensione pericolosa su parti metalliche accessibili.

ELETTRICITÀ—AVVERTENZA SUL CAVO
Usare un cavo della lunghezza massima di metri 4,5, con capacità minima di 6 A, 250 V, di filo HAR, dotato di connettore stampato IEC 320 
ad un’estremità e di spina approvata dal paese di destinazione all’altra.


ISTRUZIONI PER IL MONTAGGIO


ATTENZIONE: questi modelli sono concepiti per il funzionamento in posizione ORIZZONTALE. NON È POSSIBILE EFFETTUARE IL 
MONTAGGIO VERTICALE senza utilizzare l’apposito telaio per il montaggio verticale Allied Telesyn.

ATTENZIONE: le prese d’aria non vanno ostruite e devono consentire il libero ricircolo dell’aria ambiente per il raffreddamento.

ATTENZIONE: NON staccare il piedino in gomma dal prodotto tranne qualora si utilizzi il telaio Allied Telesyn per il montaggio verticale.


TEMPERATURA DI FUNZIONAMENTO


Questo prodotto è concepito per una temperatura ambientale massima di 50 gradi centigradi.


TUTTI I PAESI:


 installare il prodotto in conformità alle vigenti normative elettriche nazionali.


UTSTRÅLT ENERGI


Dette kommersielle produktet har blitt testet og er i samsvar med amerikanske krav for et A-Klasse apparat.


SIKKERHET


ELEKTRISKE MEDDELELSE
ADVARSEL:  FARE FOR ELEKTRISK SJOKK
For å unngå ELEKTRISK sjokk, må dekslet ikke tas av.  Det finnes ingen deler som du kan bruke på innsiden.  Denne enheten inneholder 
FARLIGE SPENNING, og må kun åpnes av en opplært, kvalifisert tekniker.  For å unngå muligheten av ELEKTRISK SJOKK, må den 
elektriske strømmen til produktet være av når du slår LAN-ledninger av og på.

FARE FOR LYNANTENNELSE
FARE:  MÅ IKKE BRUKES på utstyr eller ledninger mens LYN-AKTIVITET er i gang.

FORSIKTIG:  STRØMLEDNINGEN BRUKES TIL Å SLÅ APPARATET AV.
HVIS DU VIL DEAKTIVISERE UTSTYRET, må du fjerne strømledningen. 

Huomautus

!

Attenzione

Pericolo

!

Attenzione

!

Advarsel

Fare

!

Содержание CentreCOM AT-3012T

Страница 1: ...Allied Telesyn CentreCOM AT 3012T Multiport Repeater User Manual ...

Страница 2: ...uding but not limited to lost profits arising out of or related to this manual or the information contained herein even if Allied Telesyn International Corp has been advised of known or should have known the possibility of such damages Trademarks CentreCOM is a registered trademark of Allied Telesyn International Corp Ethernet is a registered trademark of Xerox Corporation UNIX is a registered tra...

Страница 3: ...wer cord INSTALLATION ELECTRICAL AUTO VOLTAGE ADJUSTMENT This product will automatically adjust to any voltage between the ranges shown on the label ELECTRICAL TYPE CLASS 1 EQUIPMENT THIS EQUIPMENT MUST BE EARTHED Power plug must be connected to a properly wired earth ground socket outlet An improperly wired socket outlet could place hazardous voltages on accessible metal parts ELECTRICAL CORD NOT...

Страница 4: ...alleret jordforbunden stikkontakt En ukorrekt installeret stikkontakt kan sætte livsfarlig spænding til tilgængelige metaldele ELEKTRISK LEDNING Anvend ledning af maksimum 4 5 meters længde med en kapacitet på minimum 6 amp 250 v bestående af en IEC 320 connector med indstøbt HAR ledning i den ene ende og et stik i den anden ende godkendt der er af myndighederne i brugerlandet INSTRUKTIONER FOR OP...

Страница 5: ...CUIT POUR COUPER L ALIMENTATION DE L APPAREIL débranchez le cordon INSTALLATION ELECTRICITE REGLAGE DE TENSION AUTOMATIQUE Ce produit peut s ajuster automatiquement sur n importe quelle tension comprise dans la plage indiquée sur le label ELECTRICITE EQUIPEMENT DE CLASSE 1 CET APPAREIL DOIT ETRE MIS A LA TERRE La prise de courant doit être branchée dans une prise femelle correctement mise à la ter...

Страница 6: ...ne INSTALLAZIONE ELETTRICITÀ REGOLAZIONE AUTOMATICA DELLA TENSIONE Questo prodotto regolerà automaticamente la tensione ad un valore compreso nella gamma indicata sull etichetta ELETTRICITÀ DISPOSITIVI DI CLASSE 1 QUESTO DISPOSITIVO DEVE AVERE LA MESSA A TERRA La spina deve essere inserita in una presa di corrente specificamente dotata di messa a terra Una presa non cablata in maniera corretta ris...

Страница 7: ... DISPOSITIVO DE DESCONEXÃO PARA DESELETRIFICAR O EQUIPAMENTO desconecte o cabo de alimentação INSTALAÇÃO ELÉTRICO AJUSTE AUTOMÁTICO DE VOLTAGEM Este produto ajustar se á automaticamente a qualquer voltagem que esteja dentro dos limites indicados no rótulo ELÉTRICO EQUIPAMENTOS DO TIPO CLASSE 1 DEVE SER FEITA LIGAÇÃO DE FIO TERRA PARA ESTE EQUIPAMENTO O plugue deve ser conectado a uma tomada com li...

Страница 8: ...LKÄNNAGIVANDEN BETRÄFFANDE ELEKTRICITETSRISK RISK FÖR ELEKTRISK STÖT För att undvika ELEKTRISK stöt ta ej av locket Det finns inga delar inuti som behöver underhållas Denna apparat är under HÖGSPÄNNING och får endast öppnas av en utbildad kvalificerad tekniker För att undvika ELEKTRISK STÖT koppla ifrån produktens strömanslutning innan LAN kablarna ansluts eller kopplas ur FARA FÖR BLIXTNEDSLAG FA...

Страница 9: ... T 12 Port Repeater 1 Features 2 10BASE T UTP Cabling 3 Hub to MAU Wiring 3 Hub to Hub 3 Quick Installation Checklist 4 Setup 4 Testing 4 Chapter 2 Installation 5 Ventilation 5 Power 5 Setup 5 Connections 6 Chapter 3 Operations 7 Indicators 7 Front Panel Per Port 7 Front Panel Central 7 Back Panel 8 Segmentation Switches 8 System Check 8 ...

Страница 10: ...ing 9 Collision 9 Chapter 5 Configurations 11 Appendix A IEEE 802 3 Quick Primer 13 AUI Drop Cables 13 10BASE T 13 Thin 10BASE2 Ethernet 14 Thick 10BASE5 Ethernet 14 Propagation 14 Four Repeater Rule 14 Appendix B Glossary 15 ...

Страница 11: ...t regeneration which results in a higher performance network Packet regeneration includes regenerating preamble retiming of the data packets and extending collision fragments to ensure collision enforcement by all nodes These repeaters support IEEE compliant features along with additional functions which further ensure fault protection and proper network operation The IEEE 802 3 defined link integ...

Страница 12: ...rmits a maximum of four repeaters to be cascaded allowing over a thousand individual segments to be configured into a single network Features IEEE 802 3 compliant 10BASE T repeater Ethernet Version 1 0 and 2 0 compatible Supports all standard Ethernet media including fiber optic via AUI port One AUI and 12 RJ45 ports Standalone or department concentrator applications Automatic manual partitioning ...

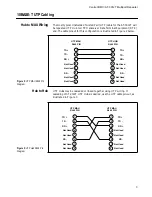
Страница 13: ...ded or linked together using UTP wiring If cascading of AT 3012T UTP Hubs is desired use the UTP cable pin out as illustrated in Figure 3 Figure 2 UTP MAU RJ45 Pin Diagram 1 2 3 4 5 6 7 8 1 2 3 4 5 6 7 8 TD TD RD Not Used TD TD RD Not Used Not Used Not Used Not Used Not Used Not Used Not Used RD RD UTP MAU RJ45 PIN UTP HUB RJ45 PIN Figure 3 UTP Hub RJ45 Pin Diagram 1 2 3 4 5 6 7 8 1 2 3 4 5 6 7 8 ...

Страница 14: ...ceiver 5 Attach a 10BASE T UTP cable with RJ45 connectors attached to 10BASE T port 1 If the AUI port is not used connect a second 10BASE T cable to port 2 6 Select the segmentation switch to the left default position for the connected ports Testing 1 Check the Link LED on the back panel for each 10BASE T port that is connected ON indicates a valid Link 2 Establish a network connection from the co...

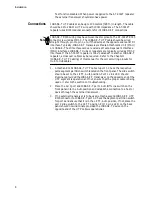
Страница 15: ...t the back panel Make absolutely sure that the voltage and frequency applied are of the correct values for your AT 3012T There is no external power switch for the AT 3012T UTP Hub Power is applied as soon as the power cord is connected Setup 1 Carefully remove the AT 3012T from its packaging materials Retain the packing materials until satisfactory installation has been achieved 2 Place the AT 301...

Страница 16: ...d Refer to the Chapter 1 10BASE T UTP Cabling of this manual for the correct wiring pinouts for Hub to Hub cables 1 Attach an RJ45 10BASE T UTP cable to port 1 Check the respective ports segment partition switch located on the front panel The slide switch should be set to the LEFT Auto position Port 1 Link LED should illuminate provided the 10BASE T transceiver on the opposite end of the UTP segme...

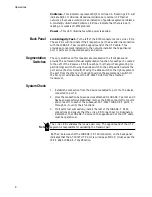
Страница 17: ...ual partitioning switch This switch enables you to manually partition a port For normal operation this switch needs to be in the Auto position Receive This LED flashes when incoming packets are present on the respective segment Front Panel Central Activity This LED indicates that the repeater is functional and is transmitting packets to all ports Figure 4 AT 3012T Front Panel Indicator ACTIVITY CO...

Страница 18: ...rtitioning switch Moving the slide switch to the Left position selects the port active Factory Default Moving the slide switch to the right segments the port from the others In the Right position the segmentation switch for the AUI port will disconnect the AT 3012T Hub from the attached transceiver System Check 1 Establish a connection from the device connected to port 1 to the device connected to...

Страница 19: ...le Level 3 or above designed for use in 10BASE T applications 10BASE T wiring lengths should not exceed 100 meters 328 ft The wiring should be routed away from devices known to emit electromagnetic interference such as fluorescent lights power transformers and relay equipment Collision If the Collision LED is flashing excessively make certain that the SQE Heartbeat Test function is disabled on the...

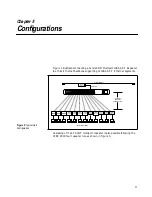
Страница 20: ... Typical Hub Configuration Ethernet Transceiver Coaxial Ethernet AUI Cable 100 Meters UTP Cable wired Pin to Pin 10BASE T Transceiver Workstations DTEs 10BASE T Transceiver 10BASE T Transceiver 10BASE T Transceiver AUI PORT 1 10 BASE T PORTS LINK TEST PORTS POWER 4 3 2 5 8 7 6 9 12 11 10 X X X X X X X X X X X X 1 3 5 9 7 11 2 4 6 10 8 12 10BASE T Transceiver 10BASE T Transceiver 10BASE T Transceiv...

Страница 21: ...7 11 2 4 6 10 8 12 AUI PORT 1 10 BASE T PORTS LINK TEST PORTS POWER 4 3 2 5 8 7 6 9 12 11 10 X X X X X X X X X X X X 1 3 5 9 7 11 2 4 6 10 8 12 AUI PORT 1 10 BASE T PORTS LINK TEST PORTS POWER 4 3 2 5 8 7 6 9 12 11 10 X X X X X X X X X X X X 1 3 5 9 7 11 2 4 6 10 8 12 UTP Link Segment UTP Link Segment Figure 7 Hubs on a Backbone 12 UTP Segments 12 UTP Segments 12 UTP Segments AUI PORT 1 10 BASE T ...

Страница 22: ...net wiring costs UTP wiring is installed in most buildings for telephone systems Care must be taken to ensure the UTP wiring used for 10BASE T is able to carry the high Ethernet data rates before a 10BASE T network solution is implemented Unlike coaxial Ethernet 10BASE2 and 10BASE5 10BASE T UTP is point to point wiring Typically one end is connected to an Ethernet 10BASE T Network Interface Contro...

Страница 23: ... of a thick coax segment is 2165 ns Propagation delay of thick Ethernet coax is calculated at 4 33 ns meter Both ends of the segment must be terminated with a 50 Ω termination with a power rating of 0 5 watts or greater Earth grounding of the segment shield must take place only at one point on the cable Propagation Propagation delay is the time it takes a signal to travel from the input of a syste...

Страница 24: ...nnection This concentration of UTP ports is later broken out for connection to a punch down block inside a building s wiring closet 50 pin Telco connections provide a very clean uncluttered interface to the building s wiring ATTACHMENT UNIT INTERFACE AUI This is the cable connection from a MAU transceiver to a DTE typically a workstation consisting of a 15 conductor twisted pair cable of 50 meters...

Страница 25: ...yer to indicate that multiple stations are contending for access to the transmission medium COMPATIBILITY INTERFACE The MDI coaxial cable interface and the AUI branch cable interface the two points at which hardware compatibility is defined to allow connection of independently designed and manufactured components to the baseband transmission system CROSS OVER Wiring is used when connecting a 10BAS...

Страница 26: ...or 10 Megabit data rates In these circumstances it is recommended that the wiring is tested with a 10BASE T signal wire tester IMPEDANCE An electrical characteristic of a circuit dealing with the combination of the AC and DC resistance and the appearance of that resistance to attached circuits JABBER LOCK UP The MAU s ability to automatically inhibit the transmit data from reaching the medium if t...

Страница 27: ...des a convenient way for the installer or network manager to connect the hub 10BASE T ports into the desired building locations PHYSICAL MEDIUM ATTACHMENT PMA The portion of the MAU that contains the functional circuitry PHYSICAL SIGNALING PLS That portion of the physical layer contained within the DTE that provides the logical and functional coupling between MAU and data link layers POLARITY CORR...

Страница 28: ...This connector is a 10BASE T standard for connecting UTP cabling They are inexpensive and easy to install onto UTP cable SIGNAL QUALITY ERROR SQE Also referred to as Collision or Collision Presence This occurs when two devices attempt to transmit at the same time which is an illegal condition SQE TEST Commonly referred to as Heartbeat is a special 802 3 signal sent by the MAU to the DTE to test th...

Отзывы: