


A
A
A
p
p
p
p
p
p
e
e
e
n
n
n
d
d
d
i
i
i
x
x
x
B
B
B
8
8
8
0
0
0
2
2
2
.
.
.
1
1
1
x
x
x
S
S
S
e
e
e
t
t
t
t
t
t
i
i
i
n
n
n
g
g
g
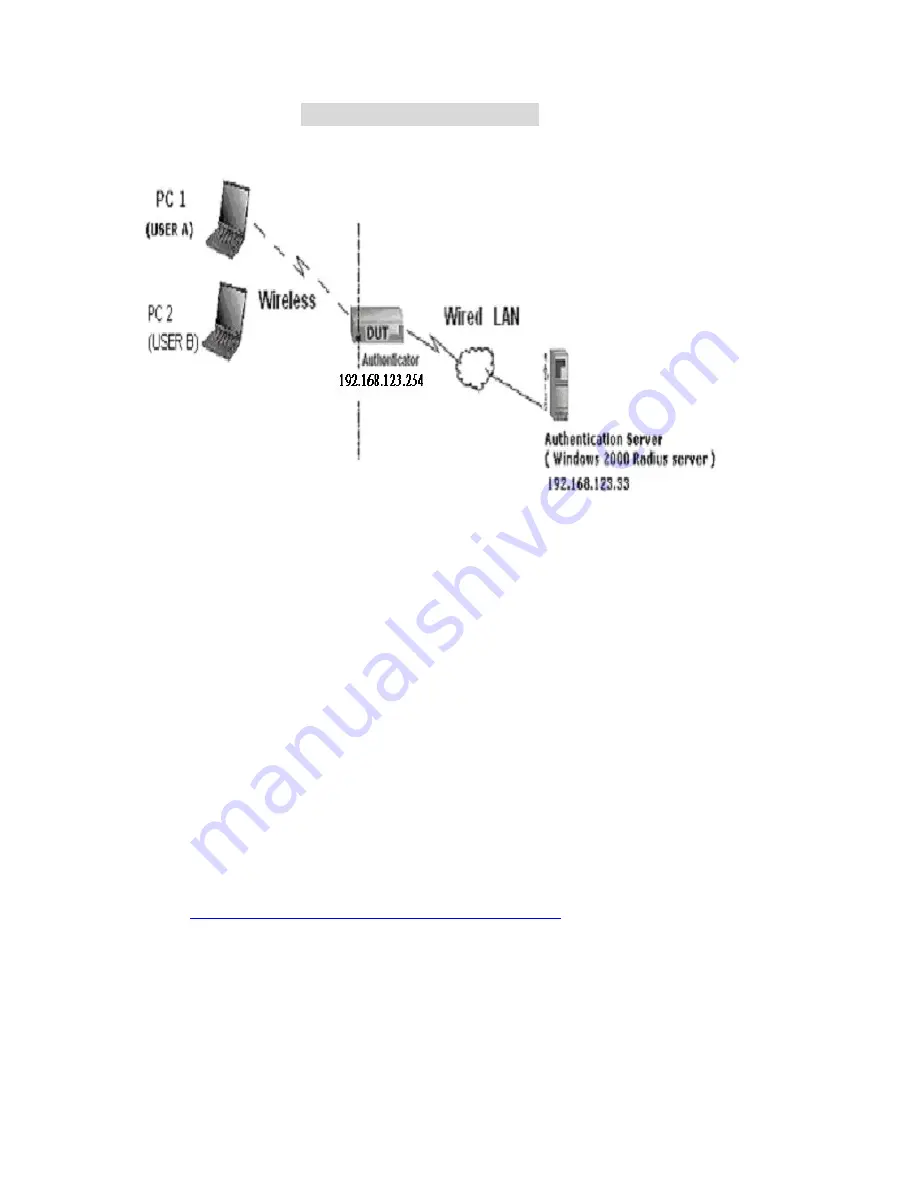
Figure 1: Testing Environment (Use Windows 2000 Radius Server)
1 Equipment Details
PC1:
Microsoft Windows XP Professional without Service Pack 1.
Wireless LAN adapter
PC2:
Microsoft Windows XP Professional with Service Pack 1a.
Wireless LAN USB adapter
Authentication Server
: Windows 2000 RADIUS server with Service Pack 3 and HotFix
Q313664.
Note. Windows 2000 RADIUS server only supports PEAP after upgrade to service pack 3
and HotFix Q313664
(You can get more information from
http://support.microsoft.com/default.aspx?scid=kb; en-us;313664
)
2 DUT
Configuration:
63
Содержание Tornado 140
Страница 14: ...4 4 Basic Setting 4 4 1 Primary Setup WAN Type Virtual Computers 14...
Страница 17: ...connect to ISP automatically after system is restarted or connection is dropped 4 4 1 6 Virtual Computers 17...
Страница 21: ...WPA PSK 1 Select Preshare Key Mode 2 Fill in the key Ex 12345678 21...
Страница 24: ...4 5 Forwarding Rules 4 5 1 Virtual Server 24...
Страница 28: ...4 6 Security Settings 28...
Страница 41: ...4 7 Advanced Settings 41...
Страница 53: ...4 8 Toolbox 53...
Страница 54: ...4 8 1 System Log You can View system log by clicking the View Log button 54...
Страница 55: ...4 8 2 Firmware Upgrade You can upgrade firmware by clicking Firmware Upgrade button 55...
Страница 60: ...a Select Obtain an IP address automatically in the IP Address tab b Don t input any value in the Gateway tab 60...
Страница 65: ...4 We will change EAP type to fit the variable test condition Figure 2 Enable IEEE 802 1X access control 65...
Страница 67: ...Figure 4 Certificate information on PC1 Figure 5 Authenticating 67...
Страница 71: ...3 Add and edit some settings 71...
Страница 73: ...Choose View available Wireless Networks like below Advanced choose 123kk 73...
Страница 76: ...5 Then Choose certificate like above 76...
Страница 77: ...6 Then go to Authentication and first Remove EAP TLS and Add EAP TLS again 77...
Страница 78: ...7 Go Network and Select 1 and ok 78...
Страница 80: ...2 Then Install this certificate and finish 3 Setting on the router and client Router 80...


