background image

BRIDGE DECK FINISHER SET-UP GUIDE  -  069596

Page 6

INSTALLING/REMOVING THE PAVING CARRIAGE

 – At 

times it is necessary for transport, different paving 
direction or winter storage to remove the carriage from the 
machine frame.
•  With the paving carriage frame resting on wood blocks 

remove the carriage hanger frame bolts and move the 
machine clear of lower paving carriage. 

•  Move the BDF over the top of the lower paving carriage 

so that the hanger frame is centered over the (4) 
carriage hanger frame bolt holes.

•  Using the leg cranks or power legs, lower the machine 

down until the bolts are seated in the nuts

•  Adjust the bottom thrust or hold down rollers that the 

rollers can turn easily by hand. 

•  The carriage chain will prevent the carriage from 

moving when the BDF is lifted onto the pipe rails. 

•  Once the carriage travel limits have been determined 

install the reversing paddles.

IF BOGIES WERE REMOVED FOR TRANSPORT:

•  Raise the machine high enough to install the bogie 

frames onto the yokes at the base of the machine legs. 

•  Install the drive bogies on the rear side and the idler 

bogies on the front side of the machine 

•  The power bogie drive chain protection shield should 

be on the outside, but can be placed on the inside, 
depending on clearance. 

•  PLEASE MAKE SURE all hoses are connected so 

that the direction of machine travel is as indicated 

on the control console. 

•  It may be necessary to reverse the hose connections to 

correct the direction of travel.

MACHINE LEG ADJUSTMENT

•  Adjust the machine leg distance to match the center to 

center distance between the pipe rails. 

•  Check and adjust the height of the legs so that the 

paving carriage will clear the deck rebar when the 
machine is placed on the rails. 

•  Check and adjust the height of the legs so that the BDF 

frame will clear the barrier rebar when the machine is 
placed on the rails. 

•  Position the bogie wheels for clearance of any 

reinforcing steel.

SQUARING TRUSS

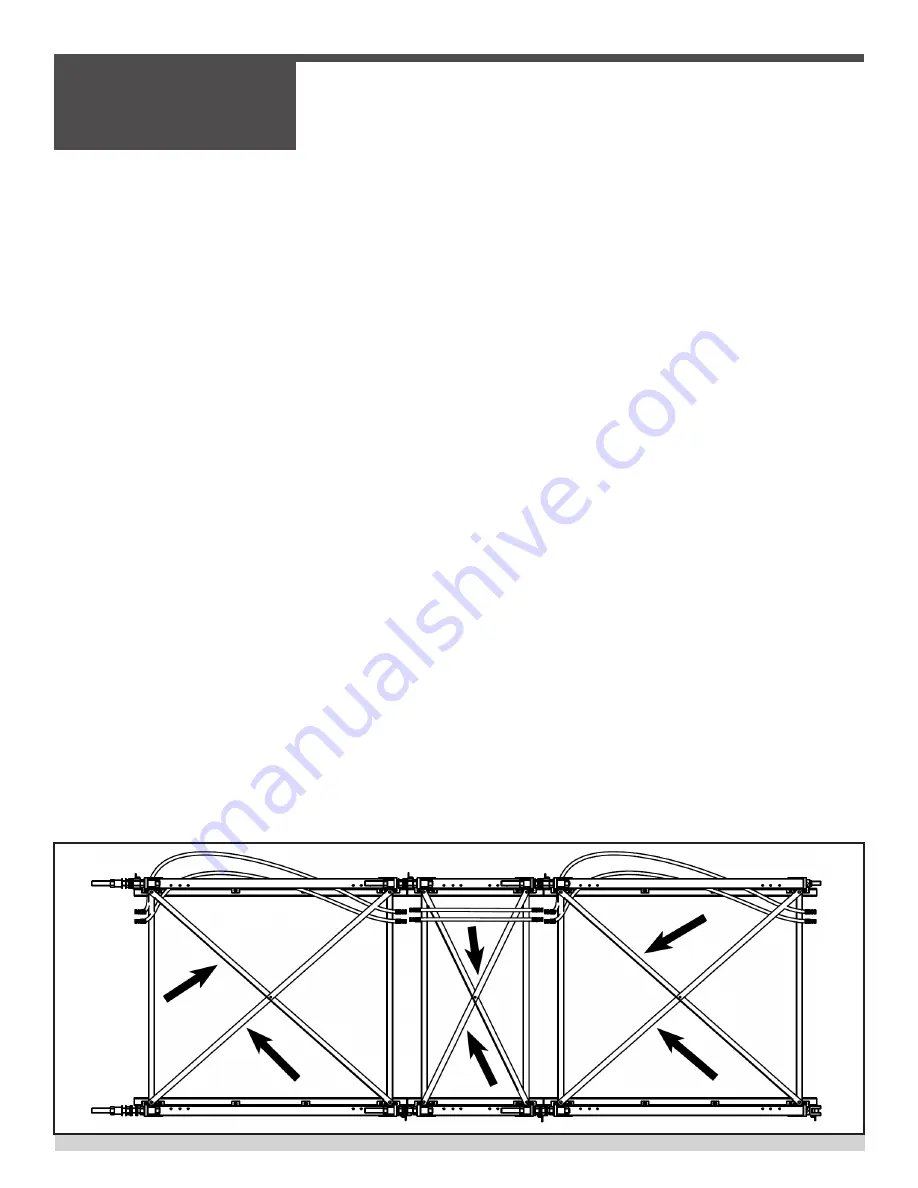
•  After the machine has been placed on the pipe rails 

move the carriage to the center of the machine truss.

•  All four legs of the machine must be set to the same 

height to assure that the truss does not have a twist. 

•  Measure the distance between the bottom or top of the 

carriage rail and the top of the screed rail or paving 
form. 

•  Adjust the height using the machine leg cranks or 

power up/down until all four corners are equal.  SEE 
PICTURE 9

BDF Assembly & Set-up

Picture 9

Содержание BDF4836

Страница 1: ...BRIDGE DECK FINISHER SET UP GUIDE BDF4836 BDF6036 BDF6048 Manual Part 069596 Revision A ...

Страница 2: ...d LOCK all 4 legs prior to lifting the machine as they could roll causing an unbalanced load and personal injury ALLOWING the weight of the machine to rest on the carriage paving rollers WILL cause damage to the carriage or the paving rollers ALWAYS place blocks under end frame ALWAYS attach LONG safety ropes or tag lines to the ends of the machine prior to lifting Position the paving carriage opp...

Страница 3: ...kes on both ends of the machine SEE PICTURE 5 Secure the wood by screwing or nailing it to the truck bed When loading the machine with the Paving Carriage attached block the carriage so that the machine or carriage weight does not rest on the paving rollers Place the blocks under the end frames of the carriage and nail them to the deck SEE PICTURE 6 With the carriage frame now setting on the block...

Страница 4: ...SET UP When the machine is riding on bridge girders you will need to fabricate a screed chair stand that will be epoxied or welded to the beam or a girder plate SEE PICTURE 7 We recommend you tie the vertical tube to the rebar mats for stability The top of the vertical tube will be below the finished surface grade The screed rail needs to be adjusted to conform to the longitudinal profile which ca...

Страница 5: ... sprocket roll up the chain to keep from tangling and place it near the paving carriage Roll up the hydraulic hoses that stretch across the top of the machine for the travel bogies power legs on the idler end of the machine and place near the power unit end Additional frame inserts are added to the machine after splitting the machine at the hinge point of the power unit section The power unit end ...

Страница 6: ...t side of the machine The power bogie drive chain protection shield should be on the outside but can be placed on the inside depending on clearance PLEASE MAKE SURE all hoses are connected so that the direction of machine travel is as indicated on the control console It may be necessary to reverse the hose connections to correct the direction of travel MACHINE LEG ADJUSTMENT Adjust the machine leg...

Страница 7: ...e augers onto the shafts Looking at the front of the carriage slide the clockwise auger onto the right hand shaft and the counter clockwise auger onto the left hand shaft Tighten auger hardware and mount the safety auger guard assembly SEE PICTURE Turn the auger adjusting crank and set the augers 1 8 to 1 4 above the bottom of the paving rollers as a starting point NOTE Grease the auger shafts STR...

Страница 8: ...here are no gaps shut off the engine and replace the cotter pin in the castle nut Align the paving rollers so that they are parallel with the upper carriage Use a level metal bar or string line across the top of each side of the upper carriage from carriage rail to carriage rail Place a 4 6 long straight edge or level across the top or the bottom of both ends of the paving rollers Measure the dist...

Страница 9: ...the idle end slide a striker target or shifter paddle onto the carriage rail at the desired point the carriage needs to shift After the shifting rod makes contact with target the paving roller reversing valve will not engage at this time TO ENGAGE the shift in the reversing valve move the paddle approximately 1 2 until the rod spring shifts the reversing valve and the lower carriage shifts Tighten...

Страница 10: ... chain sag position the carriage to one end of the machine and measure the space between the bottom and top chain in the center of the machine on both sides SEE PICTURE Our recommendation is the chain sag should not be less than the distance for dimensions 1 and or 2 shown below Too tight and excessive chain wear may result Too slack and excessive sprocket wear and or improper carriage reversal ma...

Страница 11: ... on any part that will come in contact with wet concrete DO NOT USE FORM OIL OR DIESEL Use clean designated containers to add hydraulic fluid to the hydraulic tanks and keep any dirt or contaminates from getting into the hydraulic system also take care and clean all hydraulic fittings quick dis connects components before any work performed Follow MFG guidelines for engine services or maintenance S...

Страница 12: ...he carriage travel for which lever will be adjusted When putting the automatic roller reversing valve in the Non Reversing position causes no change to the roller direction with each pass of the carriage Facing the front of the carriage the left roller turns counter clockwise and the right roller turns clockwise The leading roller will consolidate the concrete allowing the trailing roller to pave ...

Страница 13: ... paving up a grade or slope Turn the leg crank 1 2 turn counter clockwise to raise the back of the machine 1 8 of an inch With the back of the machine raised the augers may need to be adjusted lower watch the amount of concrete the rollers are carrying Use the hand crank on the sides of the carriage to adjust the auger elevation These adjustments will counteract the tendency of excess concrete fro...

Страница 14: ...machine travel advancement to coincide with the placement of the concrete Place concrete no more than 5 to 8 feet in front of the machine Average advancement of the machine can vary from 3 to 8 inches for each carriage pass In hot windy weather this will insure fresh concrete will move into the paving rollers before any drying occurs Always keep the deck wet CARRIAGE TRAVEL SPEED Slower carriage t...

Страница 15: ...power unit to power machine travel and paving carriage travel The other is mounted on the paving carriage to power the paving rollers augers and various optional carriage accessories Consult your Owner s Manual for recommended service procedures To insure the best engine performance and life a strict schedule of routine service and maintenance is recommend ed Change the engine oil after the first ...

Страница 16: ... on main controller rail and striker arms Apply to finishing roller reversing rod Idler Sprocket Bearings Lubricate NLGI 2 Lithium Base Grease Lubricate slowly until excess lubricant is observed EVERY 25 HOURS POWER UNIT Engine Crankcase Replace Engine Oil SAE 30 MS SD or SE Add oil if necessary PAVING CARRIAGE Engine Crankcase Replace Engine Oil SAE 30 MS SD or SE Add oil if necessary LEGS TRAVEL...

Страница 17: ... behind tubes Carriage bouncing caused by too much space between carriage pivot blocks and ring Tighten pivot nut or shim wear blocks until contact is made with ring MACHINE OPERATION With machine in Pave mode the engine loads up and carriage does not move Hoses on shifter mechanism are not connected correctly Connect hoses correctly on shifter Cam arm follower on shifter is not in Pave position C...

Страница 18: ...ting is malfunc tioning Change quick disconnect Tubes are operating under load but augers are not Augers are seeing too much concrete Lessen amount of concrete in front of augers Motor for auger is damaged Change auger motor Quick disconnect is faulty on auger hose Change quick disconnect fitting There is noise coming from tube bearings and bearings are extremely hot Tubes may be stopping under lo...

Страница 19: ... carriage only works in one direc tion in auto reverse move the MV1 or MV2 cartridge is stuck Remove the 9 16 Vent Cap on both the MV1 and MV2 Cartridges Insert a small screw driver or allen wrench into the vent cap holes The cartridge with the shallowest hole is the cartridge that is stuck To get by until part is available use small screw driver or allen wrench to manually push the cartridge spoo...

Страница 20: ...BRIDGE DECK FINISHER SET UP GUIDE 069596 Page 20 Revision Detail MANUAL REVISION DETAIL REVISION REVISION DATE REVISION REFERENCE REVISION BY Initial Release A 02 2019 MW ...

Страница 21: ...ny errors or inaccuracies that may appear in this man ual Allen Products are covered under one or more of the following patent numbers U S Design Patents 344 736 400 542 400 544 402 998 402 999 403 332 404 041 404 042 410 931 413 127 416 564 465 897 466 909 474 203 U S Utility Patents 5 108 220 5 238 323 5 328 295 5 352 063 5 405 216 5 476 342 5 480 257 5 480 258 5 533 831 5 562 361 5 567 075 5 61...

Страница 22: ...CONNECT WITH US ON P O BOX 819 PARAGOULD AR 72451 USA 800 643 0095 USA ONLY 870 236 7751 FAX 800 643 0097 USA ONLY 870 236 3934 WWW ALLENENG COM ...

Отзывы: