background image

iLive 

Fixed Format   Getting Started Guide 

20 

 AP7141 iss.6b 


Work with the FX 

 
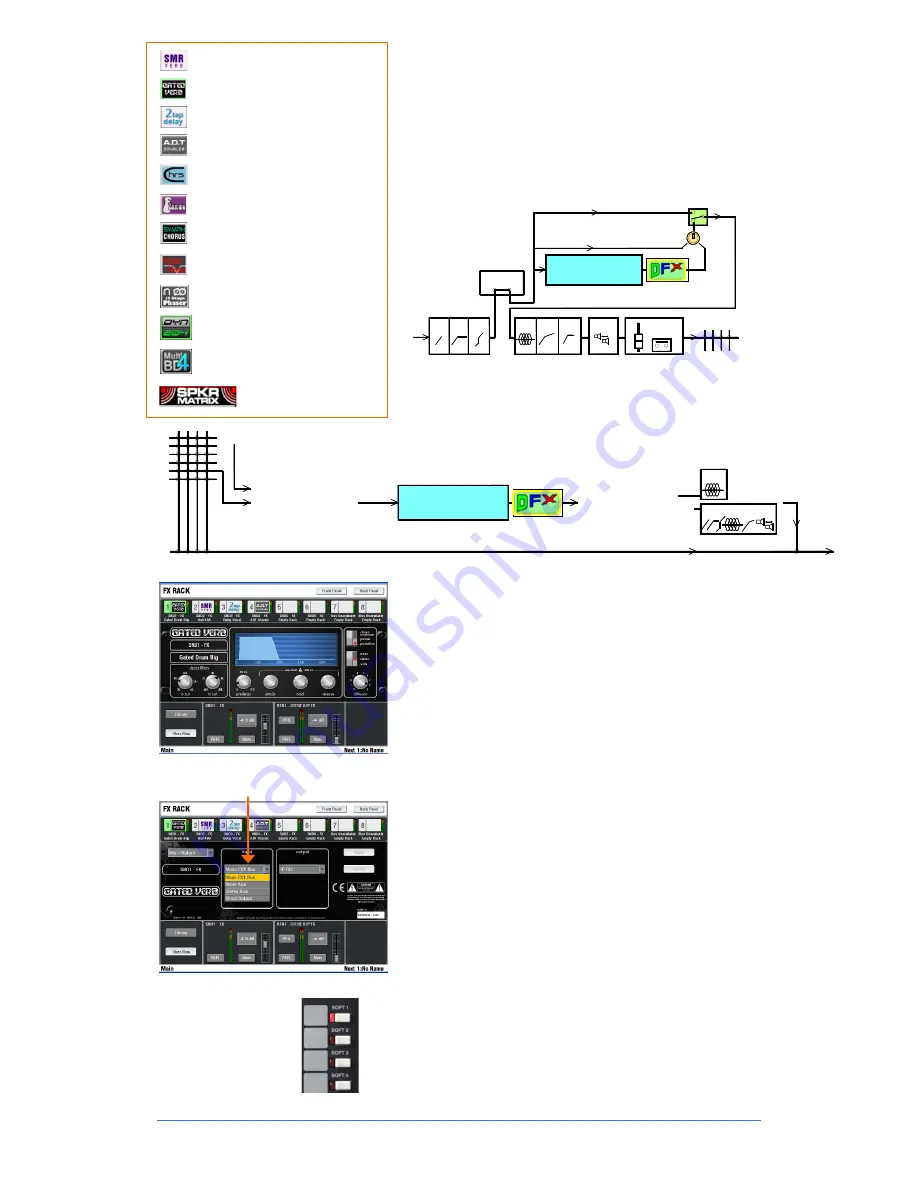
iLive works with FX in a similar way to analogue consoles, 

using a send and return path, for example reverb or delay 
effect.  You can also configure inserted effects such as a 
flanger or reverb on a single channel. 

Inserted FX

   Patch the FX unit into a channel or mix 

master signal path.


Send / Return FX

      Use  a  mix  bus  or  channel  Direct 

Output to send channel signals to the FX unit.  Return the 
effect only (wet) signal via a stereo input or IP FX short return 

to the main mix.  The effect adds to the unaffected (dry) 
signal routed directly to the main mix. 


Use the 

MIX


 key to send to the FX as you would to an Aux. 

To view and set up all 8 'RackExtra' FX select the 
TouchScreen 

FX


page. Touch one of the 8 virtual rack slots 

shown across the top of the screen. Use the Library to load 
into an empty position or change an effect type.  

The 

Front Panel

 view presents the FX parameters. Touch a 

parameter box or control and use the encoder to change the 
setting. 

All FX units feature a 

Dynamic FX Shaper

 DFX which can 

use the source to Duck or Gate the effect automatically.  This 

provides dynamic control of the effect, for example to 
prevent reverb or echo swamping the signal during loud, 
busy passages. 

The 

Back Panel

 view lets you configure whether the effect is 

inserted into a channel or master, or set up as a send/return 

path. Choose the source feeding the FX and its output 
routing. The source can be patched from a dedicated FX 
send bus (if configured in the 

Mix Config

 screen), a mono or 

stereo Aux, or channel direct output (saves using up mix 
buses). The FX can be patched via a mono or stereo input 

channel or dedicated FX return 'short' channel which 
provides full routing and a PEQ, and is in addition to the 64 
processing channels.  

Press 

SEL

 on either an FX send master or return channel to 

open the FX screen if none of the screen keys is already 
selected. The channel Processing Block PEQ becomes 

available when selecting the return.  

You can assign delay FX 

tap tempo

 to SoftKeys using the 

SURFACE / SoftKey Setup

 screen.  Multiple tap keys may 

be assigned as these are linked to specific FX units.  Choose 
whether to display the tempo on the associated LED. 

POL

0

HPF GATE

PEQ COMP LIM

FADER

MUTE

DELAY

MIX

DE-ES

Channel Signal Path

IN

OUT

ON

FX

Insert

Dry

Wet

Mono or stereo IP channel

Dedicated stereo FX IP

Patch to

CHANNEL

SENDS

DIRECT OUTPUT

Patch from

Dedicated mono or stereo FX bus

Mono or stereo AUX bus

Channel Direct Output

PEQ

FULL PROCESSING

0

Full return

Short return

Dry

Wet

MAIN MIX

FX

IN

OUT

Tap Tempo


Speaker Matrix Processor


12 Stage Phaser


Spatial Modelling Reverberator 

Gated Reverb 

2 Tap Delay 

Automatic Double Tracker 

Flanger 

Chorus 

Symphonic Chorus 

Hypabass Sub-harmonic Synthesis 

Dynamic EQ 

Multiband Compressor 

Содержание xDR-16

Страница 1: ...to help the new user quickly learn to configure and operate the fixed format iLive audio mixing system Fixed format and modular iLive components are fully compatible with each other letting you mix and match any combination of MixRack and Surface according to application and budget V V1 1 9 9 ...

Страница 2: ...s information on the fixed format iLive system Further information For further information refer to the user guides associated with each system component iDR MixRack Getting Started Guide AP7445 and xDR 16 Getting Started Guide AP8331 present further information on the iDR 16 iDR 32 iDR 48 and iDR 64 fixed format MixRacks and the xDR 16 Input Output expander Use the HELP MANUAL available from the ...

Страница 3: ...xer when it is not being used for a long period Cold Computer and touch screen technology can be affected by extreme cold If the equipment has been stored in sub zero temperatures allow time for it to reach normal operating temperature before use at the venue Recommended operating temperature range for iLive is 5 to 35 degrees Celsius Heat Avoid using the equipment in extreme heat and direct sunli...

Страница 4: ...control is possible using MIDI AviomTM and more Linked FOH Monitor system Use the MixRack Port B audio network slot to create a digital mic split between two systems over a single cable for example using the ACE or Dante card option Add a network link if the two systems are to be accessed over the same network using your laptop The network link can be tunnelled via the single cable ACE connection ...

Страница 5: ... One button access to the preamp dynamics EQ delay Preamp Gain Sharing using Trims GEQ and flip to faders Step 6 Work with the mix 18 One button access to the assignments pre post settings and levels The Routing screen Work with the FX Dynamic EQ Multiband Compression DCAs and mute groups Channel Ganging COPY PASTE RESET Step 7 Patching signals 25 Input output and insert patching Step 8 Customise ...

Страница 6: ...e Further control possibilities include MIDI and the Allen Heath range of PL Series remote controllers iLive is fully configurable the 64x32 mix architecture can be assigned as any combination of mono or stereo groups auxes FX main mix and matrix the surface fader strips arranged with any channel or master assigned anywhere to suit your way of mixing channels and masters named and coloured physica...

Страница 7: ...expander 16 Mic Line in 8 out Port B The Surface is simply a network controller for the MixRack It has a built in interface for local audio which is transported to and from the MixRack via the ACE connection along with the Ethernet control Each bank of faders has 4 or 6 layers providing a total of 72 80 or 112 control strips depending on Surface size These strips are freely assignable as inputs mi...

Страница 8: ...Paste Reset edit keys Dimmer Scene GO recall keys These are disabled by default Use the SURFACE Preferences option to enable SCENE SAFES to prevent selected channels being overwritten by the memories Hold down SAFES and press MIX keys to toggle on or off ASSIGN and PRE POST access keys for the selected mix While a MIX is active Hold down ASSIGN and press strip MIX keys to toggle the assignments on...

Страница 9: ...ress MIX keys to toggle on or off ASSIGN and PRE POST access keys for the selected mix While a MIX is active Hold down ASSIGN and press strip MIX keys to toggle the assignments on or off To assign all use the master MIX key Hold down PRE POST and press strip SEL keys to toggle pre or post fade To assign all use the master SEL key Hold down ROTARY SHIFT to access the second encoder function if it h...

Страница 10: ...rface These and any other network devices such as a wireless router and laptop need compatible network addresses Default IP addresses are MixRack 192 168 1 1 Sub mask 255 255 255 0 Surface 192 168 1 2 TouchScreen 192168 1 3 Example compatible settings Laptop 192 168 1 10 Sub mask 255 255 255 0 Wireless router 192 168 1 245 Router DHCP range 192 168 1 100 to 192 168 1 200 If the addresses or unit n...

Страница 11: ...hat the cables are correctly plugged in and are not faulty The STATUS screen With all the TouchScreen keys turned off and no channel selected the screen displays status information about the system A red cross displays in place of the green tick if a problem is detected A yellow triangle also displays in the lower toolbar if an error is detected and logged The yellow triangle should clear after vi...

Страница 12: ...able for dedicated monitor mixing with a combination of mono and stereo auxes and engineer s dual Wedge IEM monitor Split Use these when the system gets its inputs from a master console via a digital mic split such as Ace Dante MADI or EtherSound Load a Template Show Press the UTILITY key below the TouchScreen UTILITY Configuration Show Manager Highlight the Templates item Touch the button to expa...

Страница 13: ...sing the screen encoder To return to the root menu for any screen mode touch the Return button Note To display the channel parameters on the screen make sure all the mode keys next to the screen are turned off or press the CHANNEL PROCESSING key A selected screen key overrides the parameter view Note Do not leave the screen in NAME COLOUR MIXRACK or SURFACE setup mode as these change the function ...

Страница 14: ...cene edit confirmation popup screens to help prevent accidental overwriting of settings Choose the temperature display units in degree C or F Show the peak frequency activity on the RTA real time analyzer display Set the strip LCD contrast Note To avoid accidental scene recall make sure Enable Scene Up Down Go is turned off unless you need to use the GO keys next to the faders Choosing the Scene c...

Страница 15: ...en DCA Masters Top toolbar Name Colour screen Press the TouchScreen NAME COLOUR key Strip Select Single Strip Select Press a strip SEL key Touch Name to open the on screen keypad Touch Colour to select a colour Touch Apply Strip Select Block Strip Select Press the first SEL key then the last in the range you want to colour All green SEL indicators in the range light Touch Colour to select the colo...

Страница 16: ...lets you patch the Source to the DSP channel control the remote analogue mic preamp adjust channel Trim and Polarity set name and colour and adjust the HPF high pass filter Choose to present either the preamp controls Gain Pad 48V Polarity or trim controls Trim Polarity on the Surface PREAMP section This lets both FOH and Monitor engineers work with their own independent trim controls once the Gai...

Страница 17: ...In GEQ Fader Flip mode The EQ frequencies are indicated on the strip LCDs above The strip meters display the RTA PAFL signal if one is selected The red PK meters display the dominant frequency if this option has been set in the SURFACE Preferences screen The fader on the right becomes the master or currently active send level for the mix Hold down ALT VIEW to display the EQ dB settings on the stri...

Страница 18: ...key and then press channel SEL keys To set all hold down PRE POST and press the mix master SEL key 4 Adjust the send levels Aux FX and matrix mixes can be configured for sends on faders or rotaries For groups and DCAs no send levels the assignments are displayed on the LCDs The faders and encoders remain unaffected 5 Adjust the image Use the encoders to adjust Pan for stereo or multi output main m...

Страница 19: ...nd levels Aux FX and matrix mixes can be configured for sends on faders or rotaries For groups and DCAs no send levels the faders and encoders remain unaffected 5 Adjust the image For stereo or multi output main mix use the master encoders to adjust the send Pan Hold down ROTARY SHIFT and turn the encoder to adjust Pan for stereo mixes with encoder sends Channel MIX view Sends to all masters from ...

Страница 20: ... whether the effect is inserted into a channel or master or set up as a send return path Choose the source feeding the FX and its output routing The source can be patched from a dedicated FX send bus if configured in the Mix Config screen a mono or stereo Aux or channel direct output saves using up mix buses The FX can be patched via a mono or stereo input channel or dedicated FX return short chan...

Страница 21: ...e a lead vocal channel or an instrument group Patch the processor using the FX screen Back Panel view Multiband Compressor A compressor where the signal is split into several frequency bands and each is compressed according to the dynamics of the signal within that frequency range This can reduce the pumping effect common in single band compressors by preventing the compression affecting unrelated...

Страница 22: ...threshold within each frequency band You can choose whether to apply cut or boost when the signal goes above or below the threshold point Threshold View Filter View For information on the other FX available please refer to the HELP MANUAL available from the iLive Surface TouchScreen UTILITY menu and within the Editor software Visit the Allen Heath web site to download the Understanding iLive FX V1...

Страница 23: ...ion In this position the assigned channel levels are unaffected by the master Raise the master to boost the assigned channel levels by up to 10dB Lower the master to reduce the levels to fully off Using DCAs to create MUTE GROUPS With 16 DCAs available you should have enough to use some for VCA mixing and configure others as mute groups A Mute Group mode can be set for each DCA group Press the DCA...

Страница 24: ... the strip SEL keys or the Remove buttons in the Members tab Note Do not leave the screen in the Ganging page To restore normal operation of the strip SEL keys make sure you exit the Ganging setup screen COPY PASTE RESET The Surface provides dedicated edit keys to let you quickly copy or reset settings Hold down the COPY key and then press a SEL or MIX key anywhere on the Surface to copy its relat...

Страница 25: ... have the AES digital output card option fitted then assign these in the same way Assign a pair of outputs to each AES socket for example 7 and 8 Patching INSERTS In most cases you do not need to insert outboard processing However if required you can assign output and input sockets as insert sends and returns for situations where an engineer wants to use a particular device Any number of inserts m...

Страница 26: ...essing selection To change the MIX BUS configuration Press the TouchScreen MIXRACK key to view the current channel settings and assignments of the 32 mix buses MIXRACK Mixer Config Mix Config Use this screen to change the mix bus configuration Configure the 32 mix buses as a combination of mono or stereo Groups Auxes FX sends Main mix and Matrix Configure all or as many buses as you need Counters ...

Страница 27: ...cene if none is required Activate any user profiles you want to appear in the Change User or log in screen Note Only set passwords if you really need to Make sure you keep a log of all passwords allocated Clearing passwords required resetting internal jumpers and clearing the memories To log in as a different user go to the TouchScreen UTILITY page and touch the Change User button If a password ha...

Страница 28: ...Highlight your selection and touch Add to add them to the Scene list on the right You can add and remove items from the Scene and update items already in the Scene with the current console settings When you have finished editing the contents Return to the Scene Manager page Touch Update to update just the existing contents of a Scene with the current console settings Unlike Store All this does not...

Страница 29: ...reamp is automatically included in channels made safe using the SAFES key If you do not want to make the preamp safe for example because you have patched it to more than one input channel you can change its safe status using the Preamp screen Safe button Alternatively you can make just the preamp Safe for example if you have had to make a gain change to a preamp which is recalled in several Scenes...

Страница 30: ...sting settings are archived first if you want to keep them to use again in the future Show recall can take several minutes depending on how much information is stored Note Show recall should only be used when reconfiguring your system for a different event This would typically be done once for the event Use the Scene memories rather than Shows to recall settings for different scenes in a theatre p...

Страница 31: ... Refer to Allen Heath web site for recommended cable type and maximum length Step 3 Set up Dual Rack system Using the Surface TouchScreen go to Utility Network Dual MixRack Setup Touch Add Slave Highlight a MixRack in the list to add as Slave Touch Inspect Details of the MixRack are displayed Check that the firmware is compatible Touch Apply to add the MixRack as a Slave The MixRack reboots and re...

Страница 32: ...Pad controlling monitor mixes Alternatively you could connect another Surface to the iDR 48 so that each engineer works with their own Surface A laptop or iPad can be added at either or both ends in addition to or instead of the Surface Slave system The small iDR 16 with its 64x32 DSP can mix a full 64 channels even though it has just 16 inputs It gets the 48 mics via the Port B digital split The ...

Страница 33: ... 5mm to end of rail 33mm 1 3 Rack Ears Flush Mounted Rack Ears Angled 16 degrees Desk Top Side Trims Fitted 1 2 3 2 3 Dimensions iLive R72 Rack Ears Fitting Instructions The iLive R72 Surface can be configured for desk top flight case 19 rack or furniture installation The plastic side trims can be removed and replaced with the metal rack ears provided A minimum 12U rack space is needed More may be...

Страница 34: ...e Show iDR 32 Inputs T112 T80 R72 AUX sends on Faders FX sends on Faders CH1 60 mono CH61 62 63 64 stereo Channels 6 Send Return stereo FX 2 insertable stereo FX FX You can change the configuration and layout to suit your application SoftKeys DCA mutes L R S 1 1L 1R 2L 2R 1 2 3 4 5 6 1L 1R MAIN MATRIX AUX iDR 64 iDR 48 Name and archive your new configuration as a User Show L R S 1 1 2 3 4 MAIN MAT...

Страница 35: ...M A DCA Listen AUX S1 S5 S2 S3 S4 S6 C 1 2 1 2 D ret FX send iLive T80 T112 7 8 Fader layout Inputs on left fader banks Masters on right bank as shown below Masters 2 mono 1 stereo Groups 8 mono 6 stereo Auxes 6 mono FX sends 2 mono 1 stereo Matrix 16 DCAs Bus configuration CH1 60 mono CH61 62 63 64 stereo Channels 6 Send Return stereo FX 2 insertable stereo FX FX You can change the configuration ...

Страница 36: ...Hz Processing TRS Line Outputs Balanced Relay protected T and R Series Inputs HPF Gate PEQ Compressor Lim De Esser Delay Output Impedance 75Ω Nominal Output 4dBu 0dB meter reading Mixes PEQ GEQ Compressor Limiter Delay Maximum Output Level 22dBu Residual Output Noise 93dBu muted 20 20kHz Internal FX 8x RackFX engine Types Reverbs Delays Modulators Sub harmonics Speaker Mtx RCA Line Outputs Unbalan...

Страница 37: ...kg 38 5lbs 3U 6U 8U 9U 250mm 9 9 250mm 9 9 250mm 9 9 250mm 10 DEPTH DEPTH DEPTH DEPTH RACKS xDR 16 Expander WEIGHT 7kg 15 4lbs FIXED FORMAT iLIVE SURFACE R72 WEIGHT 12kg 26 5lbs 563mm 22 2 to rear of pod from front of rack rail 533 4mm 21 12U rail 578mm 22 75 13U rail 217mm 8 54 131mm 5 16 235mm 9 3 47 5mm 1 87 from front of rack rail 513mm 20 2 540 5mm 21 3 52 5mm 2 07 237mm 9 33 482 2mm 19 540mm...

Страница 38: ...L USER M MICIN A M DUALIN A M DIGIN A SPDIF A C 1 2 3 4 5 6 7 8 1 2 3 4 5 6 7 8 TRS 4dBu SPDIF A 1 2 3 4 5 6 7 8 SPDIF RCA 0dBu iLive T112 TRS 4dBu TRS 4dBu RCA 0dBu RCA 0dBu Fixed Format Surface Inputs 1 8 iLive T80 R72 PP TRIM TB MIC ADC Fixed Format MixRack MIC LINE inputs ADC digital in line 48V PAD 25dB ADC GAIN remote remote iDR 16 Slot A H Slot A B 16 inputs iDR 32 Slot A D 32 inputs iDR 48...

Страница 39: ...ide The equipment has not been subject to misuse either intended or accidental neglect or alteration other than as described in the User Guide or Service Manual or approved by ALLEN HEATH Any necessary adjustment alteration or repair has been carried out by an authorised ALLEN HEATH distributor or agent This warranty does not cover fader wear and tear The defective unit is to be returned carriage ...

Страница 40: ...iLive Fixed Format Getting Started Guide 40 AP7141 iss 6b ...

Отзывы: