background image

Qu-Pac

 Getting Started Guide 

24 

 AP9815 iss2


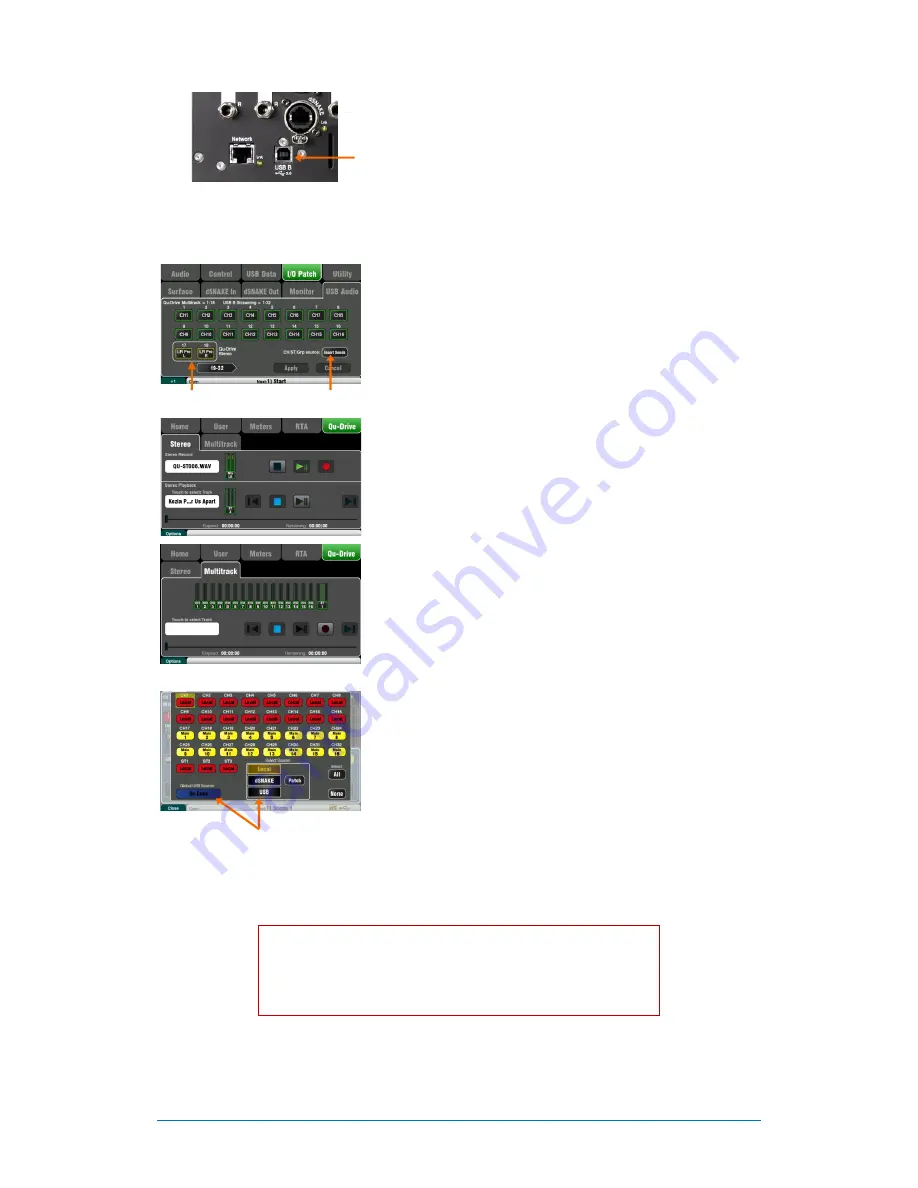
USB recording and playback:


USB B Streaming

 – Connect an Apple

®

 Mac or Windows

®

 PC 

computer  to  the  rear  panel  USB  B  port  to  stream  up  to  32 

channels of audio in both directions and send MIDI messages. 

You can download the Allen & Heath


DAW Control driver

 (for 

Mac  computer  only)  to  convert  the  Qu  MIDI  Strip  messages 

into  HUI  or  Mackie  Control  protocol.  Download  the  Allen  & 

Heath 

Qu Windows driver

 to stream standard MIDI messages 

to a PC. 

Set the Qu MIDI channel number using the 

Setup / Control / 

MIDI

 screen. 


Qu-Drive  recording  direct  to  USB  drive

  –  You  can  record 

stereo

  or 

18-track  multitrack

  direct  to  a  USB  storage  device 

plugged into the front panel Qu-Drive port. 

Note

 - Qu-Drive recording requires the USB storage device to 

support high sustained transfer rates. Not all USB devices will 

guarantee flawless performance. To find out more please refer 

to the ‘

Understanding Qu-Drive and USB

’ document in the Qu 

Knowledgebase on the Allen & Heath web site. Use the USB 

storage device with the Qu mixer only. Do not use it for other 

applications. 

Format  the  USB  device


on  the  Qu  mixer

  before  recording 

using  the 

Setup  /  Utility  /  Qu-Drive

  screen.  This  clears  the 

drive and sets up the Qu directory structure. 

Patch  the  sources  to  record

  using  the 

Setup  /  I/O  Patch  / 

USB  Audio

  screen.  Use  the  rotary  to  spin  through  available 

sources  to  each  of  the  18  tracks.  Press  the 

Fn

  key  ‘+1’  to 

increment quickly through the tracks. Choose channel sources 

to be from Insert Sends or Direct Out. 

Stereo  recording  uses  the  same  source  as  multitrack  CH17 

and 18. 

Record  Stereo  or  Multitrack

  using  the 

Home  /  Qu-Drive


screen.  Recording  creates WAV  files in  Qu  directories  on  the 

USB device. 

Note

 – Do not edit the name or contents of files on the USB 

device.  To  avoid  errors,  we  recommend  you  reformat  the 

device on the Qu mixer before your next session if you copy or 

delete files using a computer. 

Play back Stereo or Multitrack

 using the 

Processing

 screen 

Preamp page 

Fn


key view. Choose ‘USB’ as the source to the 

channels. Select ‘Qu-Drive’ as the Global USB Source. 


Patch recording sources 


Patch recording sources 


Refer to the Qu Mixer Reference Guide for further information 

on these and additional Qu functions. 

Содержание QU-PAC

Страница 1: ...For Firmware Version V1 7 Publication AP9815 Before starting please check www allen heath com for the latest Qu Pac firmware and documentation ...

Страница 2: ...ment under the terms of the warranty does not provide right to extension or renewal of the warranty period Repair or direct replacement of the product under the terms of this warranty may be fulfilled with functionally equivalent service exchange units This warranty is not transferable This warranty will be the purchaser s sole and exclusive remedy and neither Allen Heath nor its approved service ...

Страница 3: ... information Please refer to the Allen Heath website for further information knowledgebase and technical support You can join our Allen Heath Digital Community to share knowledge and information with other Qu users Check for the latest version of this Getting Started Guide Download the Qu Series Reference Guide AP9372 General precautions To prevent damage to the controls and cosmetics avoid placin...

Страница 4: ...ine out Part GLD AR2412 Part GLD AR0804 AB168 16 Mic Line in 8 Line out Remote AudioRack Part AB1608 Cat5 cables For use with dSNAKE remote audio AH8823 2m 6 6 short patch AH9651 20m 66 coil AH9981 50m 165 drum AH9650 100m 330 drum LEDlamp Right angled 4 pin XLR LED lamp with built in dimmer Part LEDlampX Qu Pad app for iPad Qu You app for iOS devices Available from the Apple Store Full mix contro...

Страница 5: ...s A starting point for mixing 25 10 2 System Hard Reset 26 About this guide This is the Getting Started Guide for the Allen Heath Qu Pac rack mount digital mixer For more information about Qu Pac setup and mixing functions please refer to the Qu Mixer Reference Guide available for download from the Allen Heath website www allen heath com Please Note This guide refers to Qu firmware V1 7 Please ref...

Страница 6: ... and zone control by non technical staff Corporate event mixing Free standing or 19 4U rack mount rack ears supplied 16 Mic Line inputs expandable to 32 via dSNAKE digital snake and optional AudioRacks 3 stereo Line inputs 12 mixes 4 mono 3 stereo LR 4 stereo groups 2 stereo matrix 4 internal FX engines with dedicated return channels 4 Mute groups 4 DCA groups Input processing Preamp HPF Gate PEQ ...

Страница 7: ...ctors The mixer front panel is angled upwards to allow easier access to the controls while in the rack Qu Pac is shipped with a rack ear kit to convert from free standing to rack operation To fit the rack ears Note Allow adequate air flow around the ventilation slots at the rear and through the inside section of the case Do not block the sides Dimensions Shown in millimetres inches Rubber feet Fit...

Страница 8: ... jack to RCA converter plugs Talkback input Dedicated input for plugging in a microphone for the engineer to talk to stage monitors or house Use the Setup Audio Talkback screen to set its gain HPF 48V and route to the various mixes Local Mix outputs These are dedicated XLR outputs for mono Mix 1 4 and stereo Mix 5 6 7 8 and 9 10 These mixes can also be patched to other sockets and dSNAKE Dedicated...

Страница 9: ... to patch mixer outputs to the AudioRack sockets Use the Setup Output Patch Monitor screen to patch channels to the ME monitor system It is typical to set the global Direct Out option to pre fade post mute post processing for these monitor sends Network port For connection to a wireless router access point for live mix control using iOS devices running Allen Heath Qu apps You can use one iPad runn...

Страница 10: ...rovide quick access to live mixing functions such as level control and signal processing Qu Control User assignable custom screen for simple level mute and on off control A user permission can be set so that this is the only control available to the Basic User for example bar staff control of zone music source and level at a venue Processing Follows the active Sel key or button to open the signal ...

Страница 11: ... key for processing or Mix key for send levels pan and assign of the channel or mix to copy to To Reset Hold down the Reset key and press an associated key Input strip Sel key HPF Gate PEQ Comp Delay Mix strip Sel key PEQ GEQ Comp Delay Master Mix key Send levels Pans Assign touch Scene item in list Scene name and contents Note Copy Reset of Mix does not affect the Pre Post fader settings Custom S...

Страница 12: ...Mic Line L M R Mic Line Inputs ST1 L M R ST2 ST3 L R Mic Talkback Line Inputs 1 16 Qu Drive USB B Stream Stream 32 ch 32 ch Playback Stereo 18 trk SIGNAL FLOW Qu Pac Local Inputs dSNAKE USB Record Stereo 18 trk PREAMP GAIN 48V POL 0 TRIM HPF GATE PEQ COMP DELAY FX Insert MUTE L R PAN FADER Channel SOURCE ASSIGN GRP LR MIX Sends PAFL PRE POST SENDS FX Sends DIR OUT Input CH1 32 ST1 3 PEQ COMP DELAY...

Страница 13: ... using the Custom Select keys The 16 green keys can be user assigned to select any combination of channels masters DCAs and MIDI for quick access while mixing The default is CH1 16 You can change this using the Setup Control Custom Layer screen The virtual fader strip presents a screen version of the physical controls found on the other Qu mixer models This includes the Fader Pan control Mute butt...

Страница 14: ...ettings You can access send levels and pan or alternatively use the Channel screen for quick access to these while mixing Global Direct Output options are also available from the input routing page Set these according to your application for example FX send USB recording source ME personal monitor source Ducker trigger source Mix master routing pages let you quickly assign or unassign all channels...

Страница 15: ...t other people accessing your Wi Fi we recommend you enable WPA WPA2 encryption and set a wireless key password SSID This is the name broadcast by the wireless router to help identify it in the network list you will see in the device Settings Wi Fi page Positioning your wireless router It is important that your iOS device operates within the specified range and in line of sight of the wireless rou...

Страница 16: ...en mix from side of stage Qu You provides personal monitor mix control for musicians and performers on stage The engineer can still keep an eye on and control each mix at the Qu mixer at any time Touch to select a mix Once selected it can be locked to this mix to prevent accidental selection of a different monitor mix You can also set processing preferences using this page Double tap to open the m...

Страница 17: ...lable to the Admin User Functions can be assigned to up to 15 positions arranged as a grid of 3 rows with 5 columns If a position is unassigned then it will appear blank in the user screen Touch to open the Function list You can choose mutes level or assignments On Off associated with channels or mixes Send On Off Radio lets you assign a selection of buttons to operate in radio mode where pressing...

Страница 18: ...ed access as set by Admin Passwords can be set Setting a known starting point To completely reset the mixer you can perform a power up System Hard Reset Only do this if absolutely necessary This clears all the memories Scenes User Libraries and User Profiles and resets all settings to factory default To zero the board as a start for setting up a new session or event you could use the Reset Mix Set...

Страница 19: ...ces to each of the mono and stereo input channels Local red selects the mixer rear panel socket Choose this if you are plugging your stage sources directly into the mixer or using an analogue snake dSNAKE yellow selects a remote socket from an AudioRack connected to the mixer dSNAKE socket via a Cat5 cable digital snake AR2412 AR84 and AB168 AudioRacks are available from Allen Heath Touch Patch to...

Страница 20: ...fader strips and SoftKeys you are using in the order you prefer Select the Setup icon in the top toolbar Setting a starting point for the processing Start by using the Processing screen Preamp page Linking button to link parameters of odd even pairs of channels for stereo operation For example stereo keyboards or backing tracks Adjusting Pan on one channel will set the width for the pair There are...

Страница 21: ...me and filter Scene Safes This function protects all parameters of a selected channel or mix from being overwritten when a scene is recalled For example walk in music DJ or presenter This means that any changes you make on those channels after the sound check has been stored will not be lost when you recall that scene later Use the Scenes Safes screen Global Scene Filter This function protects sel...

Страница 22: ...e group wheels to customise the layout to the way you want to work Refer to the app Help page Qu Pac front panel Part of the design brief for Qu Pac was to be able to access every channel and function from the front panel This means you can mix simple shows or conferences without the need for an iPad and also gives you a backup if you experience Wi Fi interference problems User assignable SoftKeys...

Страница 23: ...pe and store or recall presets Routing This screen lets you access the channel and mix sends and routing options Input Routing Global Direct Output source option Direct Out Trim level for each channel Mix Routing All sends to the mix On or Off All sends to the mix Pre or Post fader Channel source global for each mix Stereo mix output balance control You can also use the Routing screen Fn key to ac...

Страница 24: ...rage device with the Qu mixer only Do not use it for other applications Format the USB device on the Qu mixer before recording using the Setup Utility Qu Drive screen This clears the drive and sets up the Qu directory structure Patch the sources to record using the Setup I O Patch USB Audio screen Use the rotary to spin through available sources to each of the 18 tracks Press the Fn key 1 to incre...

Страница 25: ...start for vocal microphones All EQ is switched in and set flat ready to start adjusting tone Gates and compressors are switched out but have their parameters set ready for being switched in for applications such as drum gating and vocal compression Channels are assigned to the mixes and FX with their faders and send levels turned down ready to start dialling into the mix The mixes are set pre fade...

Страница 26: ...ions First turn off the system including amplifiers and powered speakers To hard reset the Qu mixer Press and hold the touch screen Reset and Setup keys together and then power up the mixer Keep the keys pressed for at least 5 seconds while the mixer boots Release the keys The hard reset Resets the current settings the same as using the Scenes screen Reset Mix Settings button Resets non scene para...

Страница 27: ...Qu Pac Getting Started Guide 27 AP9815 iss2 ...

Отзывы: